

Universal tracking script
What is a universal tracking script?
Universal script is one of the options we provide for the no-redirect tracking. It generates the click id in the cookie → records the click in RedTrack (based on the parameters from URL and additional info from UA) → records the traffic to the default RT campaign/Ad Tracking.
RedTrack universal tracking script has the following functions:
- For affiliate marketers: it can help send traffic from multiple sources to one landing page.
- For those owning an online store: it offers the possibility to track visits from various paid and organic channels.
- For those using Meta, Google, etc., alongside monitoring organic traffic on the same page: our universal tracking script can track your purchased and organic traffic separately.
RedTrack universal tracking script can be of the following types:
- default – for direct advertisers and e-commerce (for those who don’t have any landing or pre-landing pages).
- /click support – for those who work with landing pages.
- /pre-click support – for those who have 2 landing pages one after another before the offer page.
How to create a script
The script must be added at the end of the body section. Otherwise, it might fail to trigger correctly.
I am affiliate
1. Create target Campaigns. One of them should be a Default campaign for the unattributed (aka organic) traffic. Other campaigns are related to your paid traffic channels. Create as many as you need.
2. Generate your unique script based on your needs.
Tools → Scripts → New fill in the mandatory fields → Save:
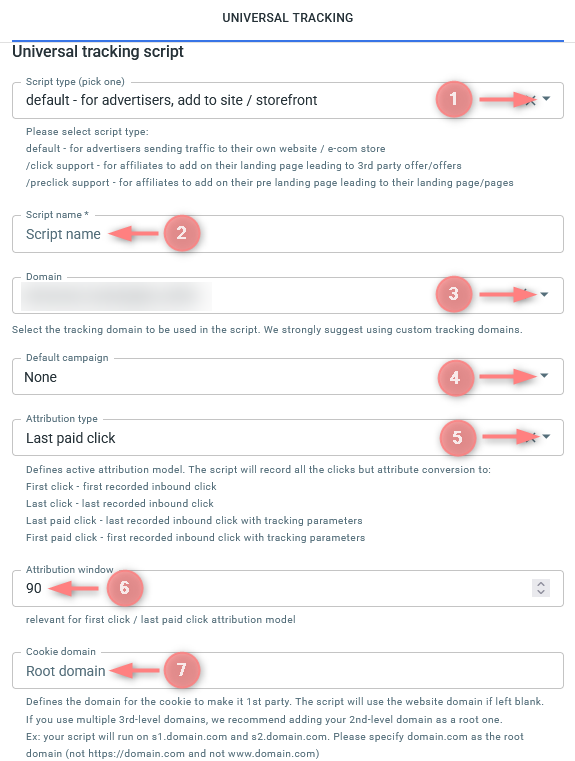
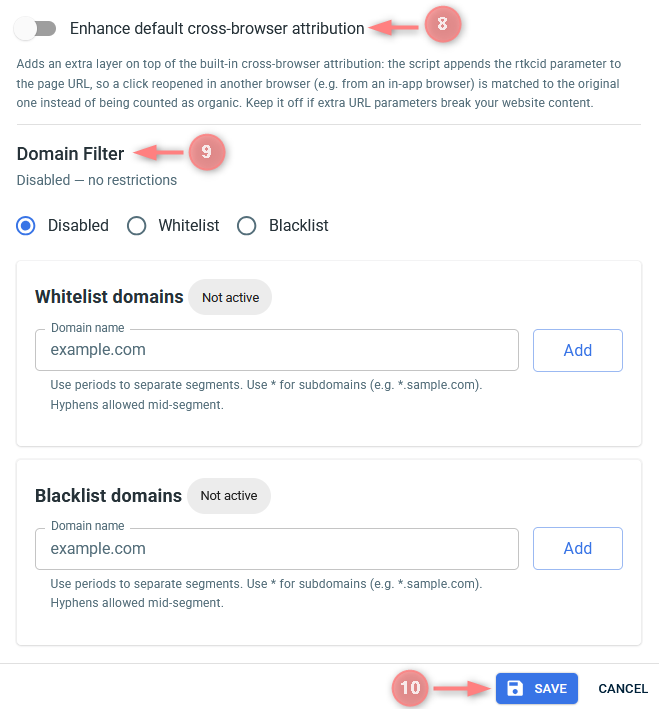
Fields explained:
Select one of the 3 types:
- default – choose this one if you plan to work with your own website (e.g. e-com store) where a visitor can click on any link or visit any tab while the target action is always tracked on some other page no matter what the visitor path was before.
- /click support – use it when you lead the visitor from your landing page to a 3rd party offer and use domain.com/click CTA link format
- /pre-click support – same as /click support but for a prelanding page with domain.com/preclick CTA link
Give your script a name.
Choose a custom tracking domain that will be used in that script. Tying a concrete domain to the concrete landing page is not necessary. You can use one custom tracking domain for everything.
Set the attribution model you want to use:
- First click – first recorded inbound click.
- Last click – last recorded inbound click.
- Last paid click – last recorded inbound click with tracking parameters.
Attribution window – set the attribution window, the period for the first click, and last paid click models.
Cookie domain – the root domain to place a cookie. This is the root domain of your website.
When enabled, it adds an extra layer on top of the built-in cross-browser attribution: the script appends the rtkcid parameter to the page URL, so a click reopened in another browser (e.g. from an in-app browser) is matched to the original one instead of being counted as organic.
Use this to control which domains are allowed to run your script. You can choose one of the 3 options:
- Disabled – choose this if you don’t need any restriction; the script will work on any domain.
- Whitelist – choose this if you only want your script to run on specific domains you trust. Add those domains below; any other domain will be blocked.
- Blacklist – choose this if you want to block specific domains from running your script, while allowing it everywhere else. Add the domains you want to block below.
To add a whitelist or blacklist domain, type it in the Domain name field → click Add → Save changes.
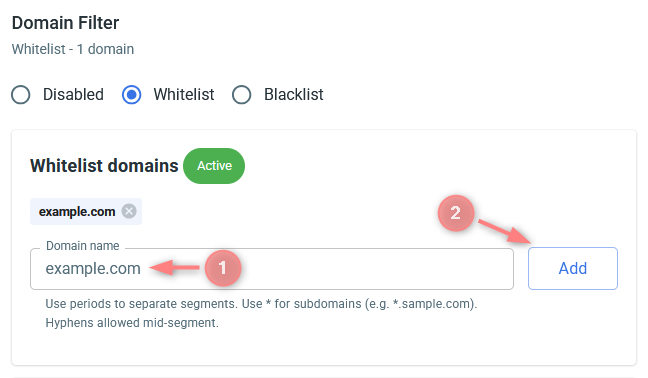
You can use periods to separate segments (e.g. shop.example.com). Use * to cover all subdomains at once (e.g. *.example.com). Hyphens are allowed mid-segment (e.g. my-shop.com).
3. Copy the generated script and add it to your landing page code:
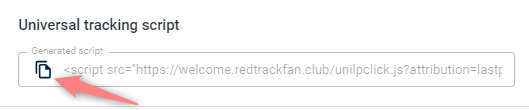
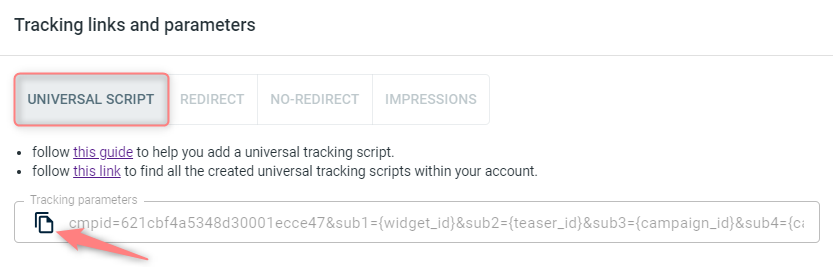
4. Campaign (the one for the paid traffic channel) → Tracking links and parameters → Universal script → copy the tracking parameters → add the parameters string to the traffic channel you use.
I am advertiser
Automatically created universal tracking script
1. Add your store. In RT go to Stores → New from Template/New from scratch → use this guide for details.
2. Add your store tracking URL. In RT go to Store tracking URLs → use this guide to help add your store tracking URL and fill in the fields in the template.
Once your Store tracking URL is saved, you will be redirected to the Scripts tab → navigate to the Universal tracking script section:
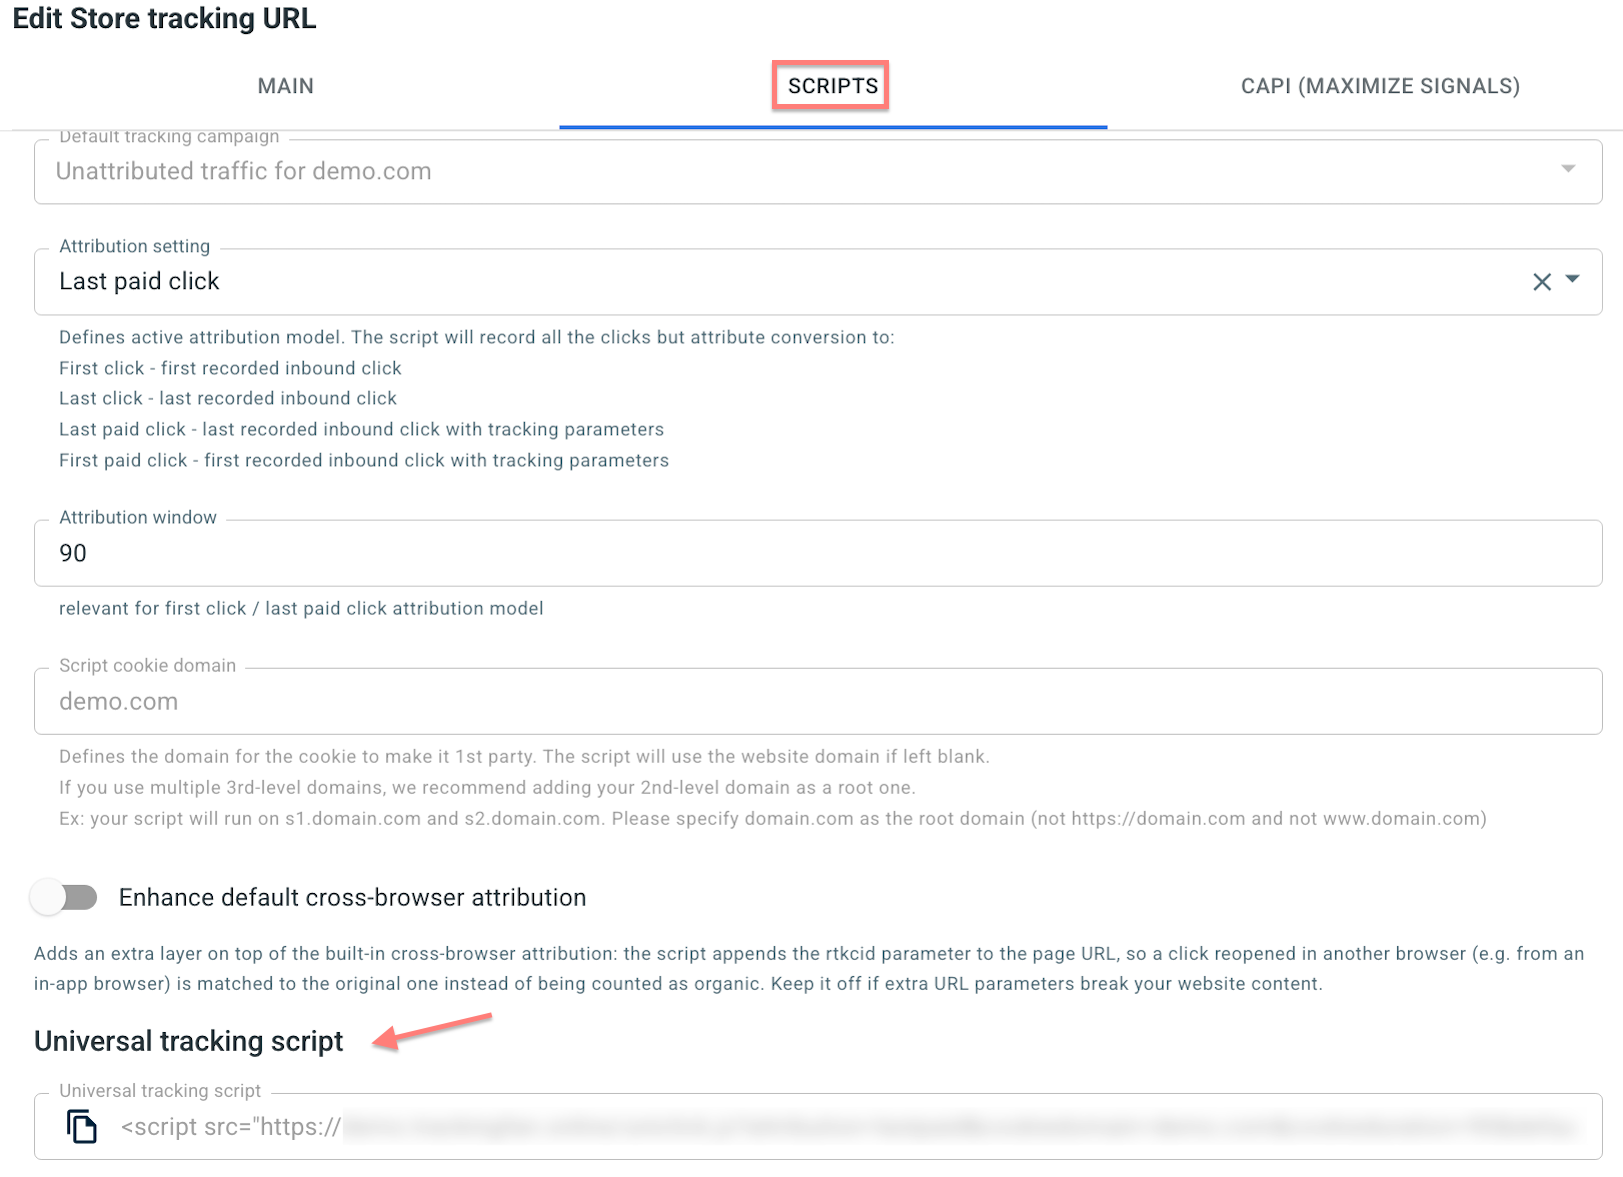
3. Copy the generated script and paste it into the <head> tag of your website.

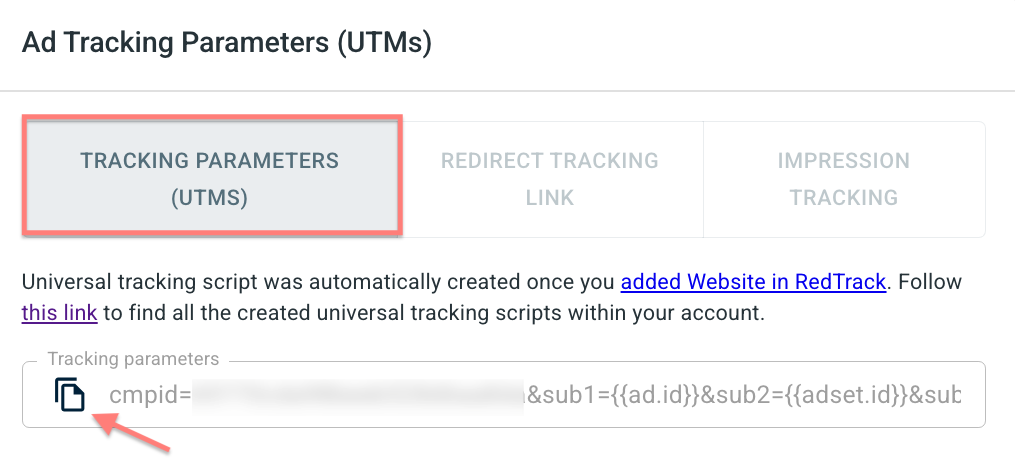
4. Open your Ad Tracking (the one for the paid traffic channel) → go to the Ad Tracking Parameters (UTMs) section → Tracking parameters (UTMs) tab → copy the tracking parameters → add the parameters string to the traffic channel you’re working with.
Manually created universal tracking script
Apart from the store tracking URL settings where you have the ready-to-use script for this particular store tracking URL, you can also find the list of your scripts in Tools → Scripts. Here, you can create a new one and edit the existing one:

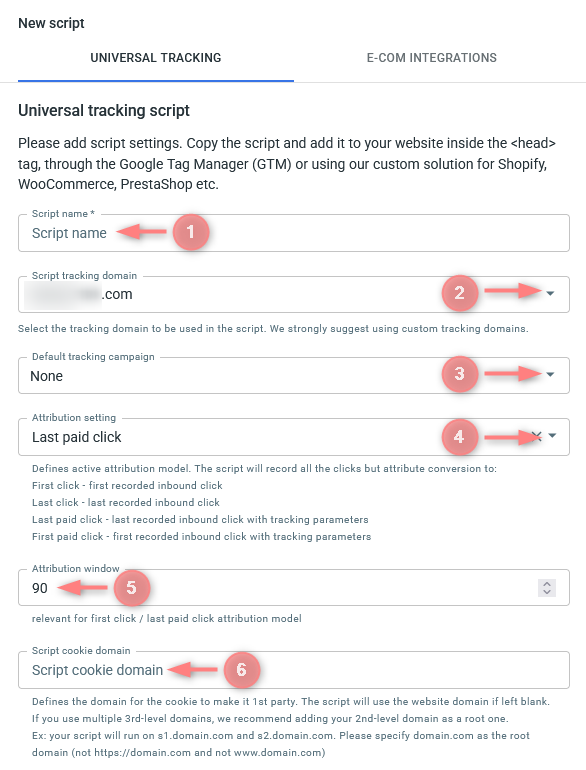
Fields explained:
Give your script a name.
Choose a custom tracking domain that will be used in that script. It’s better to use a custom tracking domain for the concrete website where you plan to put a script.
Set the attribution model you want to use:
- First click – first recorded inbound click.
- Last click – last recorded inbound click.
- Last paid click – last recorded inbound click with tracking parameters.
Attribution window – set the attribution window, the period for the first click, and last paid click models.
Cookie domain – the root domain to place a cookie. This is the root domain of your website.
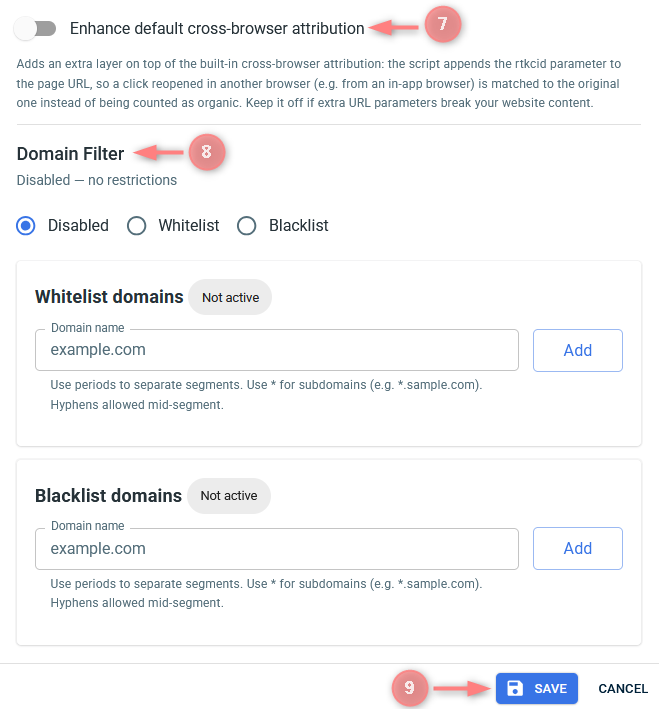
When enabled, it adds an extra layer on top of the built-in cross-browser attribution: the script appends the rtkcid parameter to the page URL, so a click reopened in another browser (e.g. from an in-app browser) is matched to the original one instead of being counted as organic.
Use this to control which domains are allowed to run your script. You can choose one of the 3 options:
- Disabled – choose this if you don’t need any restriction; the script will work on any domain.
- Whitelist – choose this if you only want your script to run on specific domains you trust. Add those domains below; any other domain will be blocked.
- Blacklist – choose this if you want to block specific domains from running your script, while allowing it everywhere else. Add the domains you want to block below.
To add a domain, type it in the Domain name field → click Add → Save changes.
You can use periods to separate segments (e.g. shop.example.com). Use * to cover all subdomains at once (e.g. *.example.com). Hyphens are allowed mid-segment (e.g. my-shop.com).
3. Once you save your script, copy the generated script and paste it into the <head> tag of your website.

4. Open your Ad Tracking (the one for the paid traffic channel) → go to the Ad Tracking Parameters (UTMs) section → Tracking parameters (UTMs) tab → copy the tracking parameters → add the parameters string to the traffic channel you’re working with.

