
Google Ads and RedTrack

Intro
Google Ads is an online advertising solution that businesses use to promote their products and services on Google Search, YouTube, and other sites across the web. Google Ads also allows advertisers to choose specific goals for their ads, like driving phone calls or website visits. With a Google Ads account, advertisers can customize their budgets and targeting and start or stop their ads at any time.
RedTrack’s API integration with Google Ads lets you:
- Send conversion data to Google and attribute it to your custom conversion type.
- Sync cost data.
- Automatically pause campaigns, placements, and creatives.
- Set up automated rules.
Integration
1. Add a custom tracking domain
1. Add a CNAME record pointing to your RedTrack default domain in your domain registrar.
2. On the left menu go to Tools → Domains → Create new domain.
3. Add the integrated domain to your RedTrack account and activate the Free SSL option.
2. Add the offer/website you are promoting
This is the target destination link where you plan to run the traffic: it can be an affiliate offer, a direct link to your website, or the shop.
1. Add the offer source: New from template/New from scratch → find the affiliate network you work with/add your custom name → Save.
2. Add the offer link: Offers → New → choose the offer source from the list, add the offer URL → save the changes.
For example: &affsub={clickid} where {clickid} is RedTrack parameter
More info on the offer source and offer in RT can be found here.
1. Go to Brands → New → Add your brand (it is the name of your shop or your website).
2. On the same page, add the purchase data parameters – Name/Description is what you will see in reports – Roles define their use with CAPI.
3. Go to Websites → New → Add your website URL (this is your e-commerce shop/website link).
4. Follow the suggested steps to generate the scripts. You will need it later for your e-commerce platform.
3. Find and copy your Google Ads account Customer ID
Here is how you can obtain your GA Customer ID.
4. Add and integrate the Google Ads template
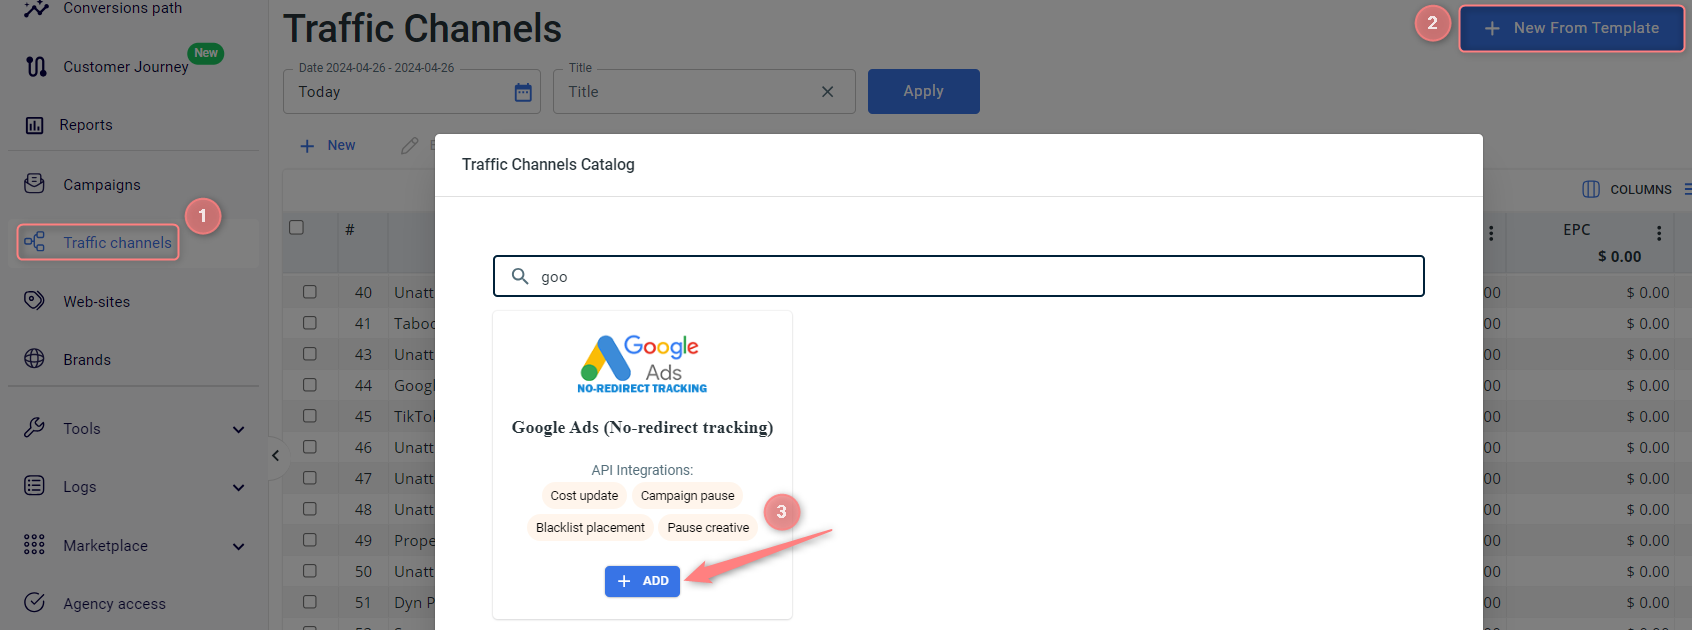
1. Traffic channels → New from template → Google Ads (no-redirect tracking) → Add → Save the template:

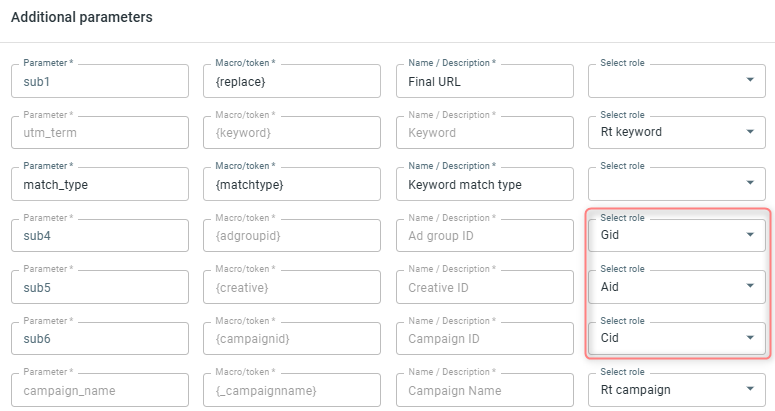
IMPORTANT INFO ABOUT ADDITIONAL PARAMETERS SECTION:
In the added template you can modify some Google parameters, although blocked (greyed) parameters should remain under the same sub-values with the same roles assigned as provided in the initial template.
The following are essential for the API cost integration:
- {creative} should always be with Aid role
- {adgroupid} should always be with Gid role
- {campaignid} should always be with Cid role
In case of IOS trafficking due to Apple’s iOS14.5 changes if the click occurs from an iOS device and the user has opted out of tracking, RedTrack can get WBRAID and GBRAID parameters:
- WBRAID is used for web-to-app measurement.
- GBRAID is used for app-to-app measurement.
The new parameters work in tandem with the modeled online conversion, which does not attribute conversions to an individual user but rather provides a holistic report on conversions, in compliance with user privacy. These parameters use aggregation and de-identification techniques that ensure cross-site behavior cannot be tied back to an individual user.
If you do conversions in-app, you need to remove the {wbraid} parameter from the Google Ads Traffic channel template in RT.

Check out this article for more details on changing the one-per-click setting in Google Ads.
2. Integrate Google Ads with RedTrack.
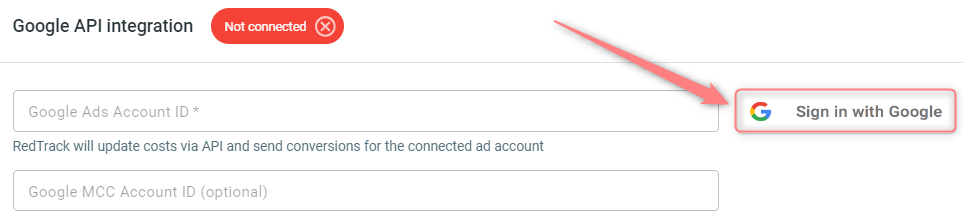
2.1 Since it is a complex API integration, we need to get permission for integration from Google first, to do that press Sign in with Google:
2.2 Once your account is verified and you give RedTrack all the required permissions, you will be redirected back to the RT Google Ads template automatically. Add the Google Ads Customer ID and (if needed) Google MCC Account ID → Save changes to the template:
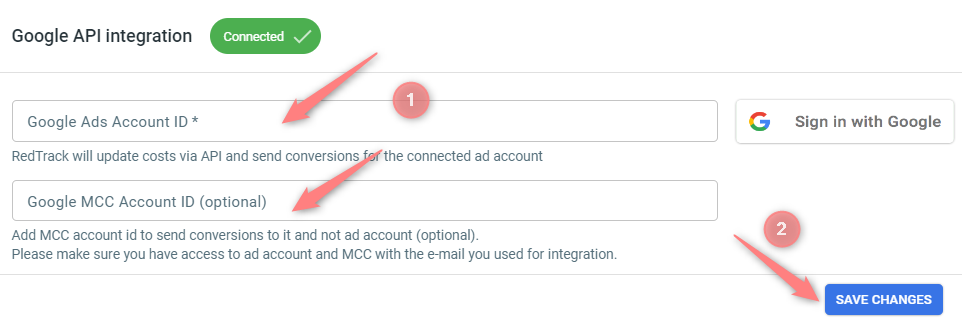
This is how you find your MCC Account ID.
Add MCC account ID ONLY if you want to send conversions to it instead of the ad account.
Combinations for account usage examples:
1. Ads Account ID is filled in + MCC Account ID is empty:
– Costs are received from Ads Account ID
– Conversions are sent to Ads Account ID
2. Ads Account ID is filled in + MCC Account ID is filled in:
– Costs are received from Ads Account ID
– Conversions sent to MCC Account ID

For Google PerformanceMax (PMax) campaigns, costs can be updated only on the Campaign level, as such campaigns send out only their Campaign IDs. That’s why the only working Auto Cost Depth for your Traffic Channel in such cases is Campaign.
5. Add and map the conversion events you would like to use
1. Add conversion events you want to use.
Tools → Conversion tracking → Conversion type → add the events you want to track → Save.
The names remain the same and will be sent to the traffic channel exactly as you’ve added them to RedTrack.
Use this guide for more details on conversion tracking in RT.
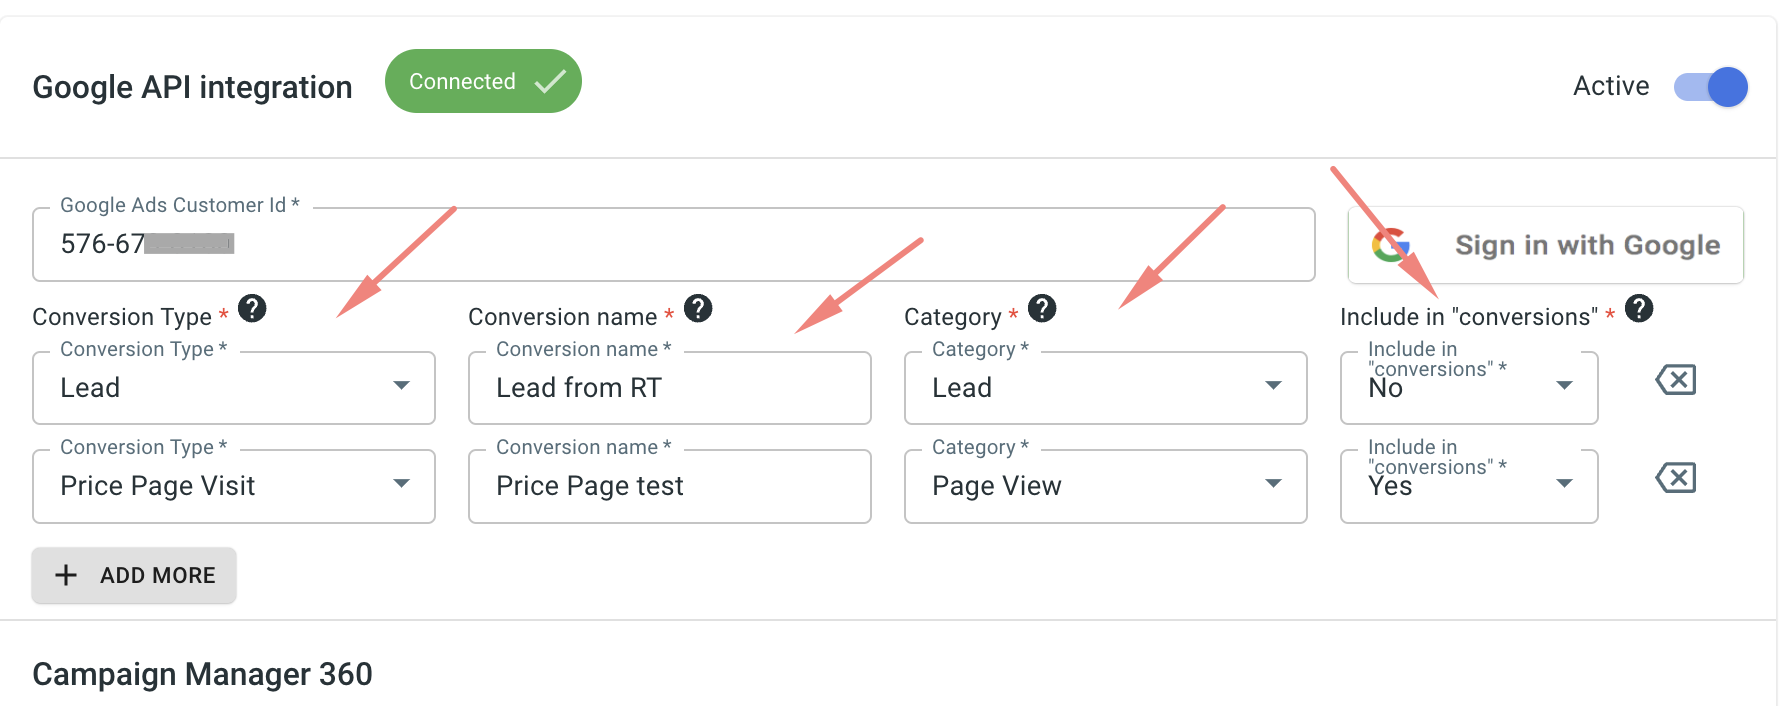
2. Map the conversion events.
Go to the settings of the Google Ads Traffic channel → Google API integration → set up the mapping:
- Conversion type is the custom conversion type from RedTrack.
- Conversion name is how this conversion type will be displayed in your Google account.
- Category is Google conversion event category. You no longer need to set the category manually in Google Ads, we will send the category with the conversion.
- Include in “conversions” – set yes to add this conversion to the conversions column in the Google Ads.
Conversion data is taken with the UTC zone.
It takes about 48 hours for Google to process IOS conversions without the clickid and make them appear in the Google Ads dashboard. However, there is a chance that Google will not attribute 100% of postbacks due to its logic or additional user settings.
6. Create a Campaign
Create a campaign in RedTrack
To create a campaign in RT act depending on your account type:
Campaigns → Create new campaign → fill in the info in all the sections and tabs:
- General: Give it the name, and choose the traffic channel, tracking domain, and cost-tracking method.
- Funnels: Choose the type of funnel you are using and add the elements from the drop-downs.
- S2S postback: This field will be filled in automatically based on the data you have added to your traffic channel settings.
- Auto update costs: Do not forget to turn the toggle on if you are working with the API-integrated traffic channel
Campaigns → Create new campaign → use this guide to help you set up campaign for the organic traffic.
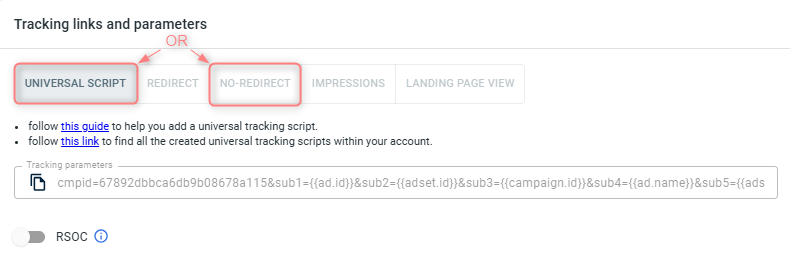
2. Once the Campaign is saved go to Tracking links and parameters → copy the corresponding tracking parameters and the script depending on tracking method you decided on:
– Use Universal Script when you’re working with the same landing page across multiple traffic channels.
– Use No-Redirect Script when you’re working with one landing page and one traffic channel.
IMPORTANT!
– If you choose the No-Redirect tab: once the campaign is saved, both the tracking parameters and the script are generated automatically. You only need to copy and apply them.
– If you choose the Universal Script tab: once the campaign is saved, only the tracking parameters are generated automatically. You’ll need to create the universal tracking script manually (follow this guide).
3. Apply Script & Parameters.
- Paste the script into your landing page code.
- Add the tracking parameters to your Google Ads campaign.
1. Campaigns → Create new campaign → Fill in the info in all the sections and tabs:
- General: Give it the name, and choose the traffic channel, tracking domain, and cost-tracking method.
- Funnels: Choose the type of funnel you are using and add the elements from the drop-downs.
- S2S postback: This field will be filled in automatically based on the data you have added to your traffic channel settings.
- Auto update costs: Do not forget to turn the toggle on if you are working with the API-integrated traffic channel
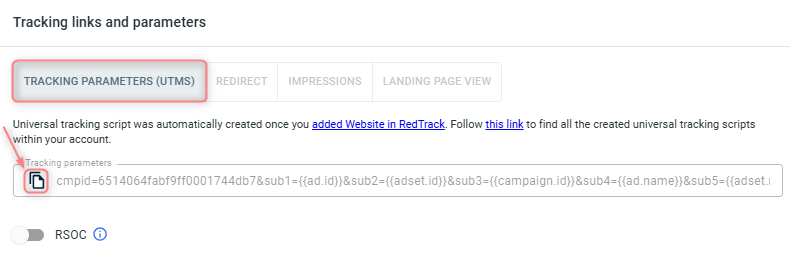
2. Once the Campaign is saved go to Tracking links and parameters → copy the tracking parameters from the Tracking parameters (UTMs) tab:
3. Apply Script & Parameters.
- Paste the script into your landing page code.
- Add the tracking parameters to your Google Ads campaign.
Create a campaign in Google Ads
Go to your Google Ads account and create a campaign according to the GA KB guide.
7. Set the tracking in your Google Ads account
1. Go to the list of your campaigns → choose the target campaign → Settings → Account settings → Tracking:
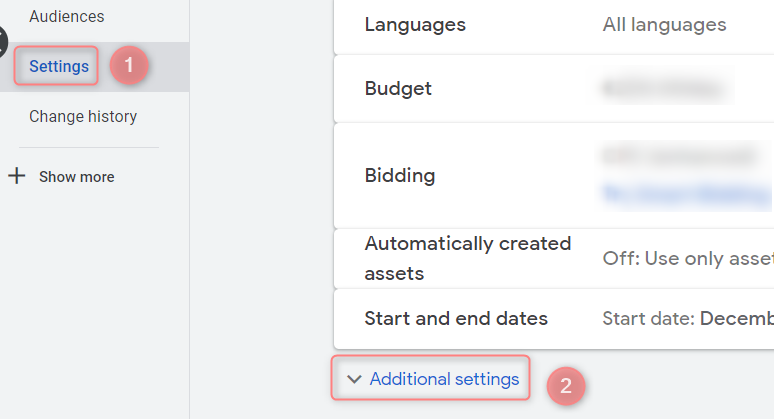

2. Add the tracking parameters you have copied within the campaign creation to the corresponding field, depending on your Campaign integration type:
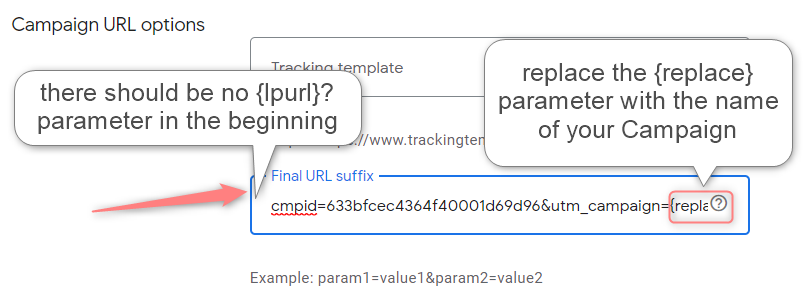
(Google Merchant Center)
If you are working with Google Merchant Center (Performance Max campaign) add the parameters to the Final URL suffix, but remove the {lpurl}? in the beginning. Remember to add the name of your campaign instead of the {replace} parameter in the middle of the tracking URL:
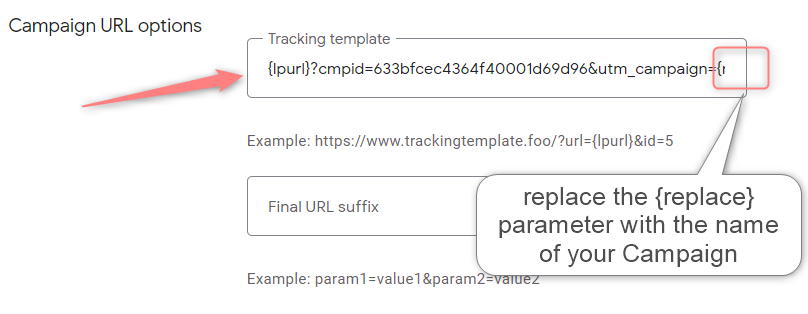
Insert the tracking parameters into the Tracking template field:
8. Set up the automation
1. Use this guide to help set up rules.
2. Use this guide for setting up the auto-update cost feature.