TikTok and RedTrack


Intro
TikTok is a social media platform for creating, sharing, and discovering short videos.
TikTok has an API integration with RedTrack, which allows you to:
- Pass all the conversion data back to TikTok.
- Pause non-converting creatives and campaigns directly on the TikTok side, with no manual work.
- Auto-update your cost data.
Parameters sent to TikTok upon conversion creation
The following parameters are sent to TikTok upon conversion creation:
Parameter | Description |
PixelId | Identifies where the conversion is going (e.g., ABC123XYZ789). |
PixelKey | API key for pixel access. |
EventId | Hashed event id value taken from the sub parameter with the assigned Event ID role (Offer source → Additional parameters). |
EventName | Type of conversion defined by matching types of conversions between RedTrack and TikTok (e.g., purchase). |
EventTime | Time for conversion action (it’s recorded in UTC and taken from the created_at conversion value). |
ClickId | Click in TikTok (e.g.: EAIaIQobChMI3oztgOuugQMV1uLtCh1Q8A2tEAAYASAAEgIe8PD_BwE). |
Page | Value for the page field from your conversion. |
Referrer | Value for the referrer field from your conversion. |
Phone | Hashed phone value taken from the sub parameter with the assigned Phone role (Offer source → Additional parameters). |
Email | Hashed email value taken from the sub-parameter with the assigned Email role (Offer source → Additional parameters). |
IP | Value for the IP field from your conversion. |
UserAgent | Value for the UA field from your conversion. |
ContentType | Hashed value taken from the sub-parameter with the assigned Content Category role. e.g.: Entertainment (Offer source → Additional parameters). |
Contents | Hashed value taken from the sub-parameter with the assigned Contents role (Offer source → Additional parameters). |
Currency | A constant USD value. |
Revenue | Conversion sum (in USD), value for the revenue_default field from your conversion. |
Integration
1. Known limitations: check your setup first
TikTok tracking runs through the Events API. The limits below are about event mapping and campaign types, not the click itself.
If your setup includes… | What to expect | What to check |
|---|---|---|
Your conversion maps to the generic “other” type | It won’t optimize – the algorithm can’t act on a non-standard event. | Map every conversion to a standard TikTok event (Registration, Purchase, or Lead). |
ttclid isn’t on the offer URL, or events aren’t reaching Events Manager | The click can’t be matched, or conversions don’t arrive in Events Manager even when the click tracks. | Confirm: • ttclid present on the incoming click • Events API active and linked to the campaign • Access Token valid and Pixel ID correct • event type mapped to a standard event, not “other” • check the API Postbacks log for the outbound event |
TikTok Smart campaigns managed from the tracker | TikTok’s API blocks third-party tools from changing budgets on Smart campaigns. | Edit Smart campaigns in TikTok directly. |
2. Add a custom tracking domain in RedTrack
1. Add a CNAME record pointing to your RedTrack default domain in your domain registrar.
2. On the left menu, go to Tools → Domains → Create new domain.
3. Add the integrated domain to your RedTrack account and activate the Free SSL option.
3. Add conversion types you want to track with RedTrack
In your RT account go to Tools → Conversion tracking → Conversion type → add the events you want to track → Save.
The names will remain the same and be sent to the traffic channel exactly as you added them in RedTrack.
4. Add to RedTrack the offer/website you are promoting
1. This is the target destination link where you plan to run the traffic: it can be an affiliate offer, a direct link to your website, or the shop.
1. Add the offer source: New from template/New from scratch → find the affiliate network you work with/add your custom name → Save.
2. Add the offer link: Offers → New → choose the offer source from the list, add the offer URL → save the changes.
For example: &affsub={clickid} where {clickid} is RedTrack parameter
More info on offer source and offer in RT can be found here.
1. Go to Brands → New → Add your brand (it is the name of your shop or your website).
2. On the same page, add the purchase data parameters – Name/Description is what you will see in reports – Roles define their use with CAPI.
3. Go to Websites → New → Add your website URL (this is your e-commerce shop/website link).
4. Follow the suggested steps to generate the scripts. You will need it later for your e-commerce platform.
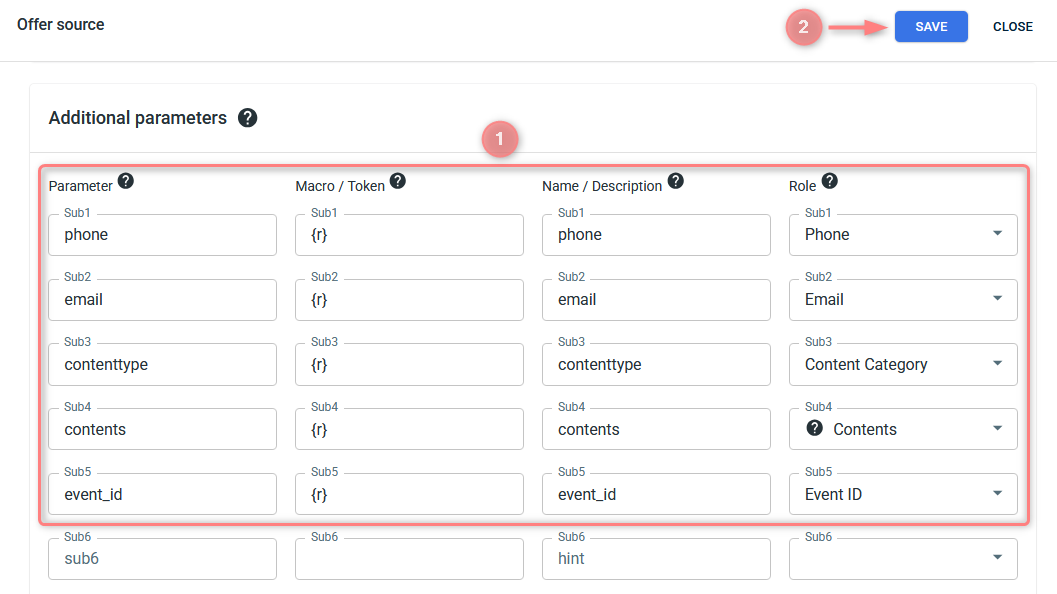
2. To send the PII data for better attribution for TikTok, go to the added Offer source/Brand → Additional parameters → add the following tokens and assign the relevant roles to them:
Here you can find the general principle of the PII data enrichment process in RT.
Parameter | Macro / Token | Name / Description | Role (selected from the drop-down) |
|---|---|---|---|
phone | {r} | phone | Phone |
email | {r} | email | Email |
contenttype | {r} | contenttype | Content Category |
contents | {r} | contents | Contents |
event_id | {r} | event_id | Event ID |
– If there is a specific parameter you are receiving with the assigned Event ID role, RedTrack will send that value as the event_id.
– If no Event ID is defined, RedTrack will automatically send the click ID as the event_id.
5. Set up the TikTok traffic channel in RedTrack
In your RedTrack account, act as follows:
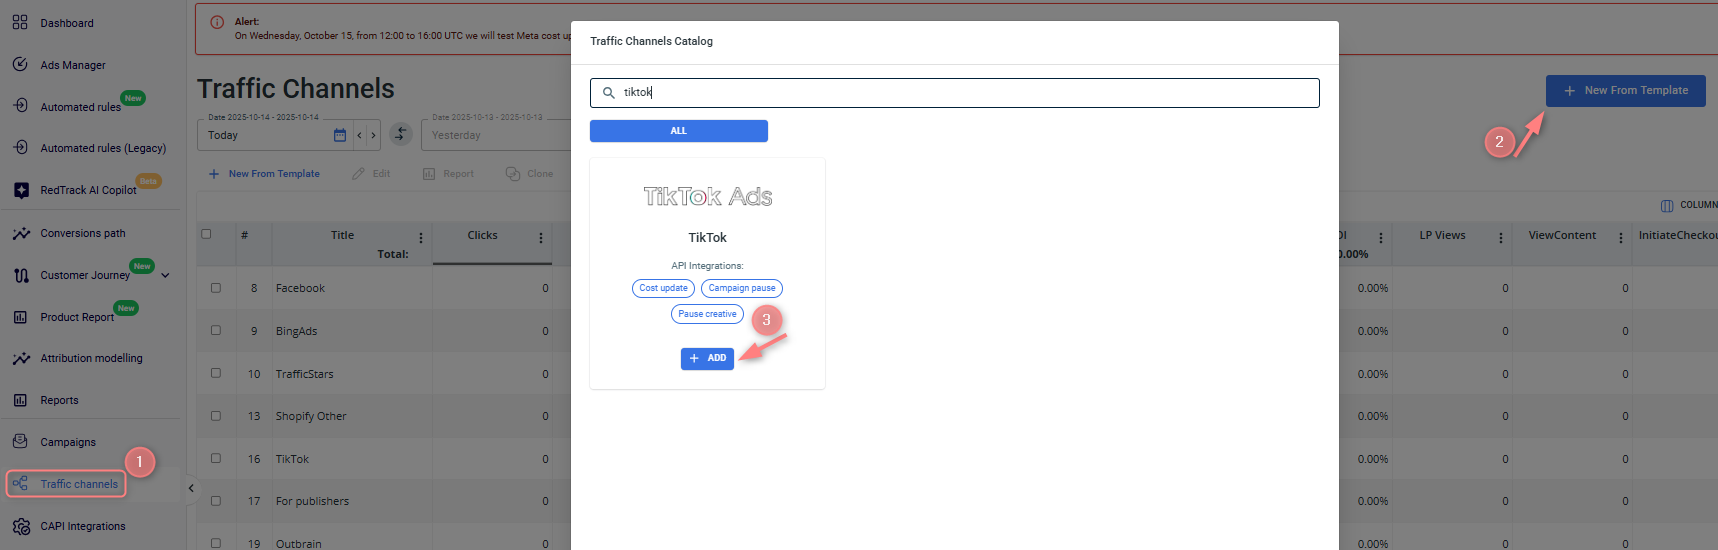
1. Add TikTok as a Traffic channel.
Traffic channels → New from template → Add → Save the template:

2. Integrate RedTrack with your TikTok account.
- Go to the saved TikTok template → TikTok API integration → Connect TikTok:

- Log in with the email that gives you access to the target ad account → Confirm to accept the integration permissions → select the TikTok ad account from the drop-down list:

– conversion type
– currency
– sum
– IP
– UA
– conversion date
6. Add TikTok Pixel ID and Conversion API Token to RedTrack
Now in your RedTrack account, you should:
- Add the copied Pixel ID and Conversion API Token to CAPI Integrations.
- Assign the added pixel details to either the TikTok traffic channel or your offer/website.
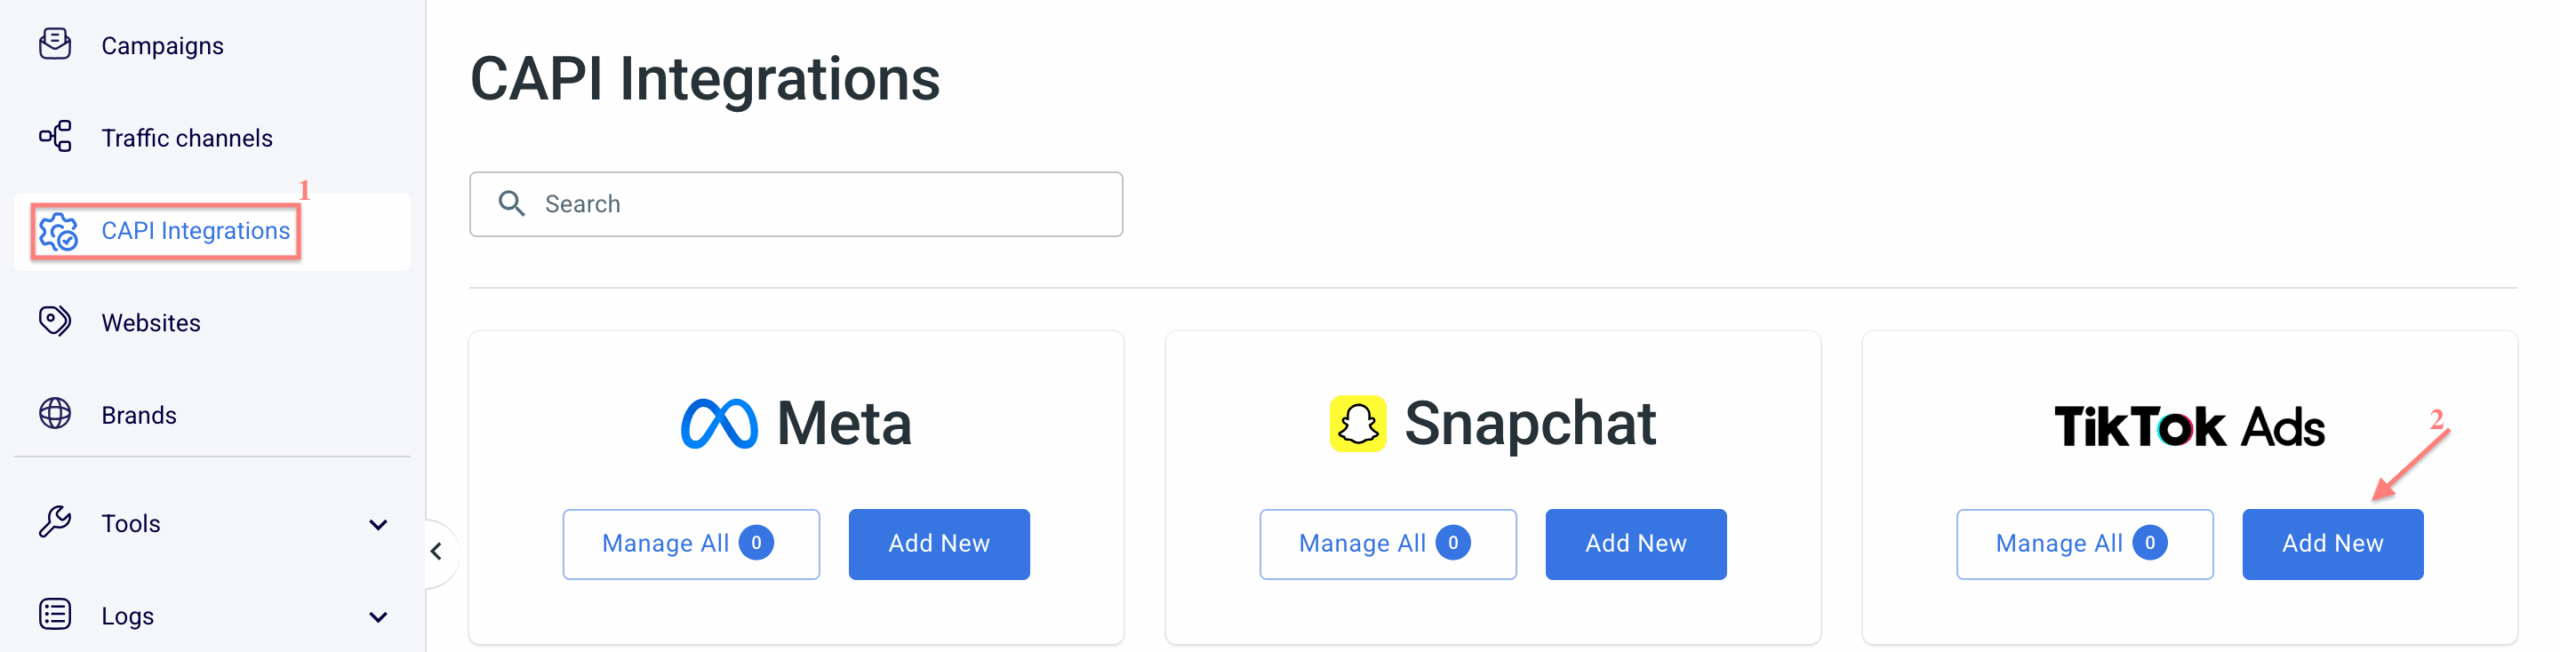
1. RedTrack → CAPI Integrations → TikTok → Add New:
2. Fill in the mandatory fields → match RT conversion event types with the ones in TikTok → Save:
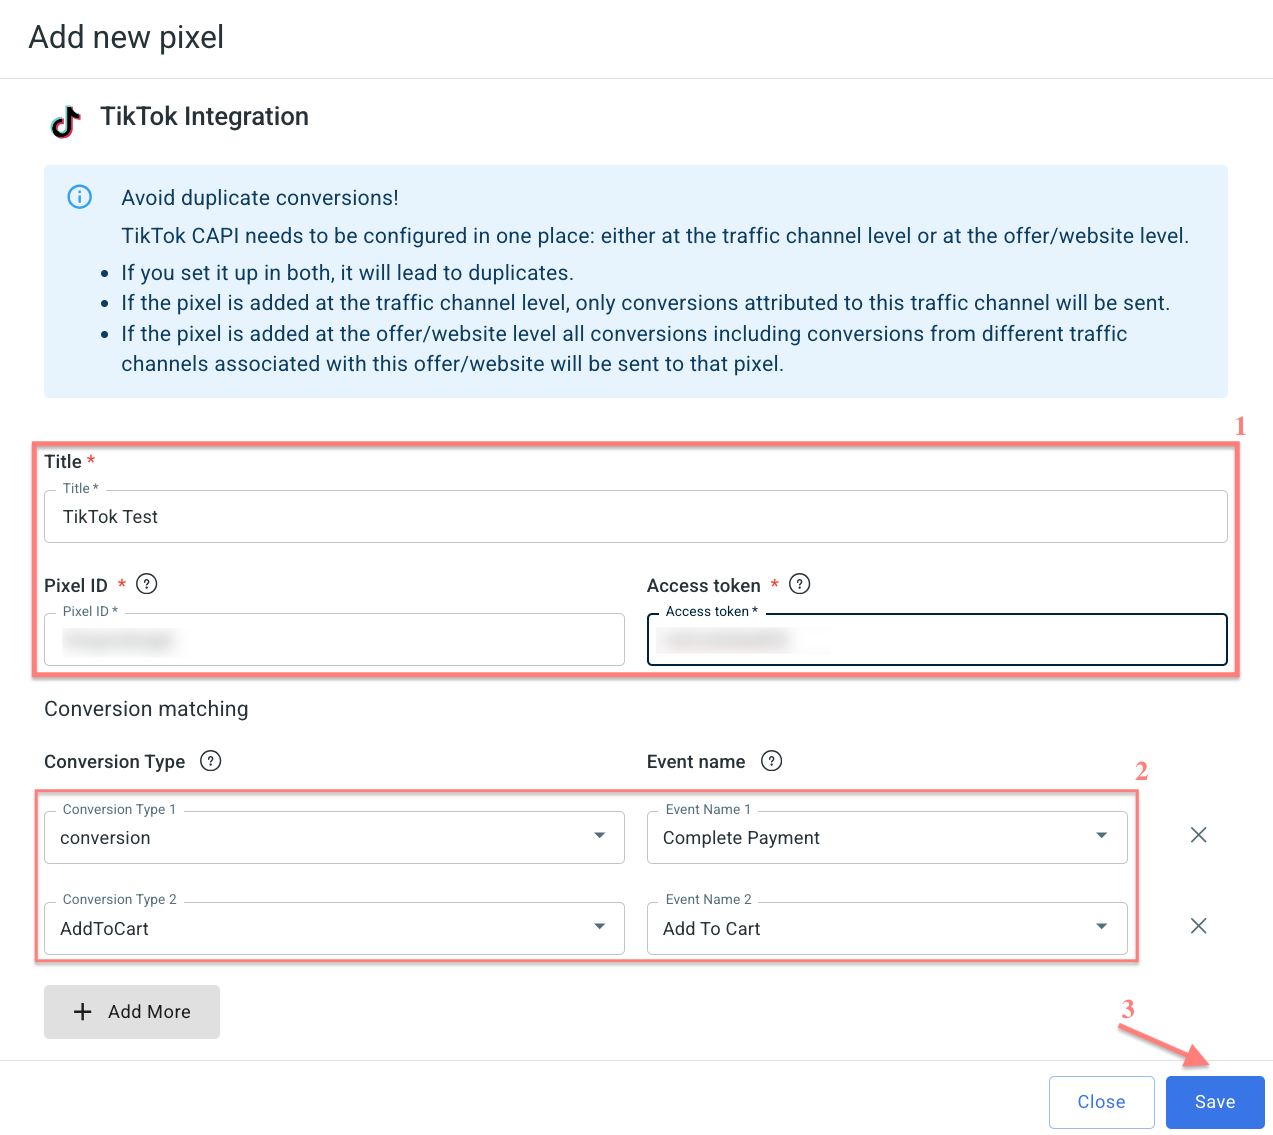
Fields explained:
Give your TikTok pixel a name to distinguish it from the other added pixels in the list.
To get your pixel and access token from TikTok, go to your TikTok Event Manager and act as follows:
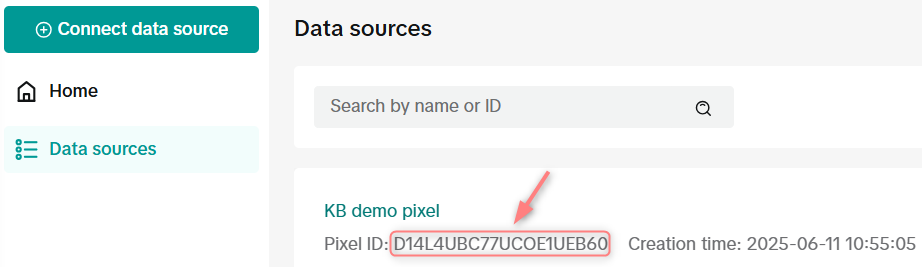
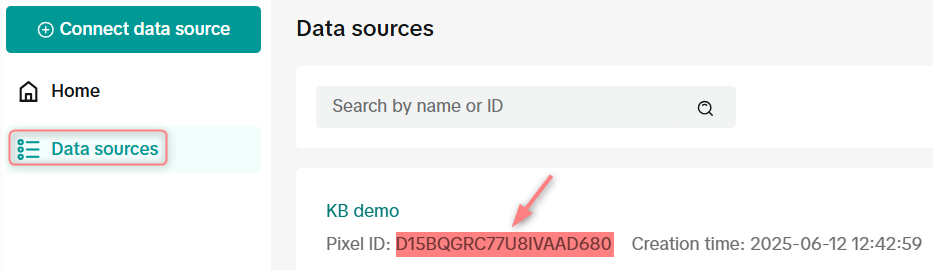
1. If you already have a pixel for your website, copy it from the Data sources settings:
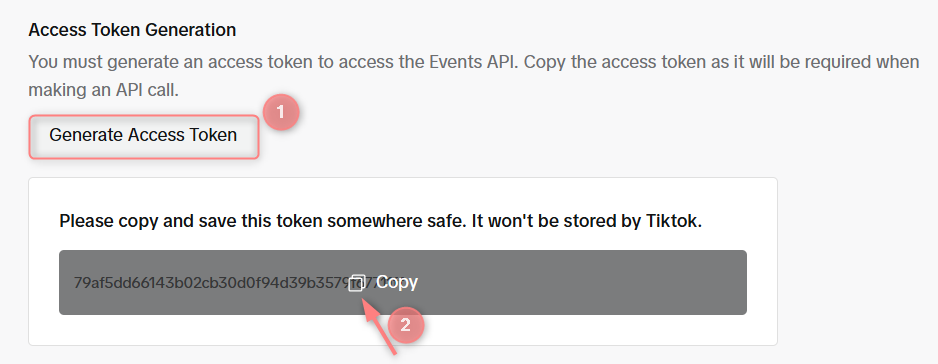
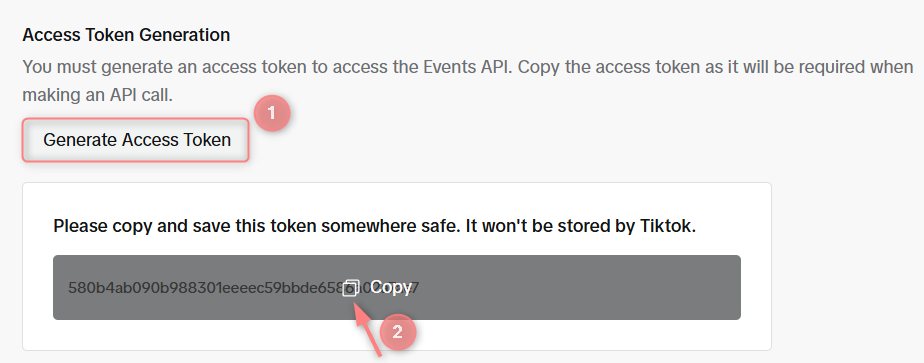
2. Go to Pixel Settings → scroll down → Generate Access Token → copy the created token:
If you don’t have the pixel, you’ll need to create it first:
1. Go to Tools → Events:
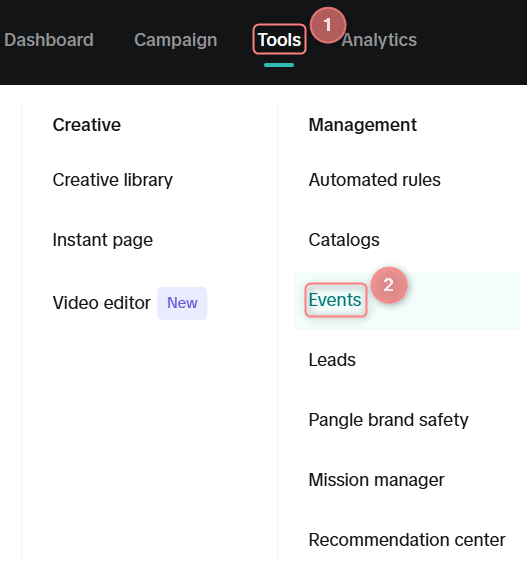
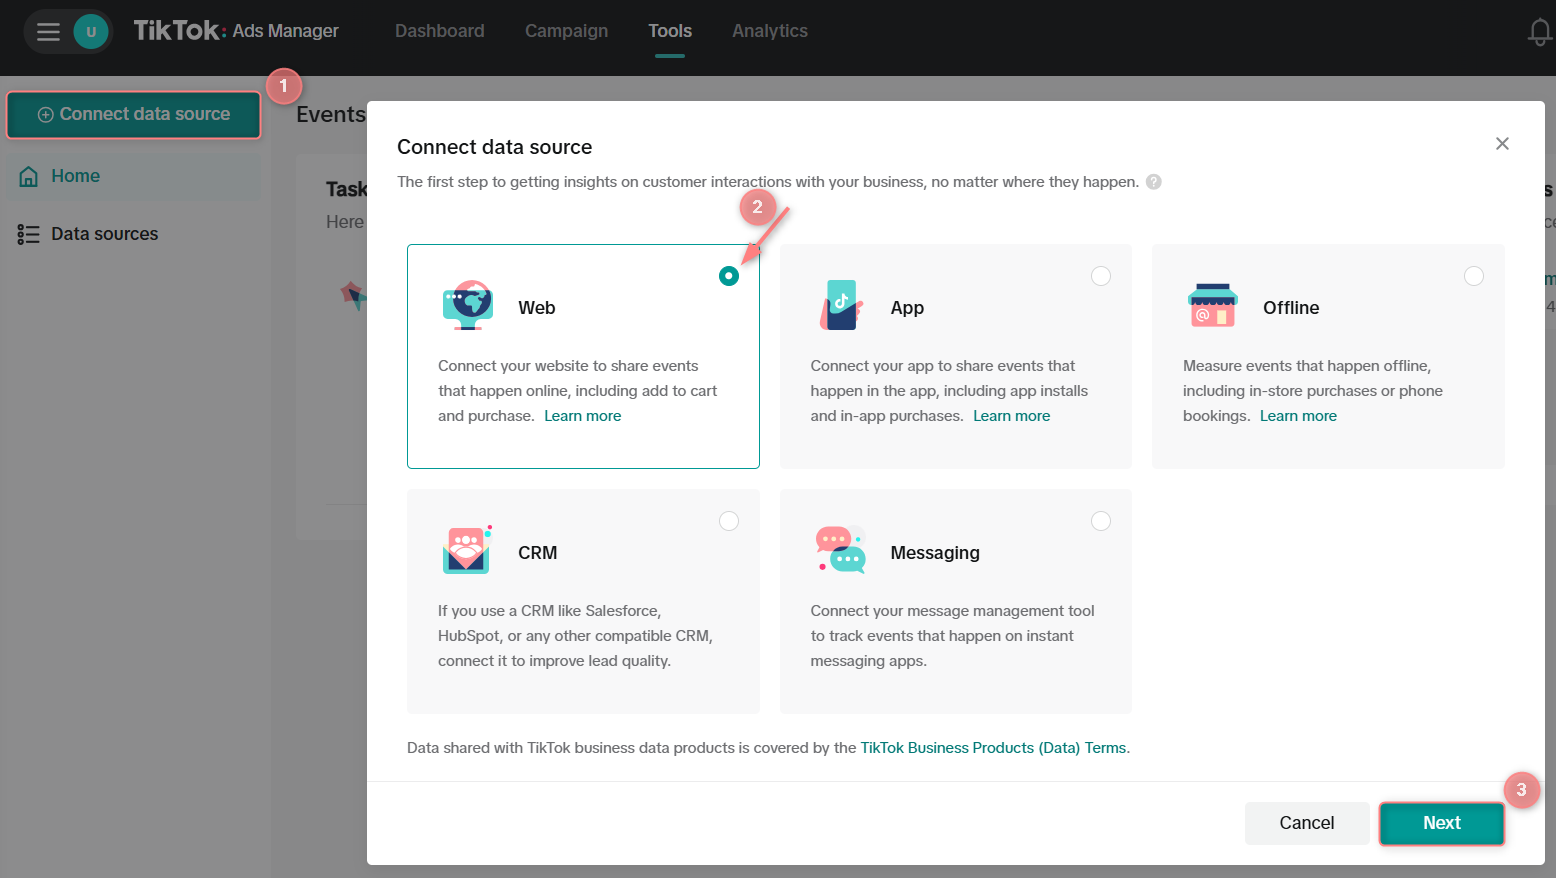
2. Connect data source → Web → Next:
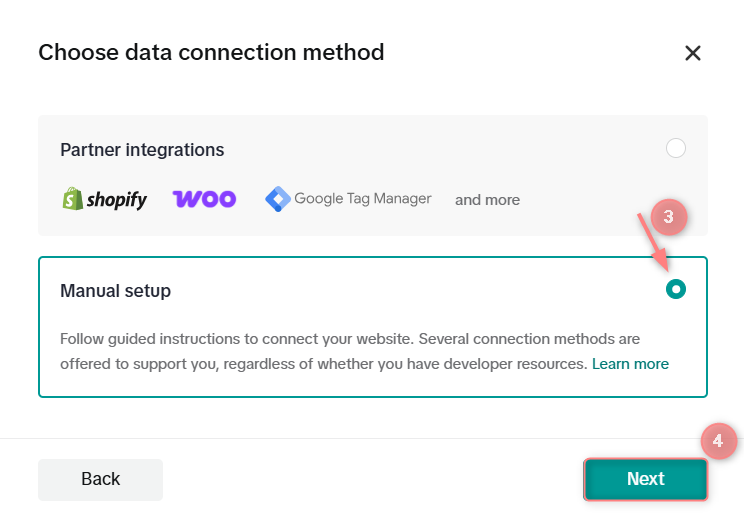
3. Type in your website’s URL → Next → Manual setup → Next:

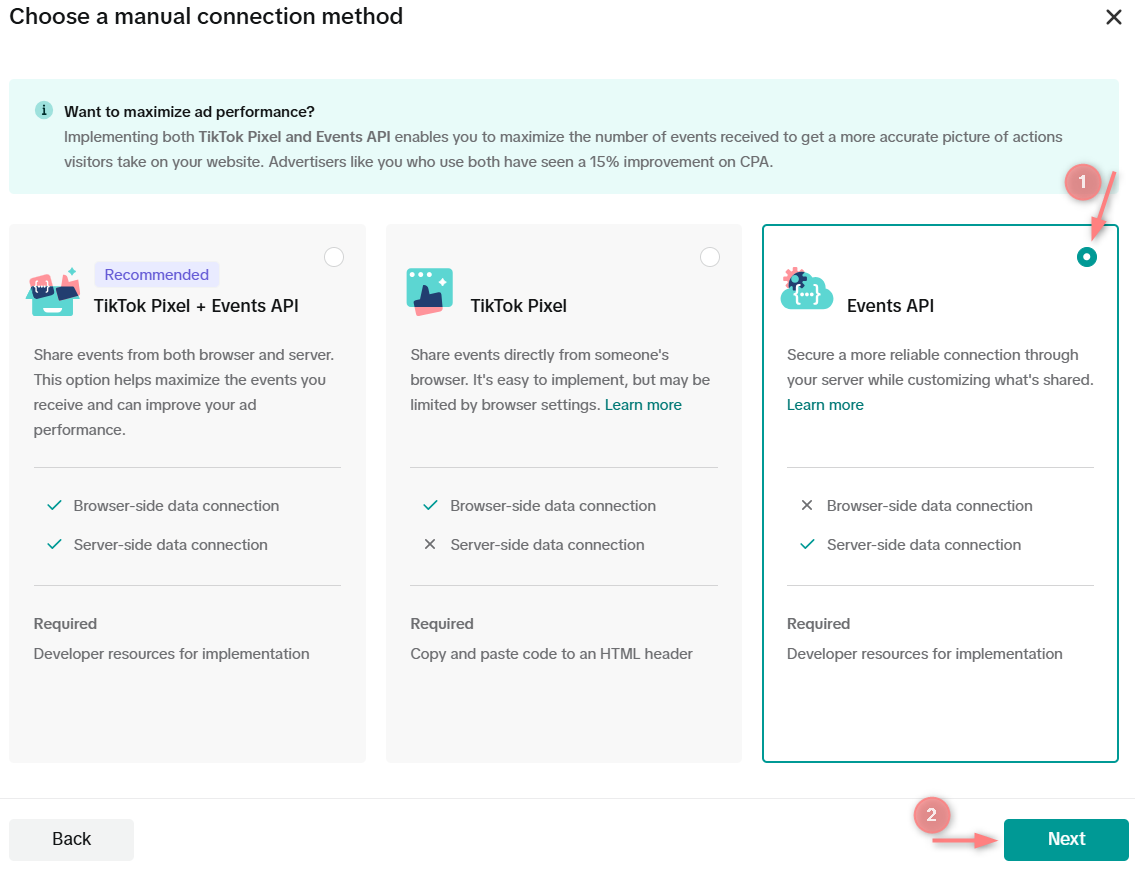
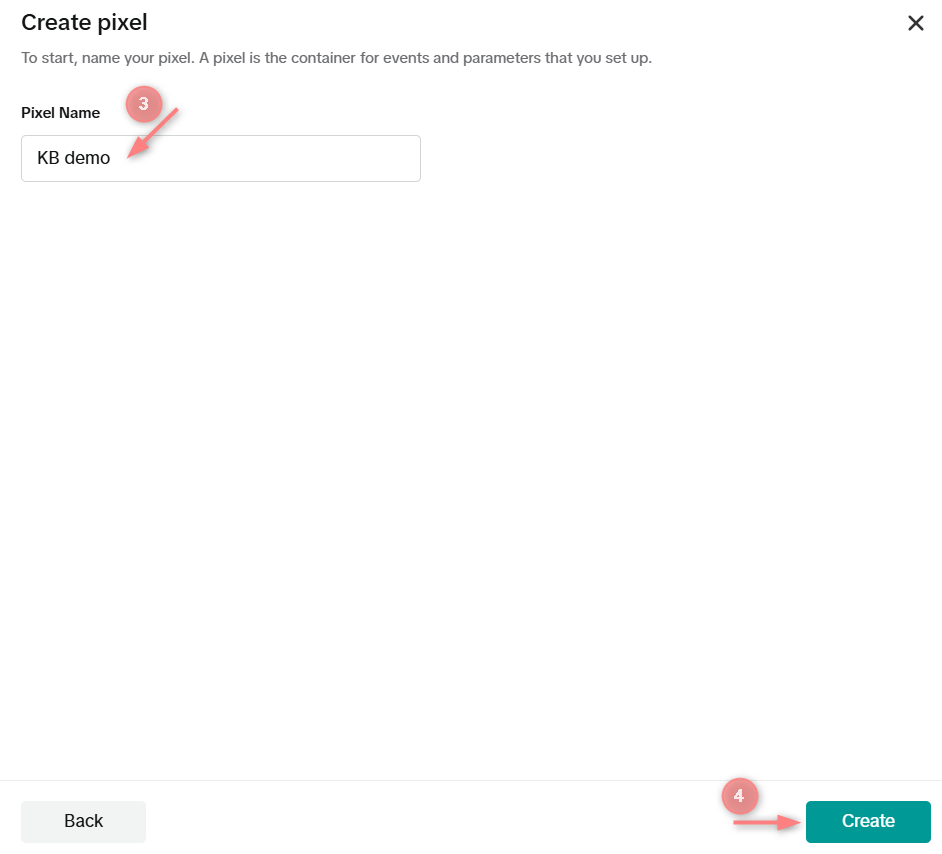
4. Events API → Next → name your pixel → Create:
5. Fill in the rest of the Events API setup as per your needs → Finish.
- The added Pixel ID can be found in the Data sources section:
- To copy the access token go to Pixel Settings → scroll down → Generate Access Token → copy the created token:
Conversion Types on the left are the ones you added in RedTrack (step 2).
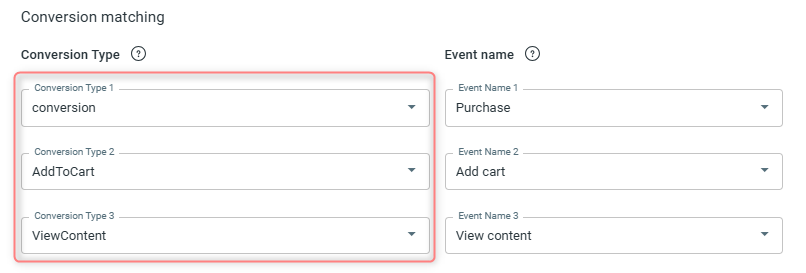
Event names that you have to match are the TikTok event names you want to match your RedTrack conversion type.
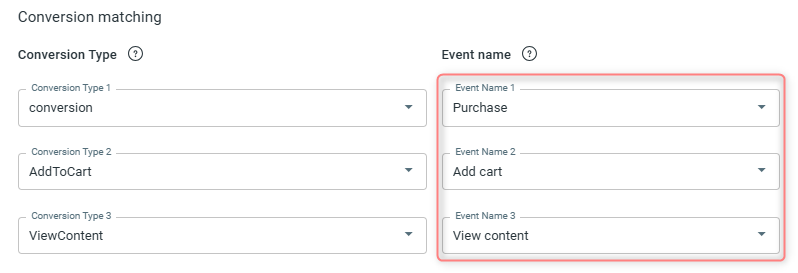
You need to match these 2 sets of events to get proper tracking data in RT Reports.
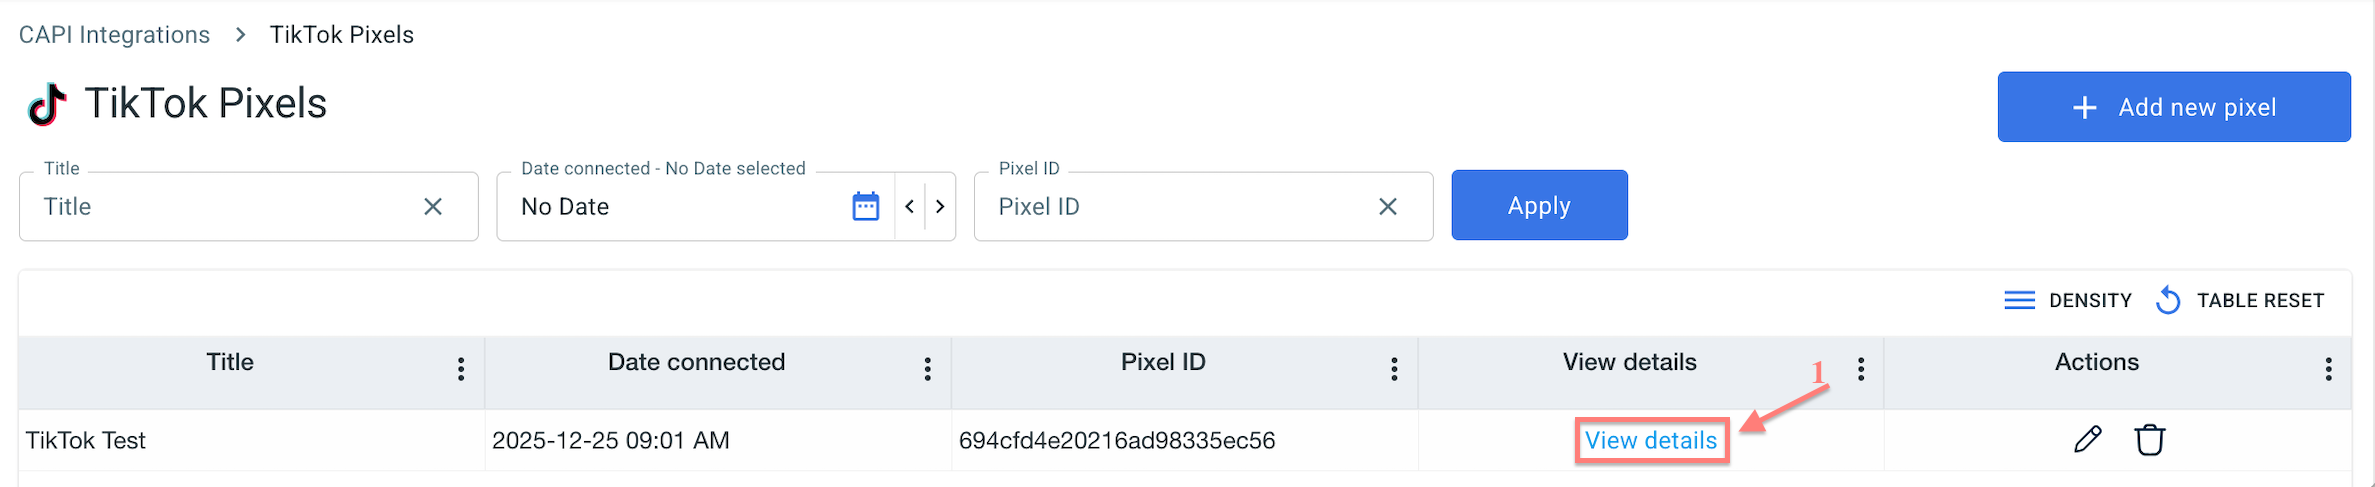
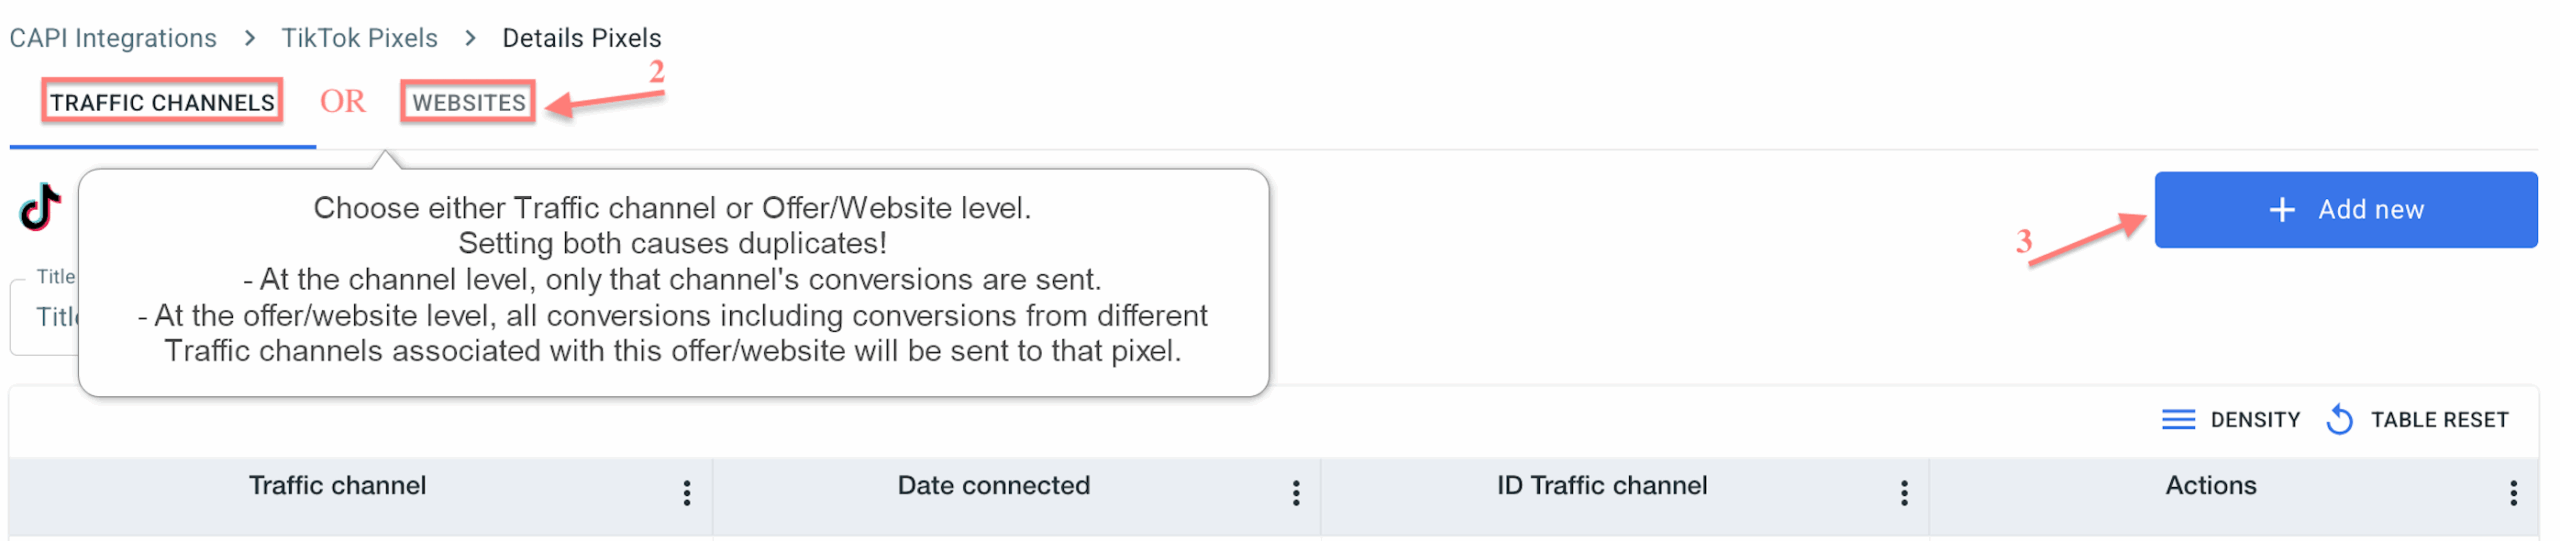
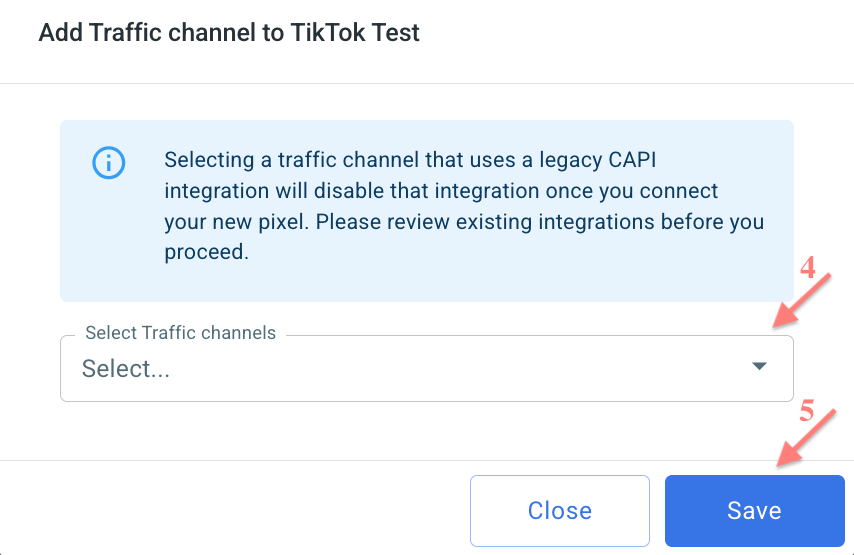
3. To assign this pixel: View details → select Traffic channel or Websites → Add new → select destination → Save:
7. Create a campaign in RedTrack and TikTok
Campaign in RedTrack
To create a campaign in RT act depending on your account type:
Campaigns → Create new campaign → fill in the info in all the sections and tabs:
- General: Give it a name, and choose the traffic channel, tracking domain, and cost-tracking method.
- Funnels: Choose the type of funnel you are using and add the elements from the drop-downs.
- S2S postback: This field will be filled in automatically based on the data you have added to your traffic channel settings.
- Auto update costs: Do not forget to turn the toggle on if you are working with the API-integrated traffic channel
Campaigns → Create new campaign → use this guide to help you set up campaign for the organic traffic.
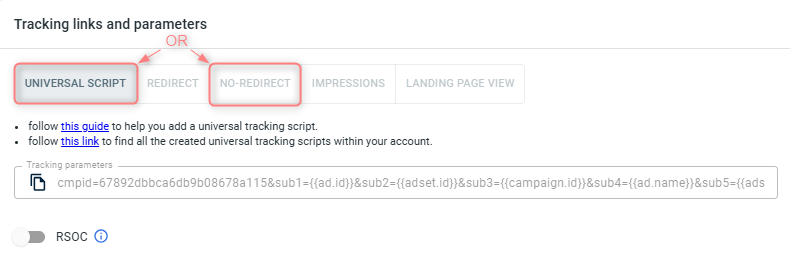
2. Once the Campaign is saved, go to Tracking links and parameters → copy the corresponding tracking parameters and the script depending on tracking method you decided on:
– Use Universal Script when you’re working with the same landing page across multiple traffic channels.
– Use No-Redirect Script when you’re working with one landing page and one traffic channel.
IMPORTANT!
– If you choose the No-Redirect tab: once the campaign is saved, both the tracking parameters and the script are generated automatically. You only need to copy and apply them.
– If you choose the Universal Script tab: once the campaign is saved, only the tracking parameters are generated automatically. You’ll need to create the universal tracking script manually (follow this guide).
3. Apply Script & Parameters.
- Paste the script into your landing page code.
- Add the tracking parameters to your TikTok campaign.
1. Campaigns → Create new campaign → Fill in the info in all the sections and tabs:
- General: Give it a name, and choose the traffic channel, tracking domain, and cost-tracking method.
- Funnels: Choose the type of funnel you are using and add the elements from the drop-downs.
- S2S postback: This field will be filled in automatically based on the data you have added to your traffic channel settings.
- Auto update costs: Do not forget to turn the toggle on if you are working with the API-integrated traffic channel
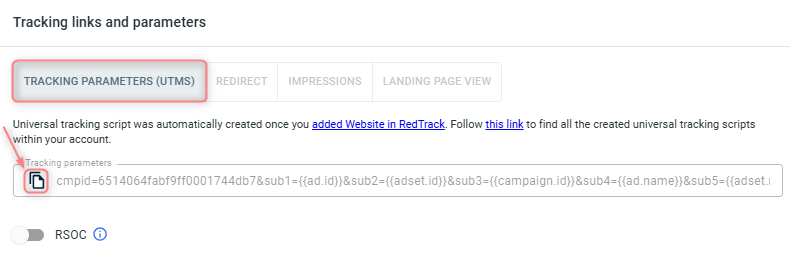
2. Once the Campaign is saved go to Tracking links and parameters → copy the tracking parameters from the Tracking parameters (UTMs) tab:
3. Apply Script & Parameters.
- Paste the script into your landing page code.
- Add the tracking parameters to your TikTok campaign.
Campaign on TikTok
1. Generate a test click on TikTok.
2. Check if the tt_test_id provided by TikTok (the tt_test_id is typically included in the URL or as part of the event data when a test click is fired) is in place; it will be available under the RedTrack ref_id parameter.
3. Generate a test conversion.
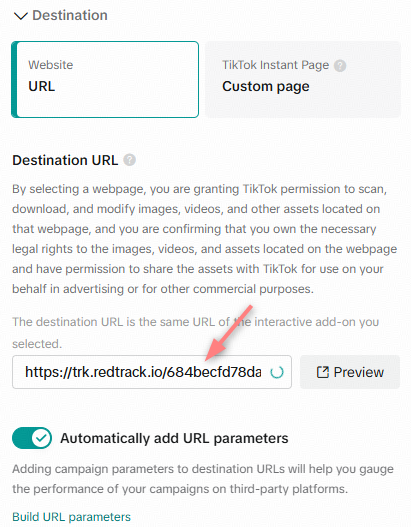
Go to your TikTok Ads Manager → Campaign → Create → use this TikTok guide to help you navigate your campaign settings. Your tracking link from RedTrack should be inserted in the Destination URL field: