Traffic filtering
Overview
Traffic filtering means redirecting traffic based on defined criteria (geo, ISP, OS, etc.) or excluding it from your reports.
This feature is helpful for those working with more complex funnels where you may have different landing pages for different locations or different offers for mobile and desktop visitors.
The ability to sort traffic by a specific criterion is critical, as some offers may not be paid due to so-called proxy users, often associated with fraud. To avoid losing reputation, it is sometimes better to filter traffic this way. In RedTrack, we offer one of the best and most expensive proxy bases, which sets us apart from similar services.
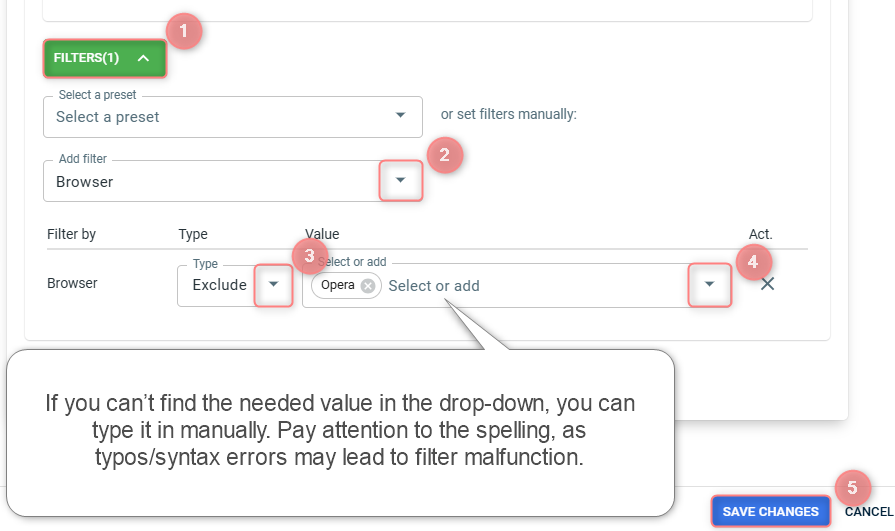
Supported filters can be viewed and applied in Campaigns → edit → Funnels → Filters → Add filter.
Filter categories available
Countries
Regions
Cities
ISP
Browser
Browser version
OS
OS version
Device brand
Device model
IP
Sub-values
Languages
Referrer
Referrer domain
Device type
Connection types
Proxy types
Fraud check
Unique path (contact [email protected] to activate this filter)
The reason for that is that the no-redirect method / universal script presupposes tracking via a script, which means that the click is recorded when it’s already on the page, while filters work out before the click gets to the page.
With no-redirect tracking, filtering works on the offer level only (considering you have a landing page + the offer in the funnel)
How filters work
Non-matching traffic will be sent to the ‘forbidden’ page (aka fallback URL), if available, or you can ask the system to redirect this traffic to another funnel/lander/offer under the same campaign.
RedTrack allows you to create custom filters that can be added either as pre-set templates or directly on the Campaign level.
1. Choose the method of adding a filter you want to work with:
Go to Funnels → choose the needed one (if you have multiple funnels) → Filters → choose the filter from the Add filter drop-down → choose the Type and the Value for it (type and value define how the filter works out) → Save changes:
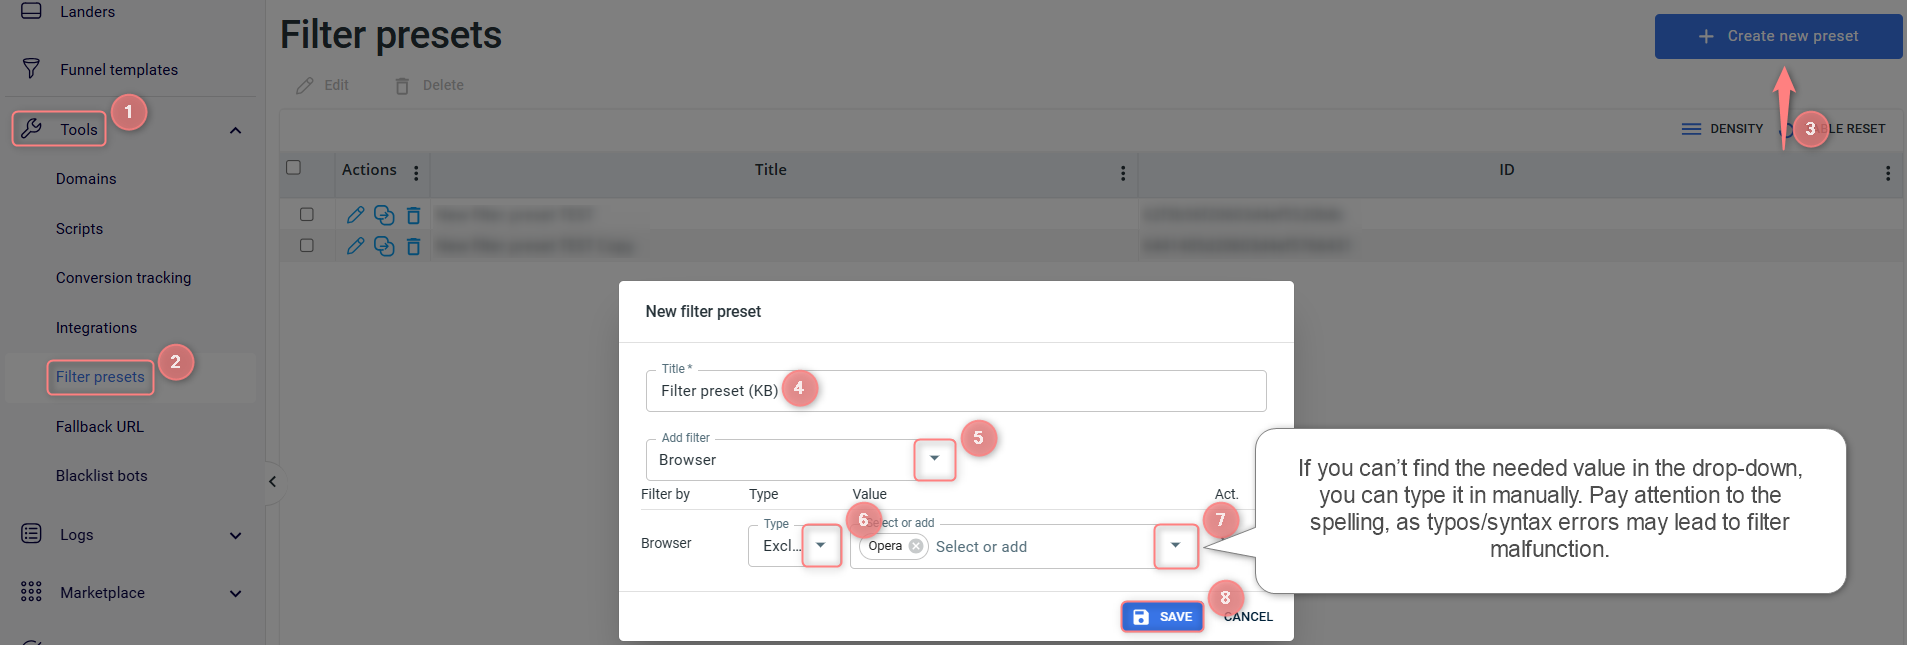
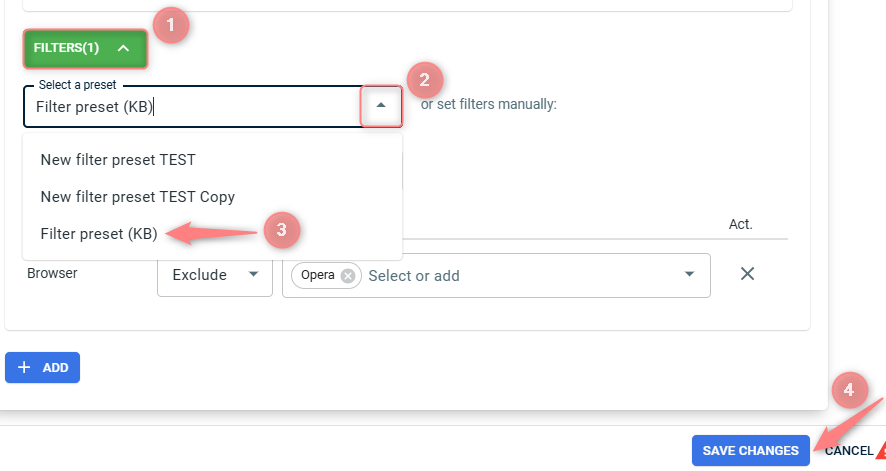
1. Go to Tools → Filter presets → Create new preset → give it a name → choose the filter → add Type and Value (type and value define how the filter works out) → Save:
Filter by
Most of the filters are self-explanatory. That being said, some of them are specific in a way:
Filter’s name | Filter specifics |
Proxy type | This filter has the following types:
|
Subs | The sub-value you want to put inside the filter should be the same as you have received from your source of traffic with the click. If several values under the same sub are to be used, simply put them in the same field separated by a comma: 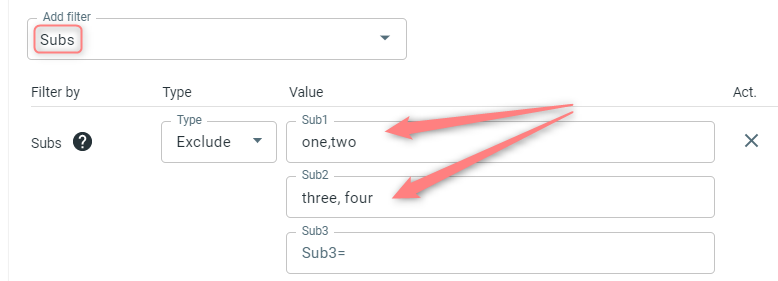 Important! If you want to filter a sub with an empty value, you must put {null} in the sub value when applying the filter by Sub: 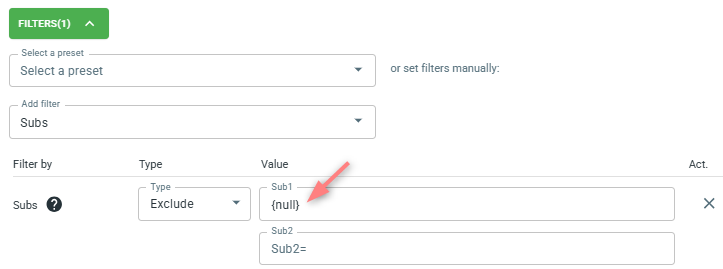 |
Unique path | This filter ensures that returning users are redirected through specific paths within a campaign, based on their visit history. This is particularly useful in cases where multiple offers are available in a campaign funnel (e.g., to avoid showing the same offer multiple times, or to ensure consistency). The “Unique path” filter can work in two modes: – Using it with the “Exclude” type ensures that users are shown a different path (offer) each time they visit. – Using it with the “Include” type ensures that users are consistently shown the same path (offer) they saw on their first visit. How it works: Using this filter with “Exclude” type: 1. User clicks an ad → lands on Offer 1. 2. On the next visit, the same user is redirected to a different offer (e.g., Offer 2). 3. On the third visit → Offer 3. 4. After all paths are used, the stats are reset and the cycle starts again. Using this filter with “Include” type: 1. User clicks an ad → lands on Offer 1. 2. On subsequent visits, the user is always redirected to Offer 1, as long as they’re identified as the same user. 3. Once the tracking window expires or data is reset, they may be sent to a new offer. How users are identified: RT tracks users based on a combination of their IP address + User Agent (UA) (which includes device and browser details).
Retention window: User path history is stored for 7 days. After all paths are visited, or the 7-day window expires, the stats are reset, and path assignment starts from the beginning. |
Type
Include vs Exclude
- Include type means that the page will be available for a certain group of people only.
All the conditions should be met for the click to be sent to this funnel.
Your filters are:
Filter by countries → Include → Germany
Filter by OS → Include → Windows
Result:
Your funnel will be shown only for people from Germany with Windows OS, non-matching clicks from Germany and MacOS will be redirected to another funnel or the default fallback URL (make sure you set it up).
- Exclude type means that your offer will be shown for everyone except those values in the filters.
Only one of the conditions can be met for the filter to be triggered.
No matter if it is the “Include” or “Exclude” condition.
Example
Considering the click is coming from the US in all the cases below
Include: US
Exclude: sub1 – 123
https://domain.com/67dbdac1f9cbc639f88?sub1=123 – blocked/fallback
https://domain.com/67dbdac1f9cbc639f88?sub1=245 – accepted
Exclude: US
Exclude: sub1 – 123
https://domain.com/67dbdac1f9cbc639f88?sub1=245 – blocked/fallback
https://domain.com/67dbdac1f9cbc639f88?sub1=123 – blocked/fallback
Include: US
Include: sub1 – 123
https://domain.com/67dbdac1f9cbc639f88?sub1=123 – accepted
https://domain.com/67dbdac1f9cbc639f88?sub1=245 – blocked/fallback
Contains vs No contains
Contains and No contains filter types work the same way as Include/Exclude but for partial matching.
If your filter is Subs → Set contains 12345, but the Subs data will have 123456 upon the click, the system will count this click with 123456 as matching the filter.
2. To apply this filter template, go to your campaign settings → Funnels → choose the needed one (if you have multiple funnels) → Filters → choose the added filter preset from the Select a preset field → Save changes to the campaign:
2. Choose the filter according to your needs.
Most of the filters are self-explanatory. That being said, some of them are specific in a way:
Some filters explained
Filter’s name | Filter specifics |
Proxy type | This filter has the following types:
|
Subs | The sub-value you want to put inside the filter should be the same as you received from your traffic source with the click. If several values under the same sub are to be used, put them in the same field separated by a comma:  Important! If you want to filter a click with an empty sub value, you should put {null} instead the sub value when applying the filter by Sub: |
Unique path | This filter ensures that returning users are redirected through specific paths within a campaign, based on their visit history. This is particularly useful in cases where multiple offers are available in a campaign funnel (e.g., to avoid showing the same offer multiple times, or to ensure consistency). The “Unique path” filter can work in two modes: – Using it with the “Exclude” type ensures that users are shown a different path (offer) each time they visit. – Using it with the “Include” type ensures that users are consistently shown the same path (offer) they saw on their first visit. How it works: Using this filter with “Exclude” type: 1. User clicks an ad → lands on Offer 1. 2. On the next visit, the same user is redirected to a different offer (e.g., Offer 2). 3. On the third visit → Offer 3. 4. After all paths are used, the stats are reset and the cycle starts again. Using this filter with “Include” type: 1. User clicks an ad → lands on Offer 1. 2. On subsequent visits, the user is always redirected to Offer 1, as long as they’re identified as the same user. 3. Once the tracking window expires or data is reset, they may be sent to a new offer. How users are identified: RT tracks users based on a combination of their IP address + User Agent (UA) (which includes device and browser details).
Retention window: User path history is stored for 7 days. After all paths are visited, or the 7-day window expires, the stats are reset, and path assignment starts from the beginning. |
Types of filtering
In RedTrack, we have including, excluding, contains and no contains filters.
1. Including something makes the page available only to a specific audience.
All the conditions should be met for the click to be sent to this funnel.
Your filters are:
Filter by countries → Include → Germany
Filter by OS → Include → Windows
Result:
Your funnel will be shown only for people from Germany with Windows OS, non-matching clicks from Germany and MacOS will be redirected to another funnel or the default fallback URL (make sure you set it up).
2. Excluding means your page will be shown to everyone except those who match the filter values.
Only one condition can be met for the filter to trigger.
3. Contains and No contains filter types work the same way as Include/Exclude, but for partial matching.
If your filter is Subs → Contains 12345, but the Subs data will have 123456 upon click, the system will count that click as matching the filter.
Special cases and exceptions
1. If two or more conditions are set, all must be met.
Example
Considering the click is coming from the US in all the cases below
Include: US
Exclude: sub1 – 123
https://domain.com/67dbdac1f9cbc639f88?sub1=123 – blocked/fallback
https://domain.com/67dbdac1f9cbc639f88?sub1=245 – accepted
Exclude: US
Exclude: sub1 – 123
https://domain.com/67dbdac1f9cbc639f88?sub1=245 – blocked/fallback
https://domain.com/67dbdac1f9cbc639f88?sub1=123 – blocked/fallback
Include: US
Include: sub1 – 123
https://domain.com/67dbdac1f9cbc639f88?sub1=123 – accepted
https://domain.com/67dbdac1f9cbc639f88?sub1=245 – blocked/fallback
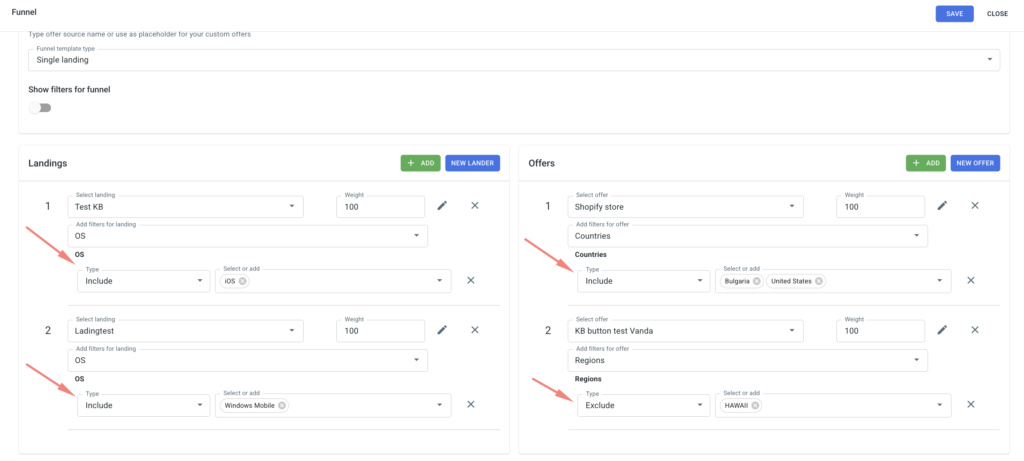
2. Separate filters for different landing pages and/or offers under the same funnel can be added.
You can add as many landers and offers as you need, with different filters.
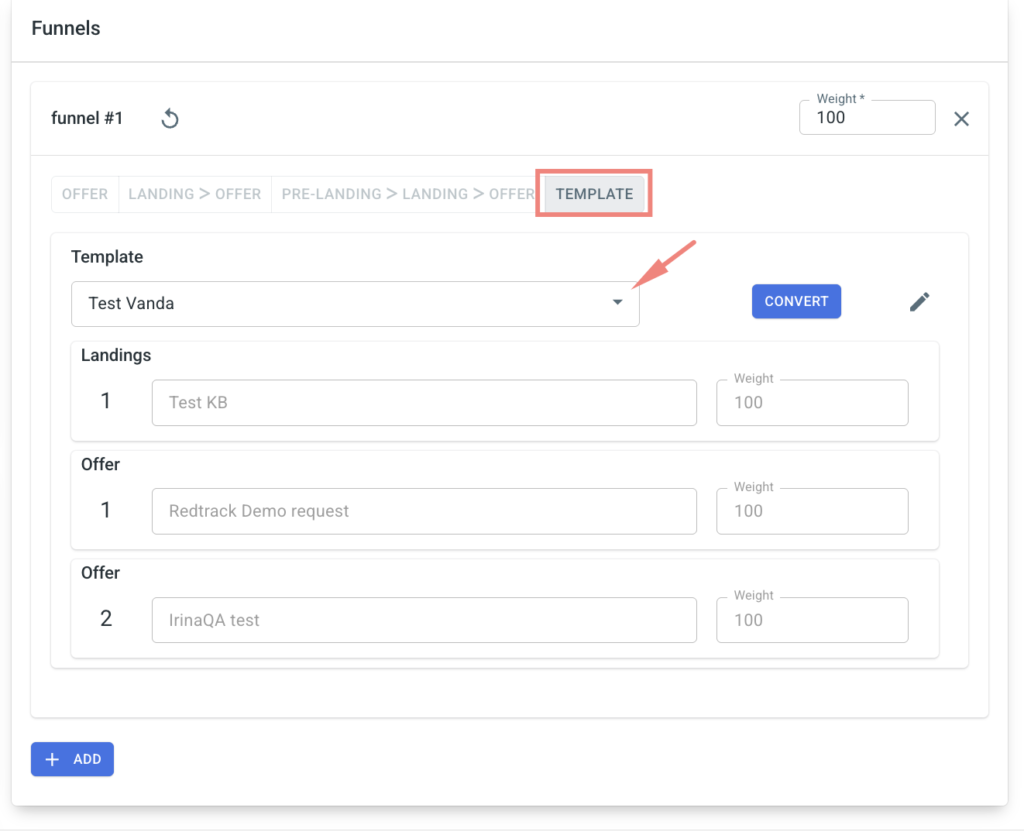
Go to Funnel templates → Create new funnel → give your funnel a name → select a type (only offer, with landing page, with pre-landing and landing page) → add the (pre)landing pages and/or offers you want to use and set the filters following the logic described above for each of the lander/offer → save the changes.

To use that funnel in the campaign, choose this funnel template in the funnels section of your target campaign.
When a template is used, you won’t see all the setup details, as they are managed in the Funnel templates section only and are applied to all the campaigns using this funnel.