

Custom tracking domain: Cloudflare setup
Why use Cloudflare for your custom tracking domain
We recommend using Cloudflare as the DNS provider for your custom tracking domain. It adds an extra layer between your tracking domain and RedTrack, which provides several benefits:
- No visible direct connection to RedTrack. When Cloudflare proxying is enabled, requests to your tracking domain go through Cloudflare first. This masks the direct connection between the domain and RedTrack infrastructure.
- DDoS and WAF protection. Cloudflare helps protect your tracking domain against malicious traffic and common web attacks. Its security features can filter potentially harmful requests before they reach the destination.
- SSL management. Cloudflare provides tools for managing SSL/TLS encryption between visitors, Cloudflare, and the origin. Depending on your setup, you can use Cloudflare SSL together with the appropriate SSL configuration in RedTrack.
- Improved performance. Requests are routed through Cloudflare’s global network, which can reduce latency and provide faster, more reliable connections for visitors in different locations.
How to add a custom tracking domain with Cloudflare
1. Add a CNAME record in Cloudflare.
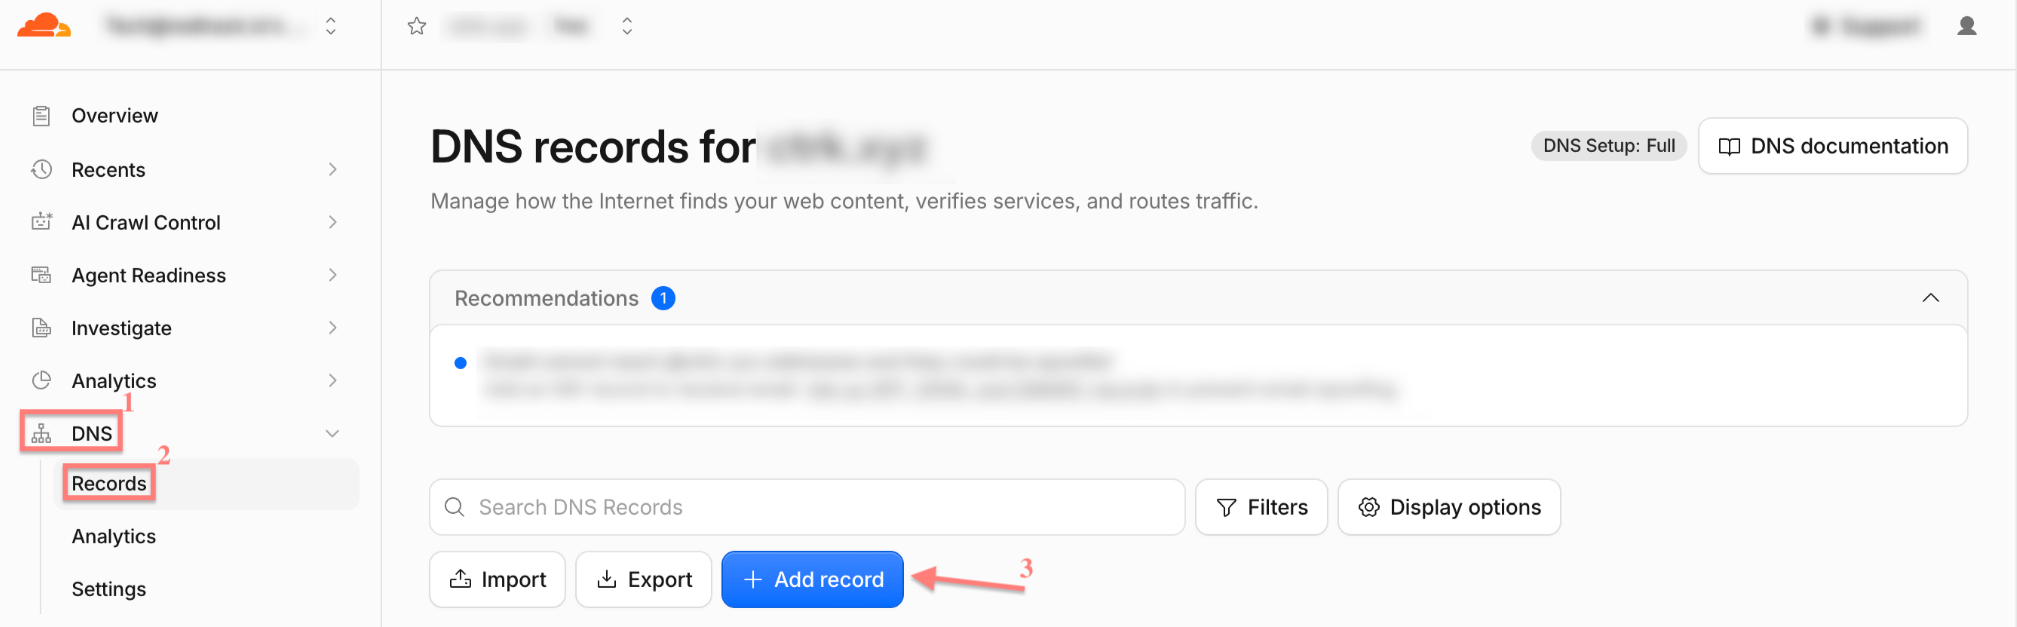
1.1 Cloudflare Dashboard → select your domain → DNS → Records → Add record:
1.2 Fill in the mandatory fields → Save:
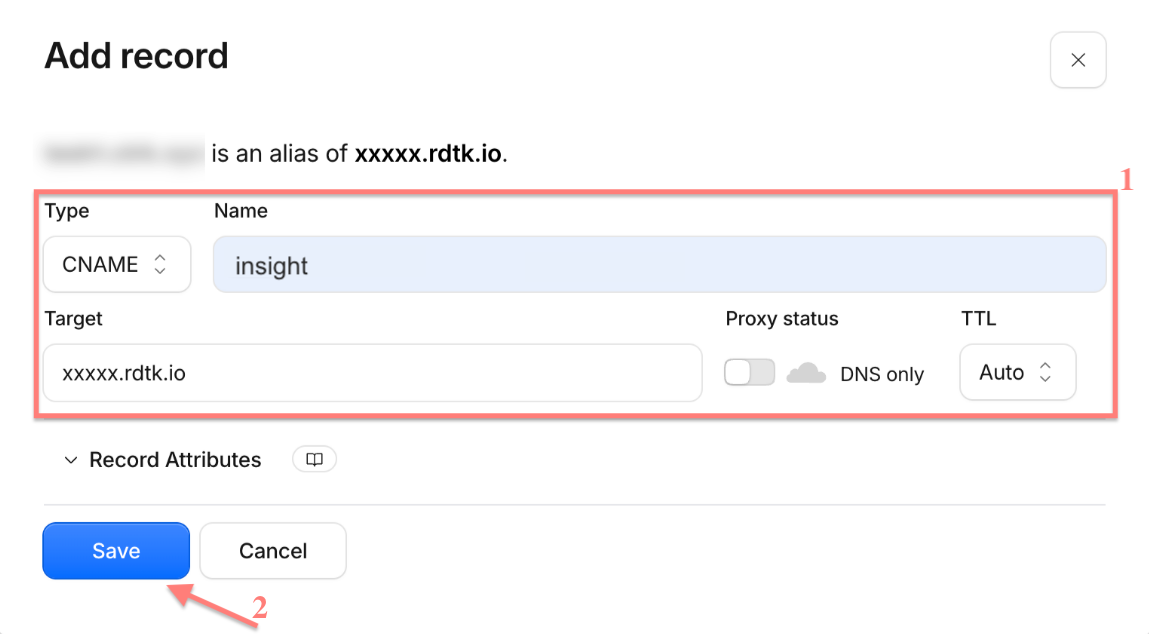
Fields explained
- Type: CNAME
- Name: one word, no spaces or special characters — this becomes your subdomain

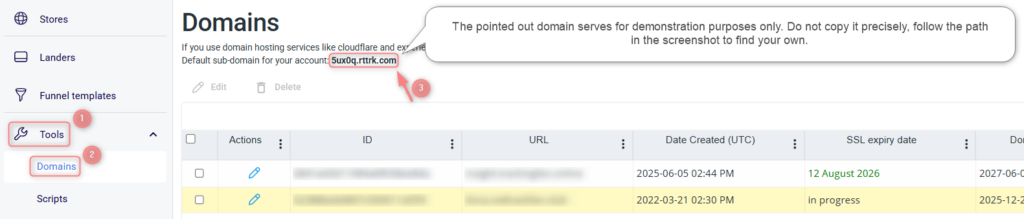
- Target: your RedTrack dedicated domain (RedTrack → Tools → Domains)
- Proxy status: DNS only (grey cloud)
- TTL: the lowest possible
2. Select the encryption mode in Cloudflare
Cloudflare Dashboard → SSL/TLS → Overview → Configure → choose the encryption mode (Flexible/ Full (strict)):
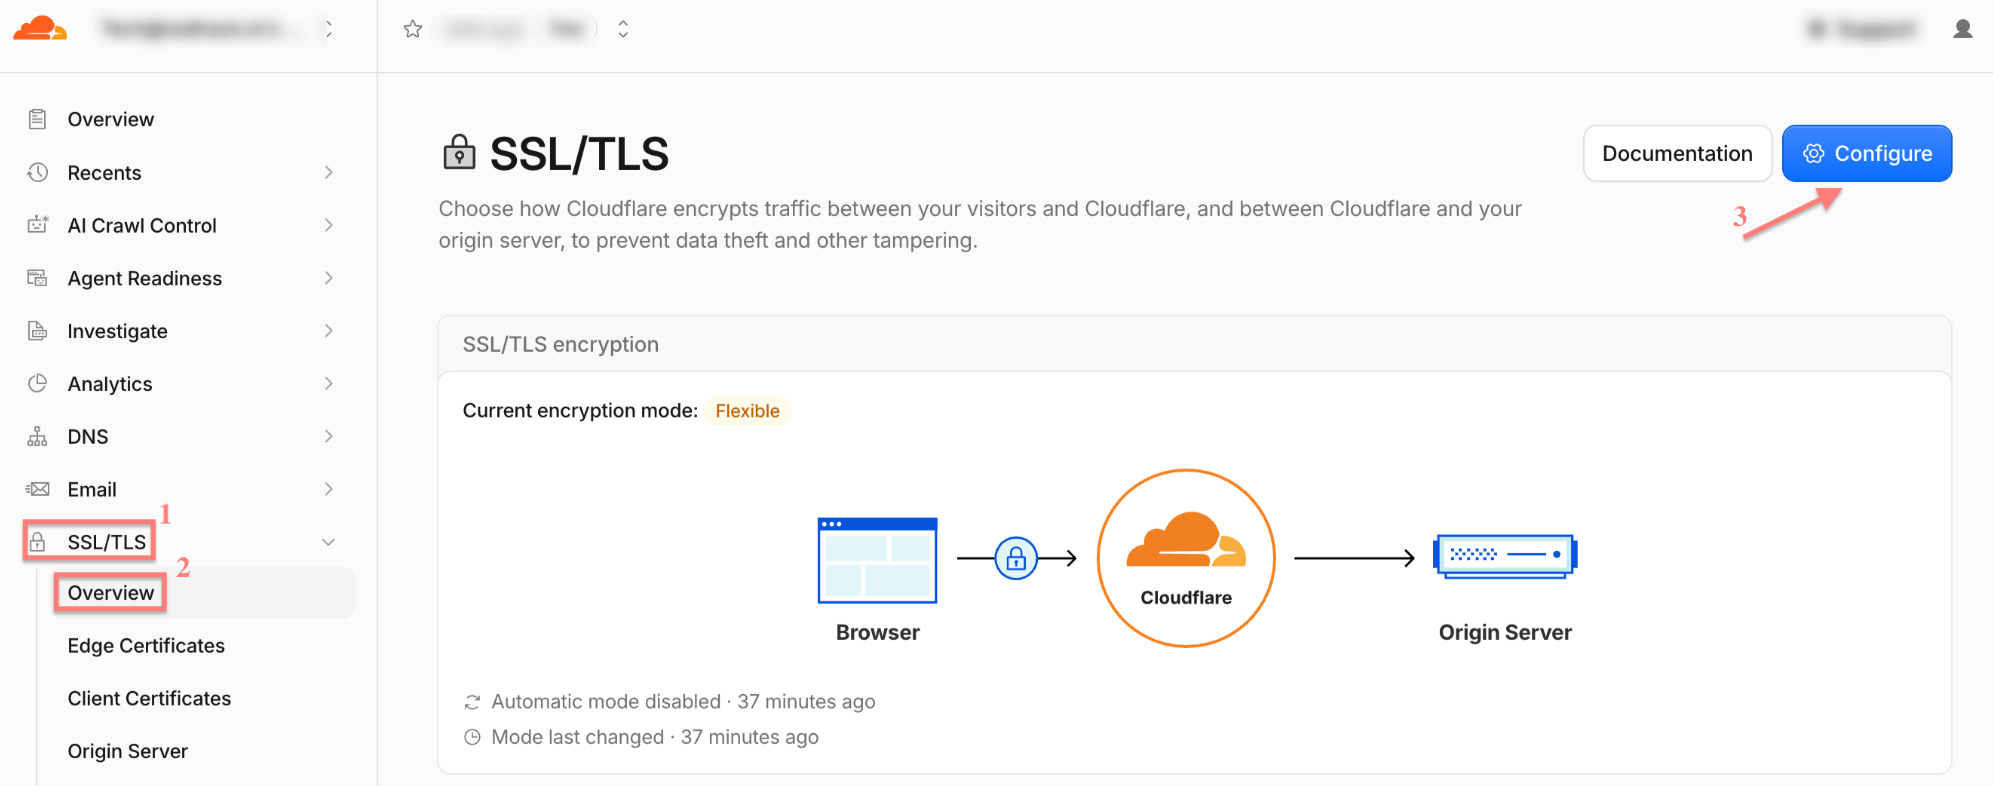
3. After choosing Flexible mode add the created custom tracking domain to RedTrack.
Tools → Domains → New → fill in the necessary fields → Save:


Fields explained
- URL: the word you entered in the Name field, followed by the domain you purchased in your registrar

2. Name of the domain you have purchased in your registrar and for which you added the CNAME (in our example it’s trackingfan.online):

- Root domain URL: the address visitors will be sent to if they enter the domain directly (optional — can be left blank)
- To issue SSL certificate enable the Free SSL toggle:
We are extra cautious about our service, so RedTrack generates certificates using open-source Let’s Encrypt technology, which claims to be free, automated, and open certificate authority (CA) run for the public’s benefit (it is a service provided by the Internet Security Research Group (ISRG)).
3. After choosing Full (strict) mode, create Origin Certificate and Private Key in Cloudflare.
3.1 SSL/TLS → Origin Server → click Create Certificate:
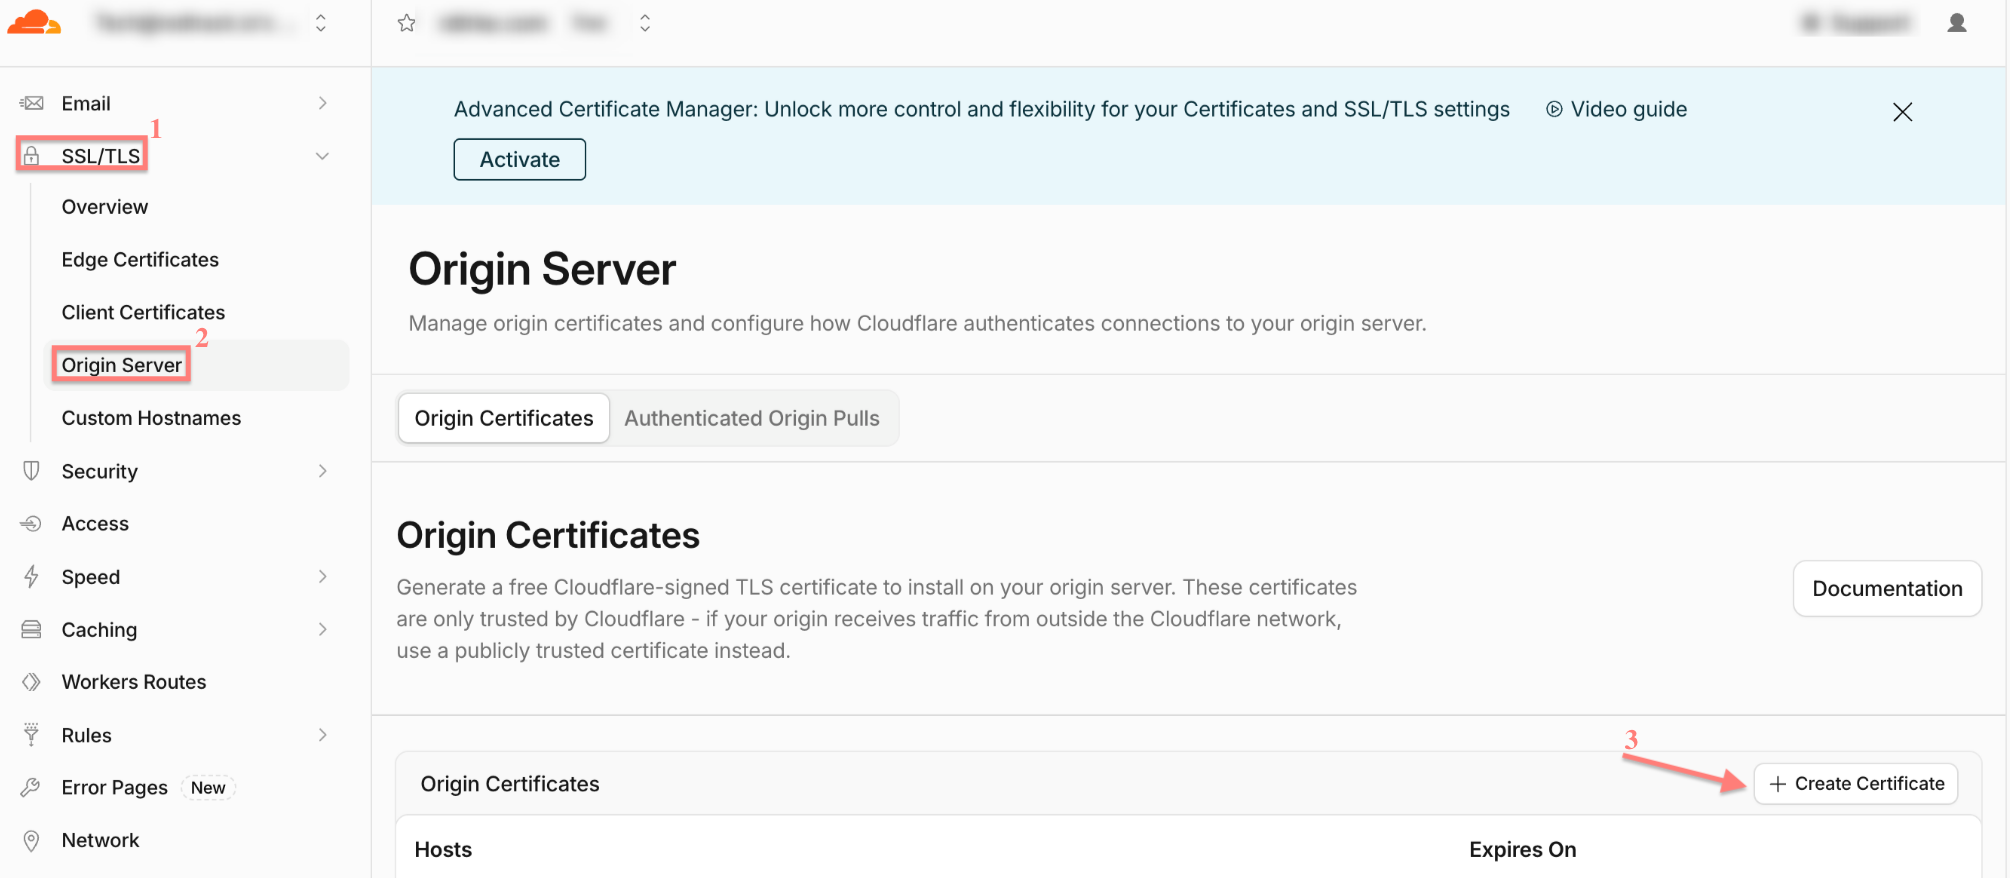
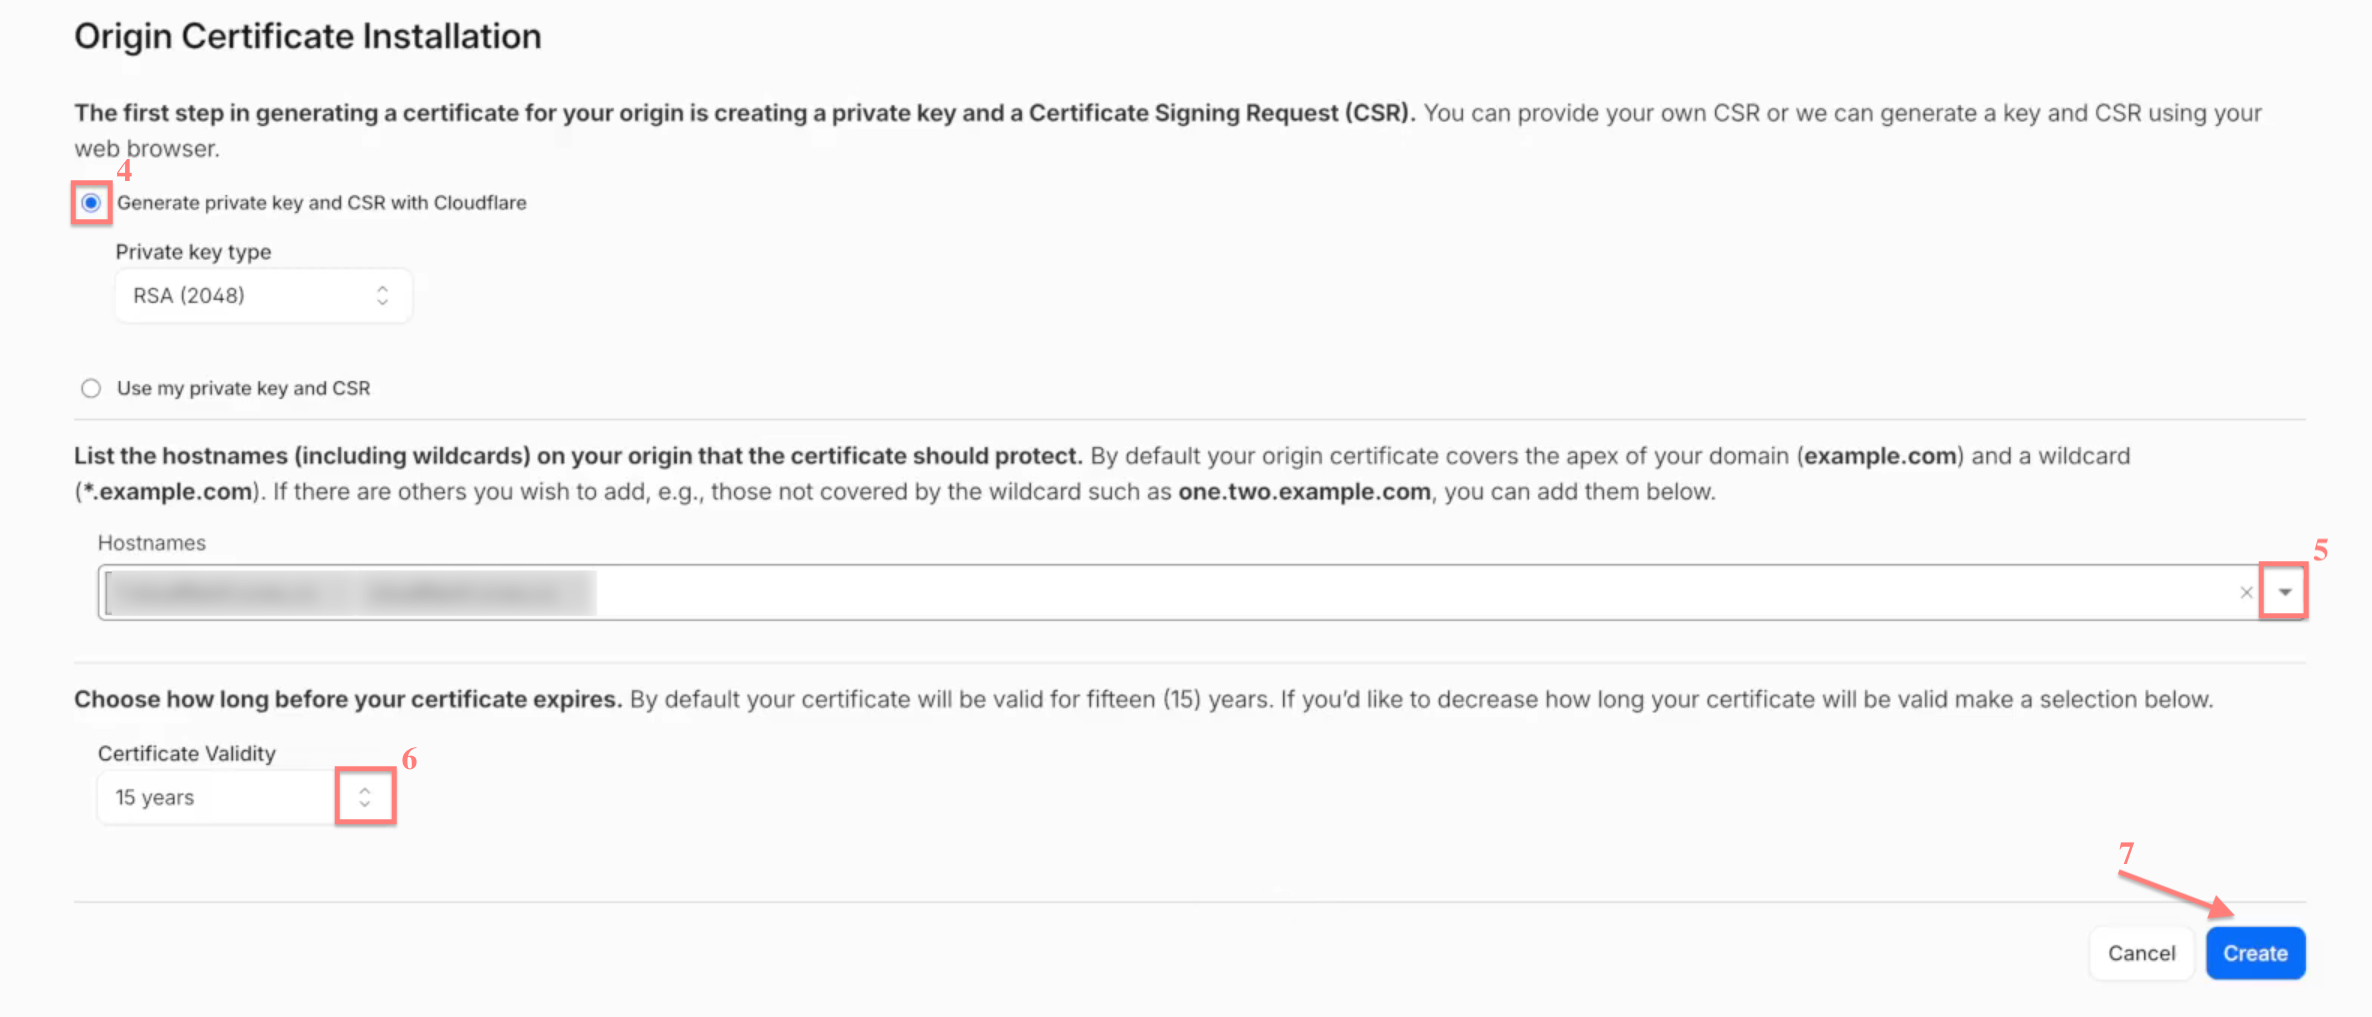
3.2 Select Generate private key → add the hostnames (if needed) → set 15 years as Certificate Validity → Create → copy the generated Origin Certificate and Private Key:
3.3 Add the custom tracking domain to RedTrack.
Tools → Domains → New → fill in the necessary fields → Save:

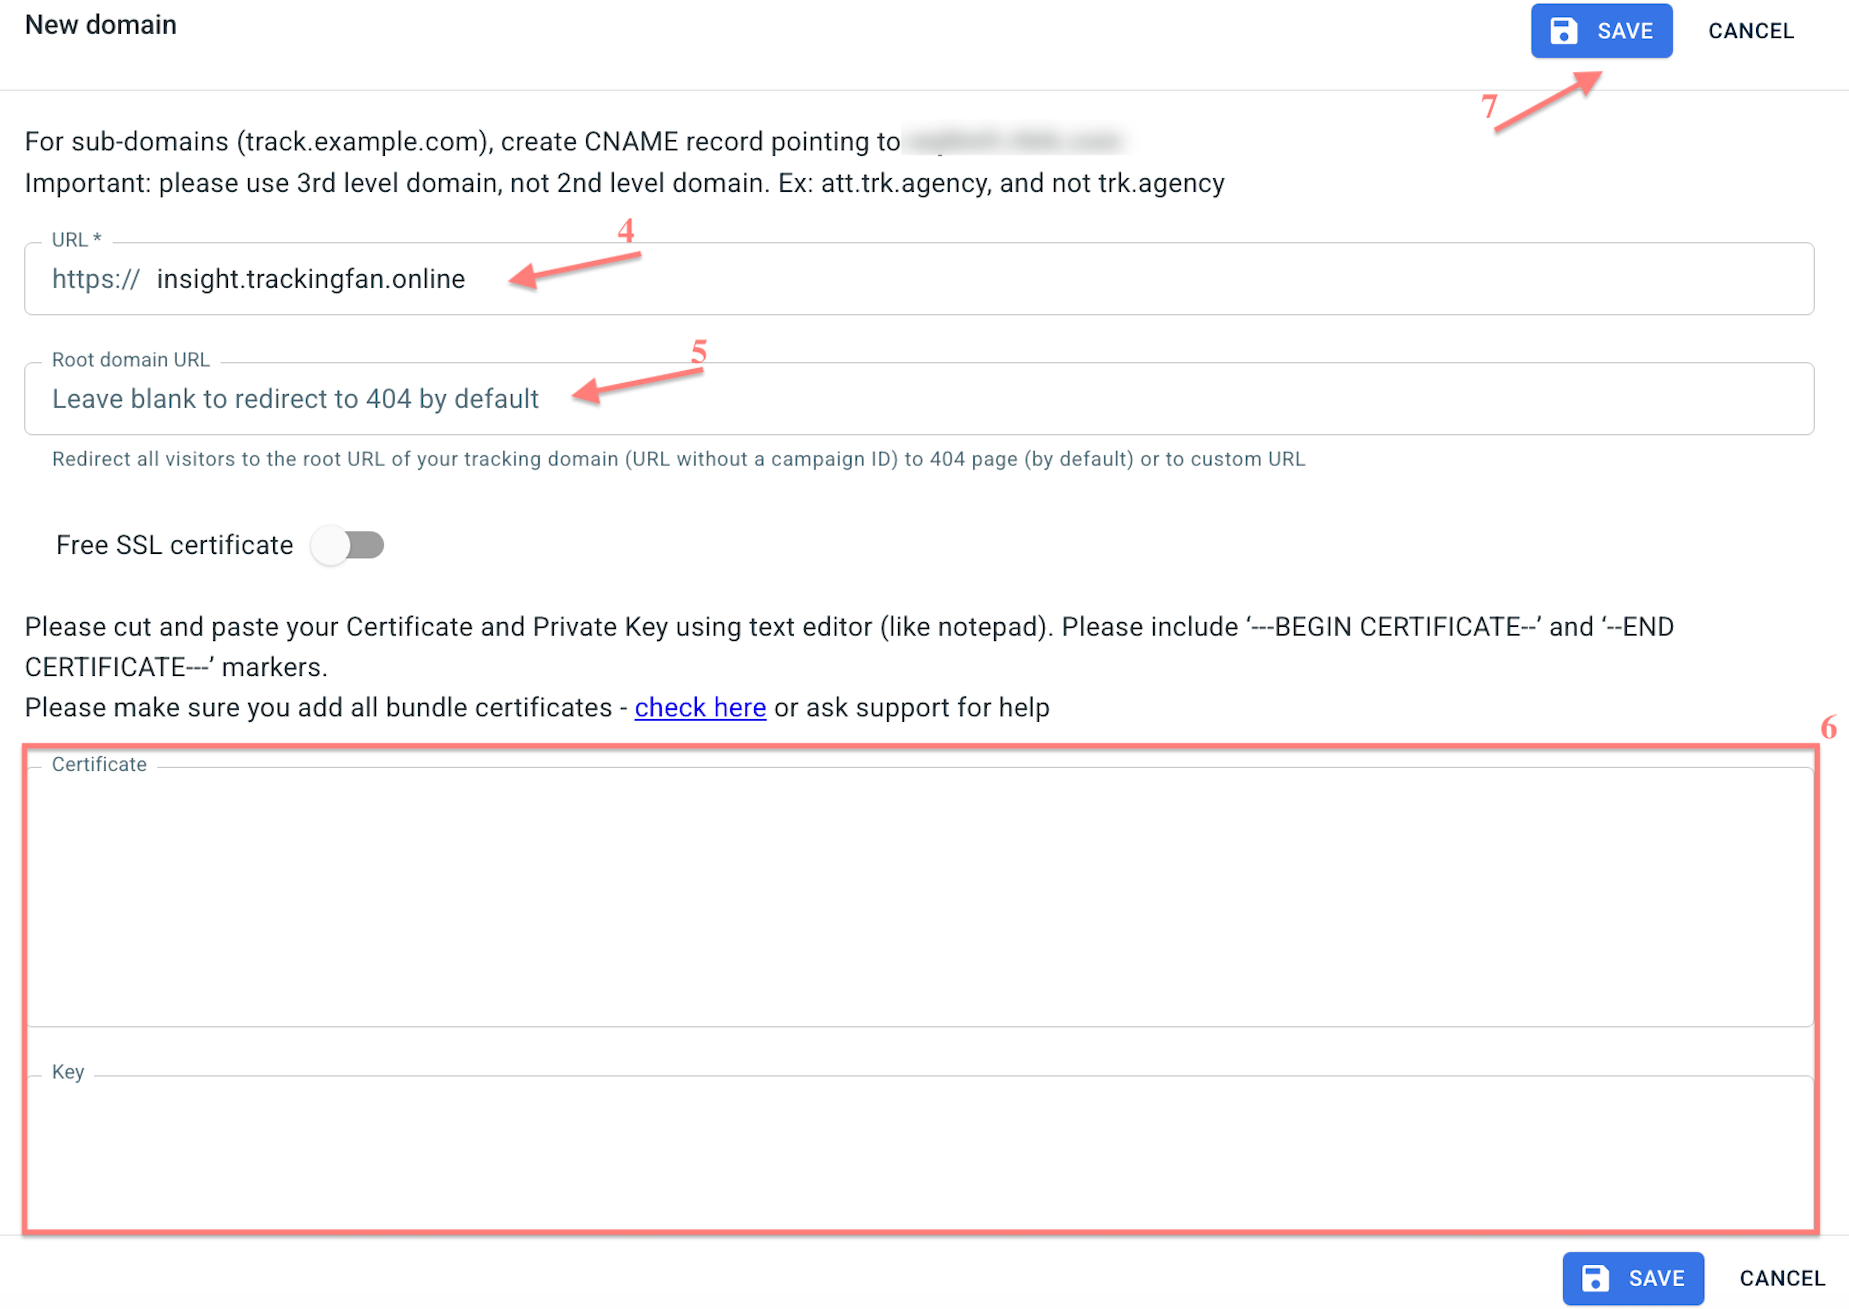
Fields explained
- URL: the word you entered in the Name field, followed by the domain you purchased in your registrar
2. Name of the domain you have purchased in your registrar and for which you added the CNAME (in our example it’s trackingfan.online):
- Root domain URL: the address visitors will be sent to if they enter the domain directly (optional — can be left blank)
- Certificate and Key: paste the Origin Certificate and Private Key generated in Cloudflare (step 3.2).
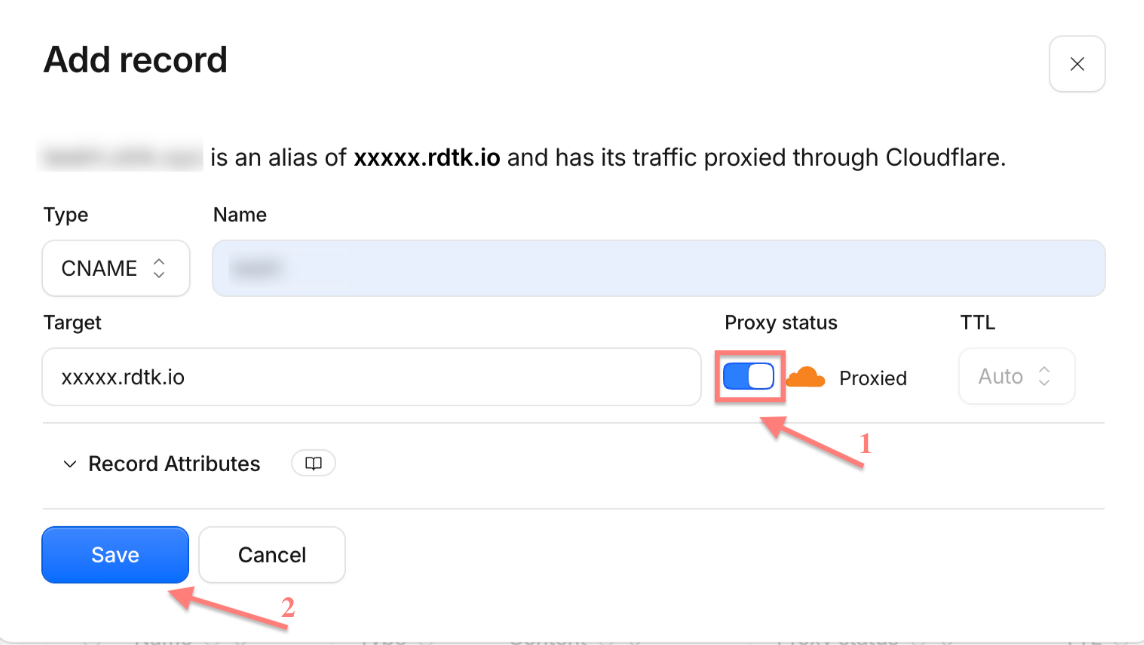
4. Enable Proxy in Cloudflare
Go to Cloudflare → select the CNAME that you created → click edit → set Proxy status to Proxied (orange cloud) → Save:
How to proxy a domain managed by another DNS provider
If your domain’s DNS is currently managed by another provider, you can move DNS management to Cloudflare and then use Cloudflare proxy for your custom tracking domain.
Your domain remains registered with your current registrar. Only DNS management is moved to Cloudflare.
1. Add your domain to Cloudflare.
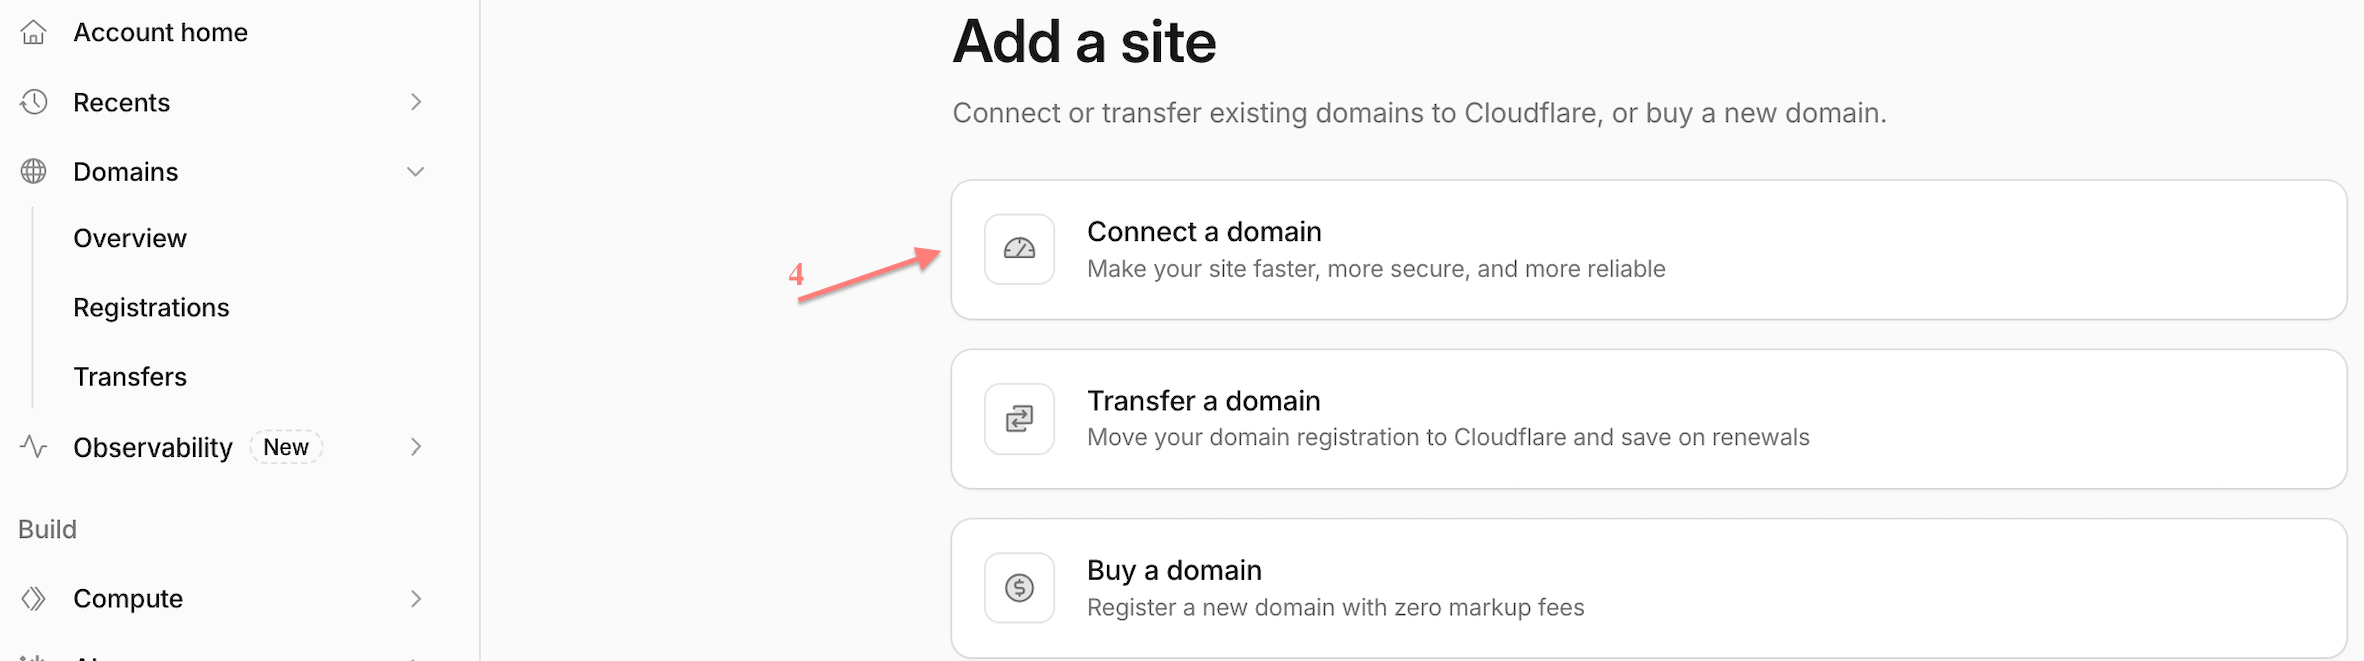
1.1 Cloudflare Dashboard → Domains → Overview → Add domain → Connect a domain → enter your root domain → Continue:

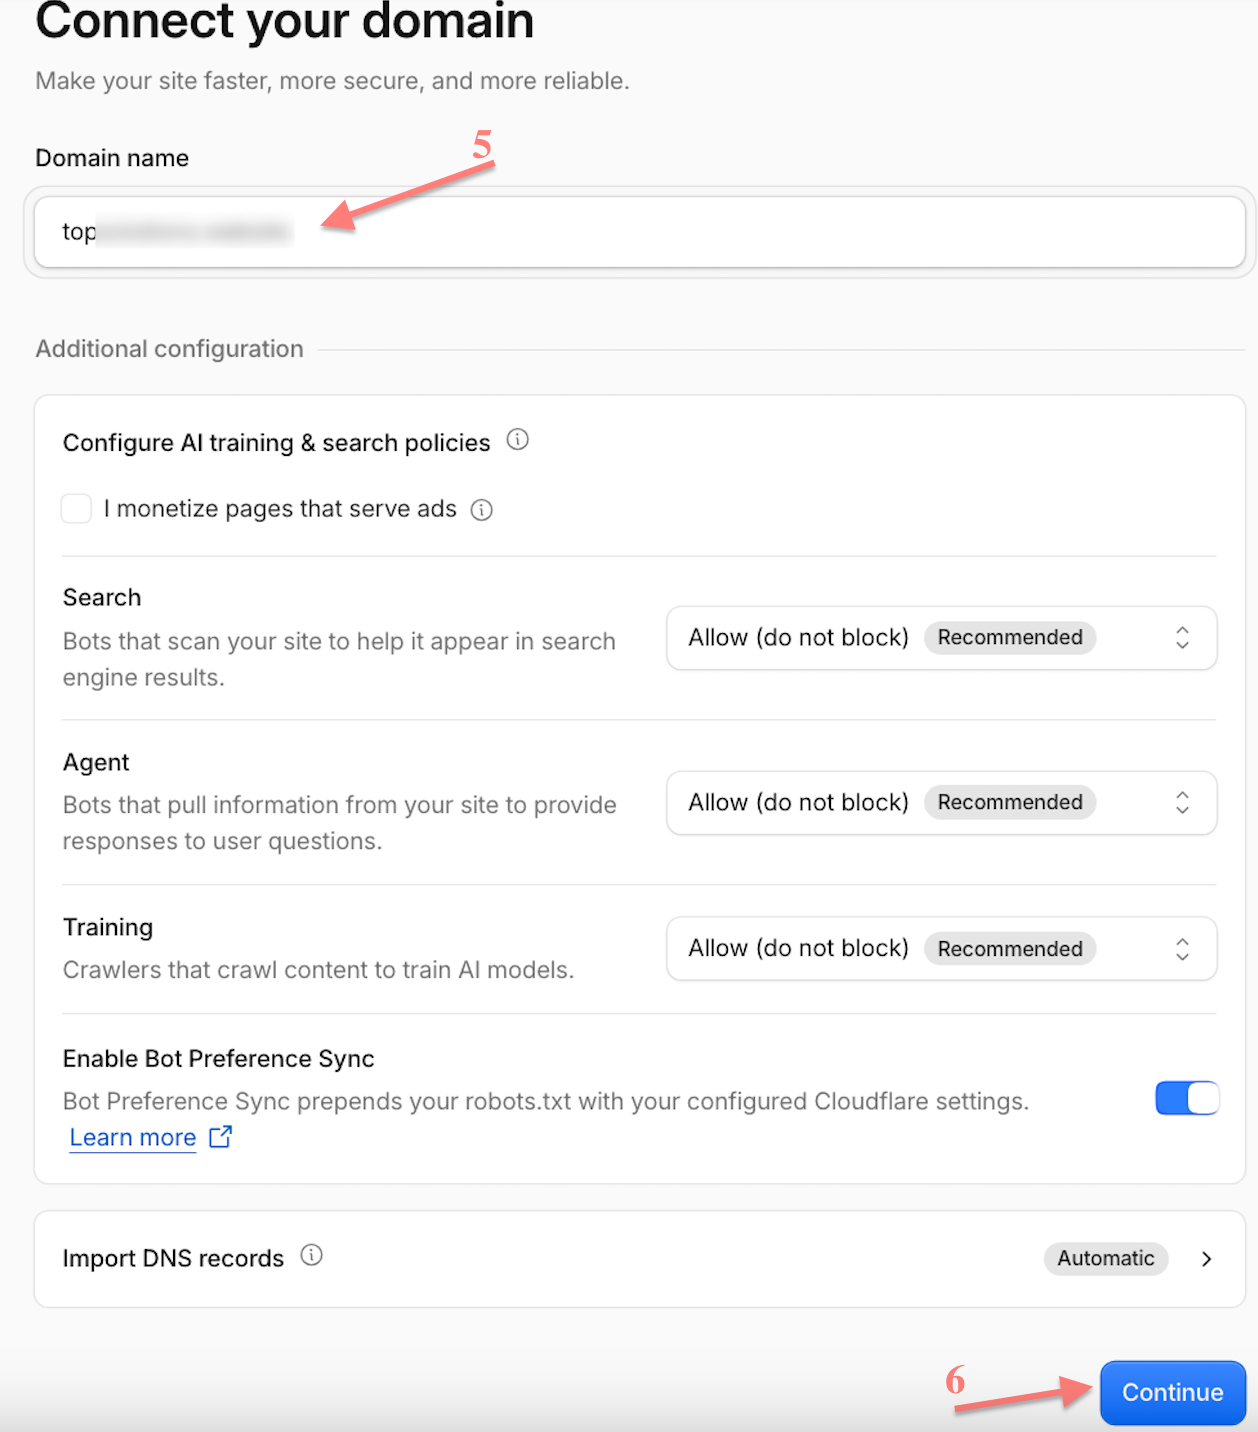
1.2 Select the plan → Continue to activation.
2. Replace the nameservers at your registrar.
2.1 Cloudflare shows two nameservers assigned to your domain → copy both of them:
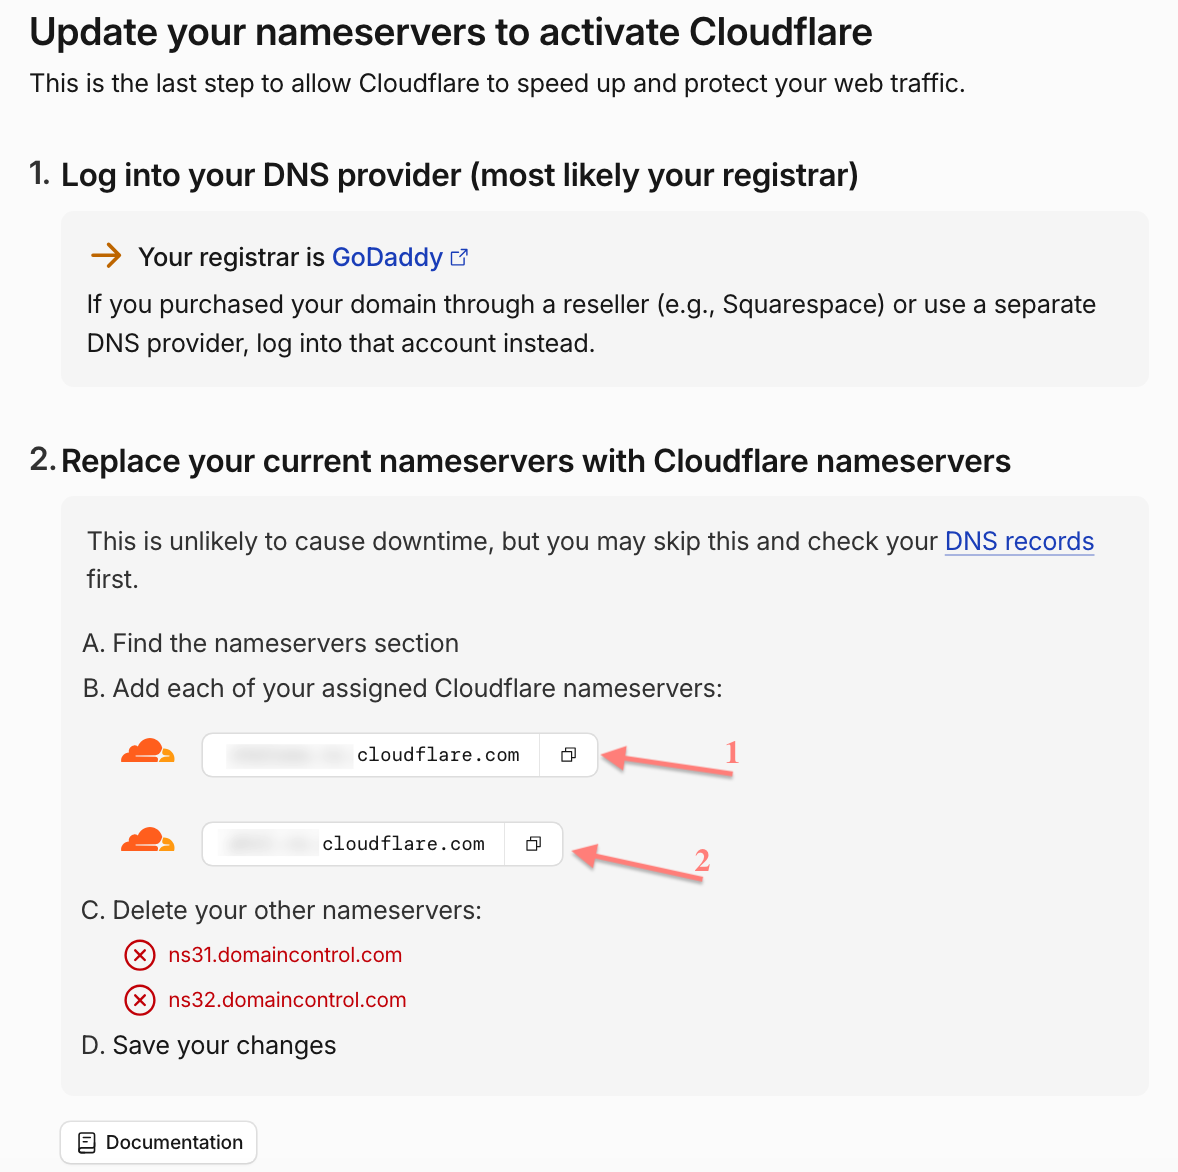
2.2 Domain → DNS → Nameservers → Change Nameservers → select I’ll use my own nameservers and paste the two copied in Cloudflare nameservers (step 2.1) → Save:
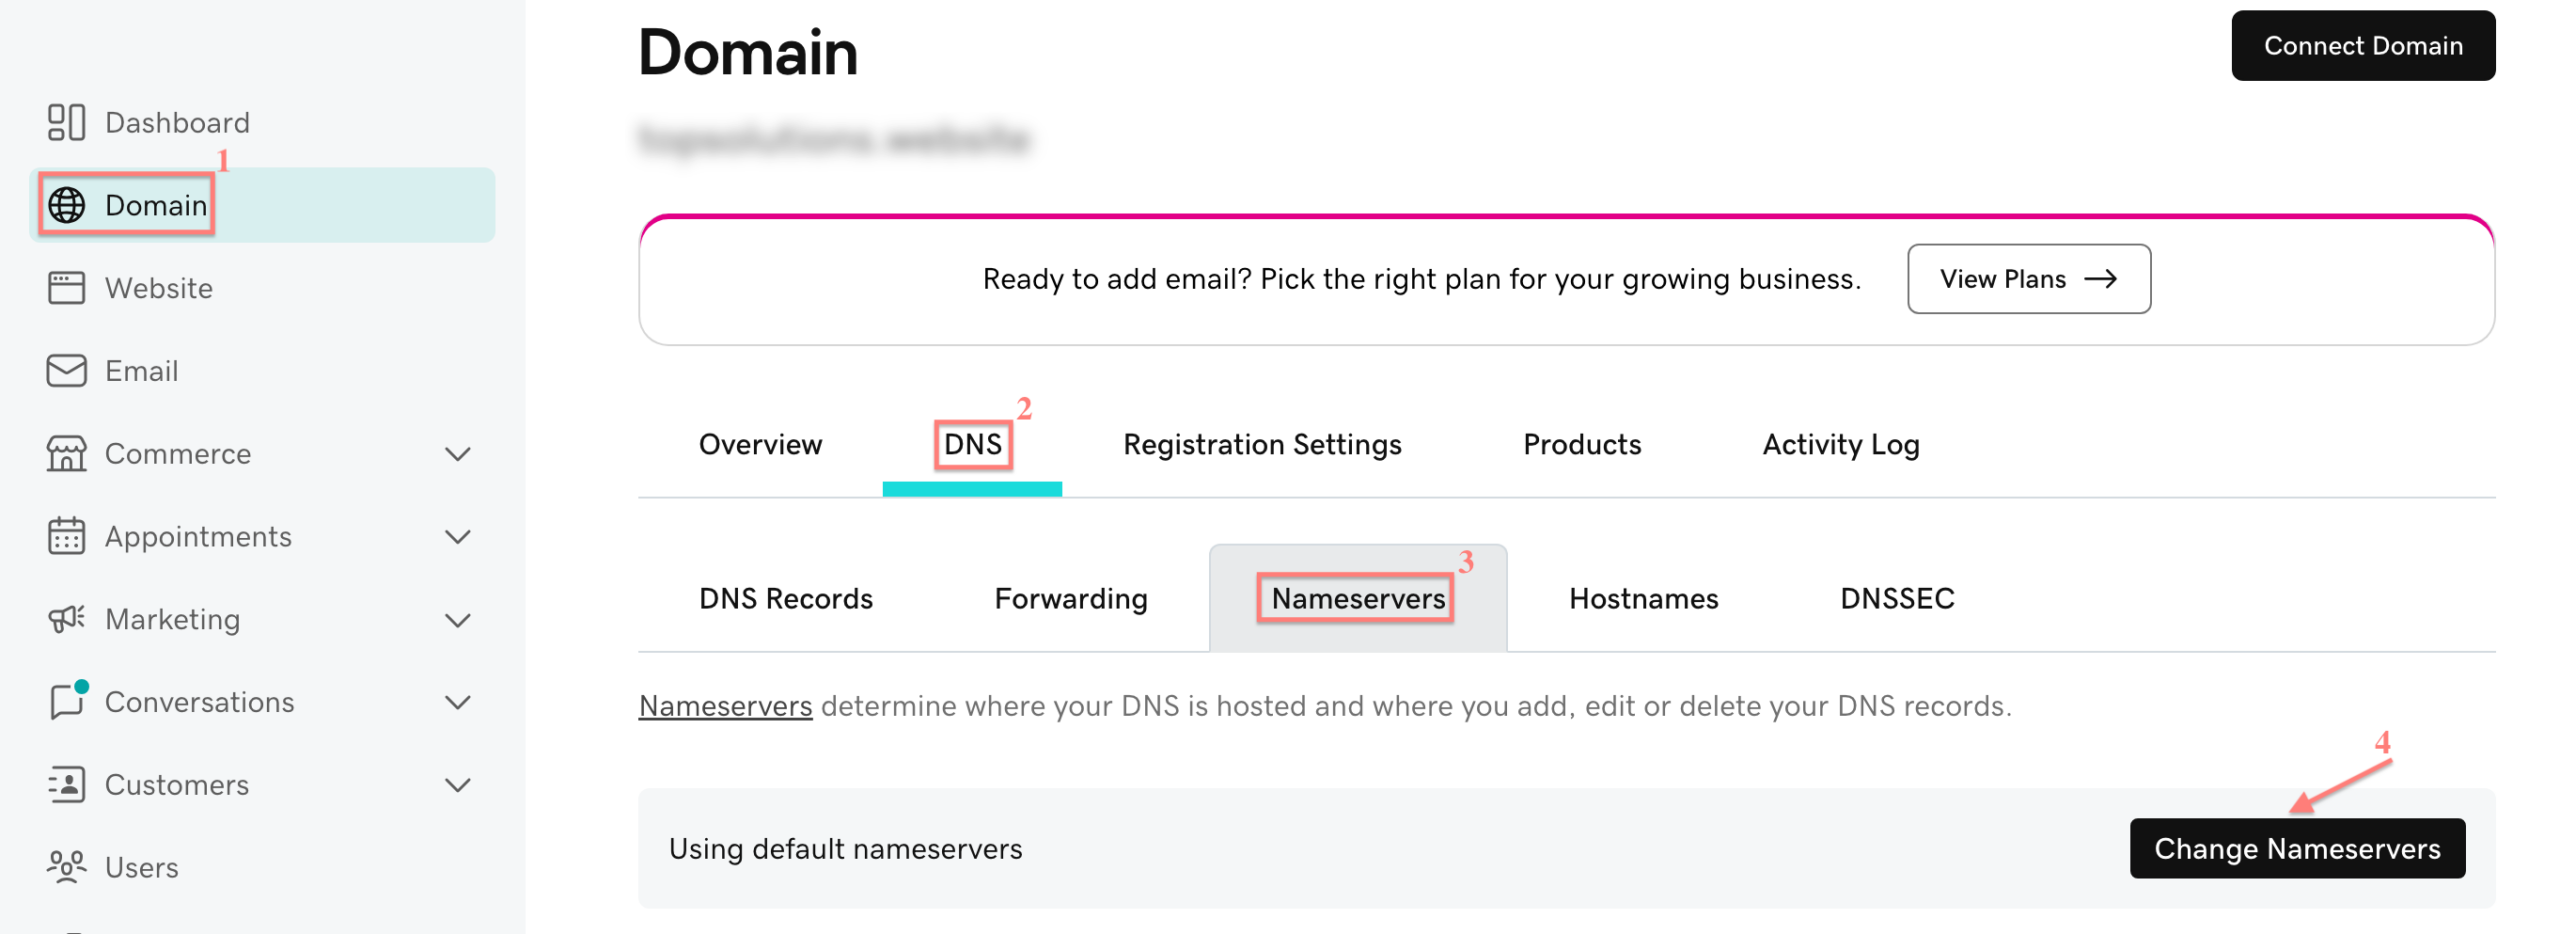
2.2 Domain List → Manage → Nameservers → Custom DNS → paste the Cloudflare nameservers copied in step 2.1→ click the checkmark to save.
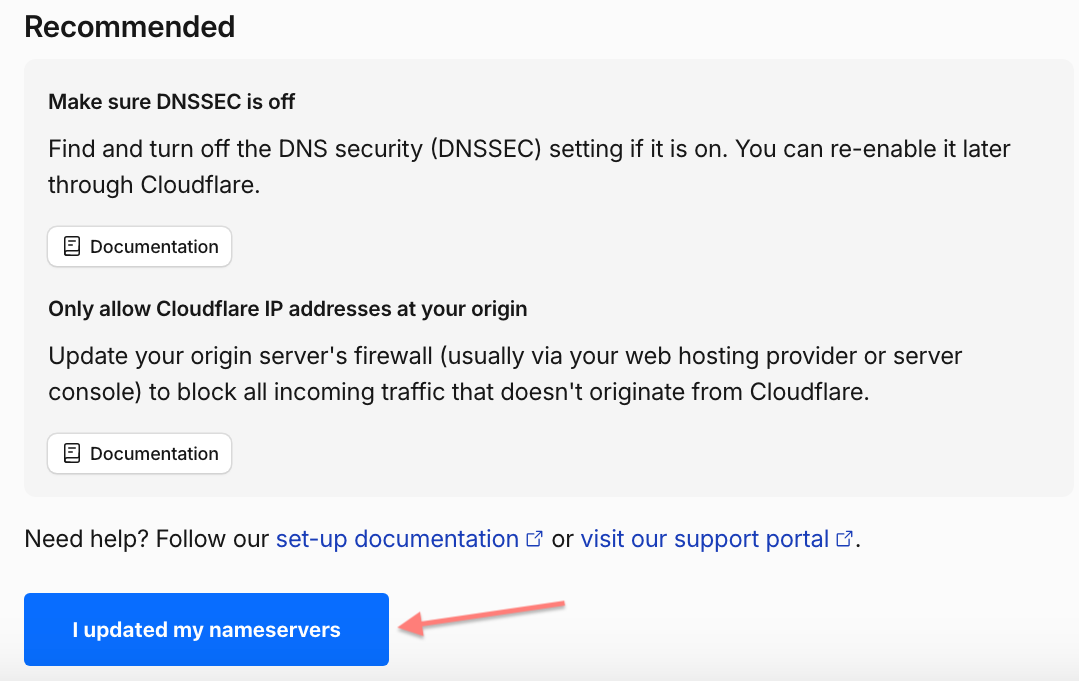
3. Confirm the activation in Cloudflare.
In Cloudflare, scroll down to the Recommended section → click I updated my nameservers:
4. Set up the custom tracking domain
Once the domain status in Cloudflare is Active, add a CNAME record in Cloudflare.
4.1 Cloudflare Dashboard → select your domain → DNS → Records → Add record:
4.2 Fill in the mandatory fields → Save:
Fields explained
- Type: CNAME
- Name: one word, no spaces or special characters — this becomes your subdomain
- Target: your RedTrack dedicated domain (RedTrack → Tools → Domains)
- Proxy status: DNS only (grey cloud)
- TTL: the lowest possible
5. Select the encryption mode in Cloudflare
Cloudflare Dashboard → SSL/TLS → Overview → Configure → choose the encryption mode (Flexible/ Full (strict)):
6. After choosing Flexible mode add the created custom tracking domain to RedTrack.
Tools → Domains → New → fill in the necessary fields → Save:
Fields explained
- URL: the word you entered in the Name field, followed by the domain you purchased in your registrar
2. Name of the domain you have purchased in your registrar and for which you added the CNAME (in our example it’s trackingfan.online):
- Root domain URL: the address visitors will be sent to if they enter the domain directly (optional — can be left blank)
- To issue SSL certificate enable the Free SSL toggle:
We are extra cautious about our service, so RedTrack generates certificates using open-source Let’s Encrypt technology, which claims to be free, automated, and open certificate authority (CA) run for the public’s benefit (it is a service provided by the Internet Security Research Group (ISRG)).
6. After choosing Full (strict) mode, create Origin Certificate and Private Key in Cloudflare.
6.1 SSL/TLS → Origin Server → click Create Certificate:
6.2 Select Generate private key → add the hostnames (if needed) → set 15 years as Certificate Validity → Create → copy the generated Origin Certificate and Private Key:
6.3 Add the custom tracking domain to RedTrack.
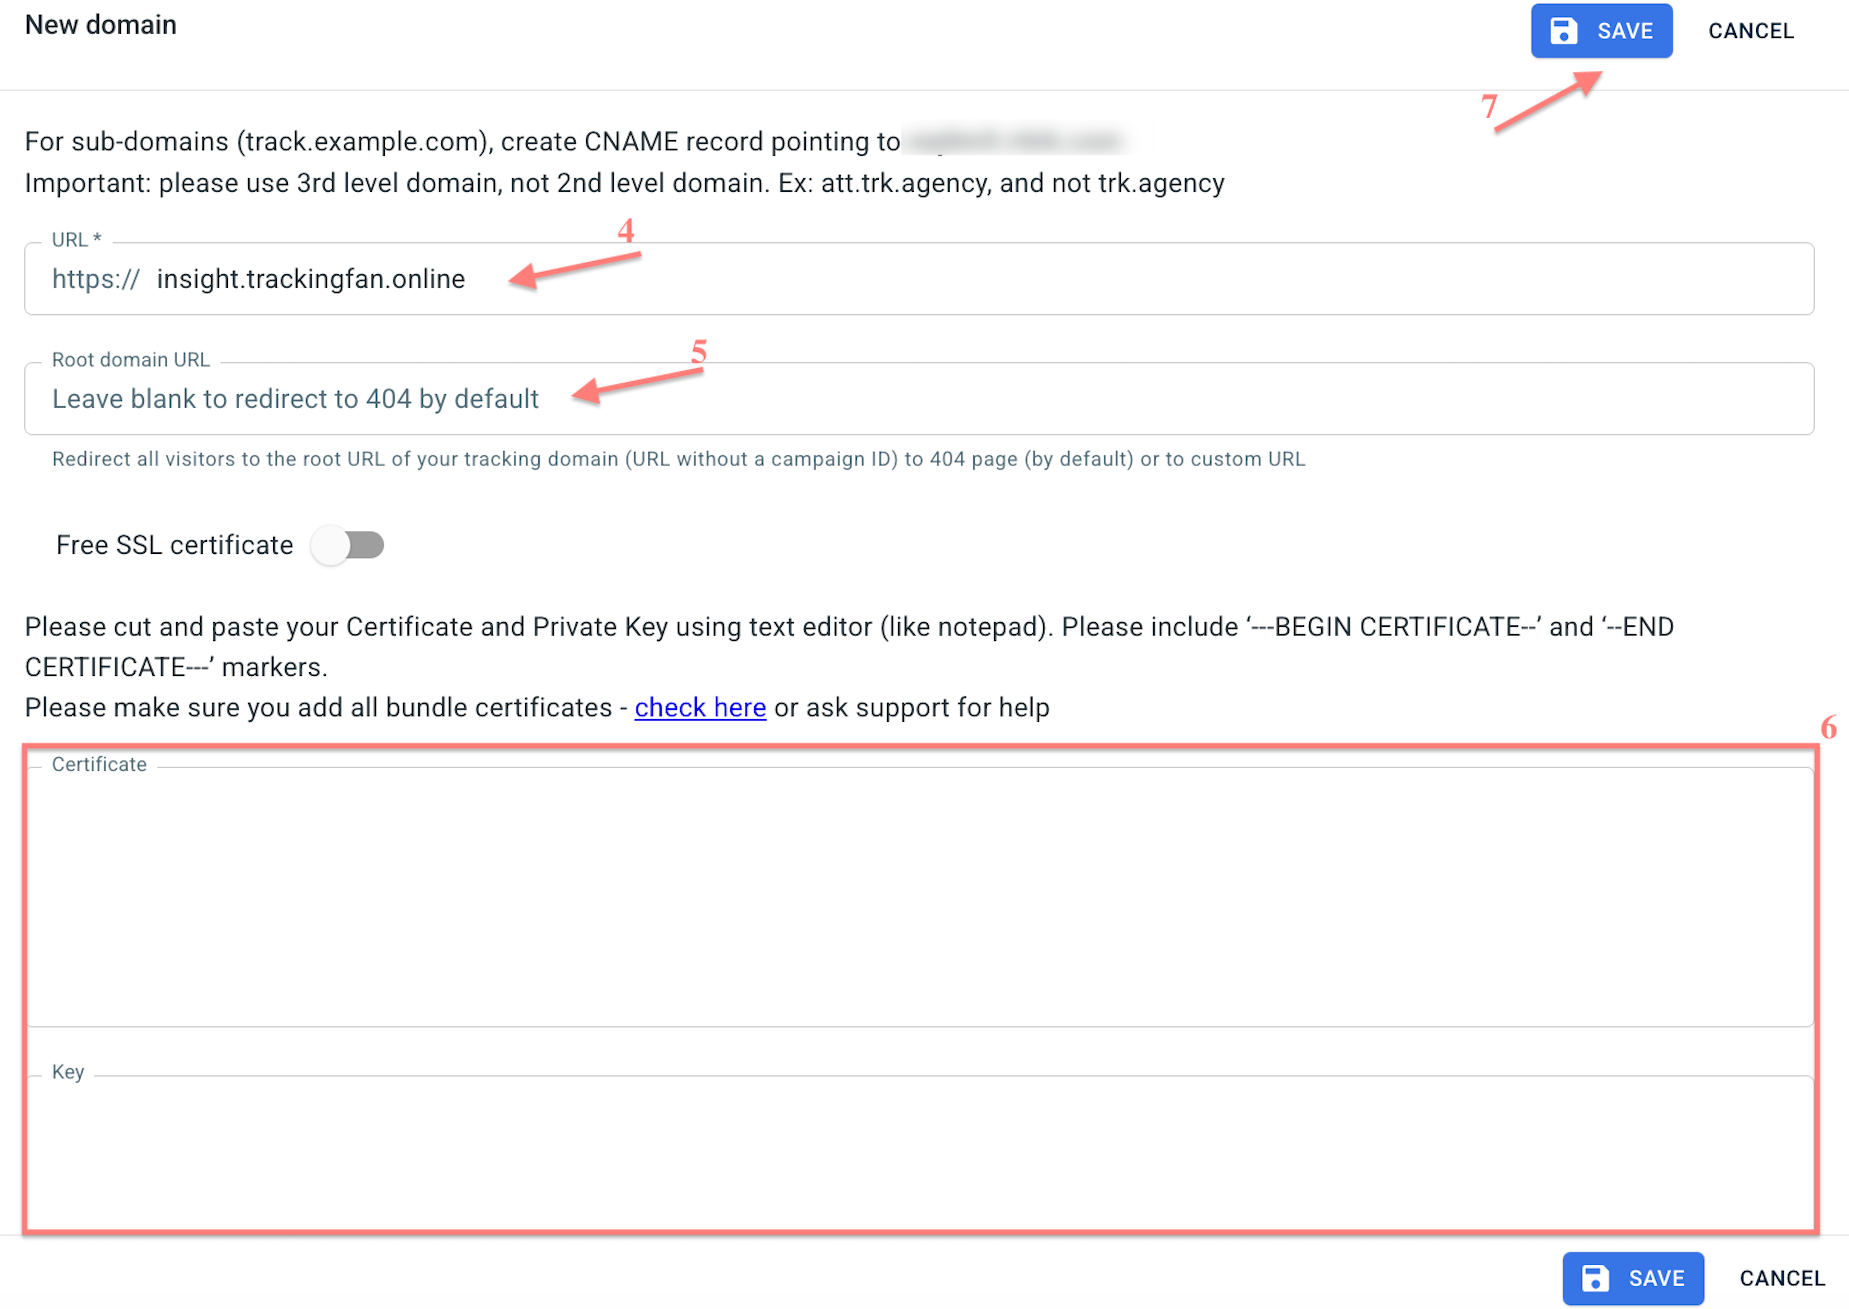
Tools → Domains → New → fill in the necessary fields → Save:
Fields explained
- URL: the word you entered in the Name field, followed by the domain you purchased in your registrar
2. Name of the domain you have purchased in your registrar and for which you added the CNAME (in our example it’s trackingfan.online):
- Root domain URL: the address visitors will be sent to if they enter the domain directly (optional — can be left blank)
- Certificate and Key: paste the Origin Certificate and Private Key generated in Cloudflare (step 3.2).
7. Enable Proxy in Cloudflare
Go to Cloudflare → select the CNAME that you created → click edit → set Proxy status to Proxied (orange cloud) → Save:

