

AppLovin and RedTrack
AppLovin’s leading marketing software enables developers to market, monetize, analyze, and publish their apps.
– Send conversion data to AppLovin via CAPI and attribute it to your custom conversion types.
– Sync cost data automatically.
Integration steps
1. Add a custom tracking domain in RedTrack
1. Add a CNAME record pointing to your RedTrack default domain in your domain registrar.
2. On the left menu, go to Tools → Domains → Create new domain.
3. Add the integrated domain to your RedTrack account and activate the Free SSL option.
2. Add conversion types you want to track with RedTrack
In your RT account go to Tools → Conversion tracking → Conversion type → add the events you want to track → Save.
The names will remain the same and be sent to the traffic channel exactly as you added them in RedTrack.
3. Add the offer/store tracking URL you are promoting
1. This is the target destination link where you plan to run the traffic: it can be an affiliate offer, a direct link to your website, or the shop.
1. Add the offer source: Offer sources → New from template/New from scratch → find the affiliate network you work with/add your custom name → Save.
2. Add the offer link: Offers → New → choose the offer source from the list, add the offer URL → save the changes.
For example: &affsub={clickid} where {clickid} is RedTrack parameter
More info on the offer source and offer in RT can be found here.
1. Go to Stores → New → Add your store (it is the name of your shop).
2. Go to Store tracking URLs → New → Add your store URL (this is your e-com shop).
3. Follow the suggested steps to generate the scripts. You will need it later for your e-com platform.
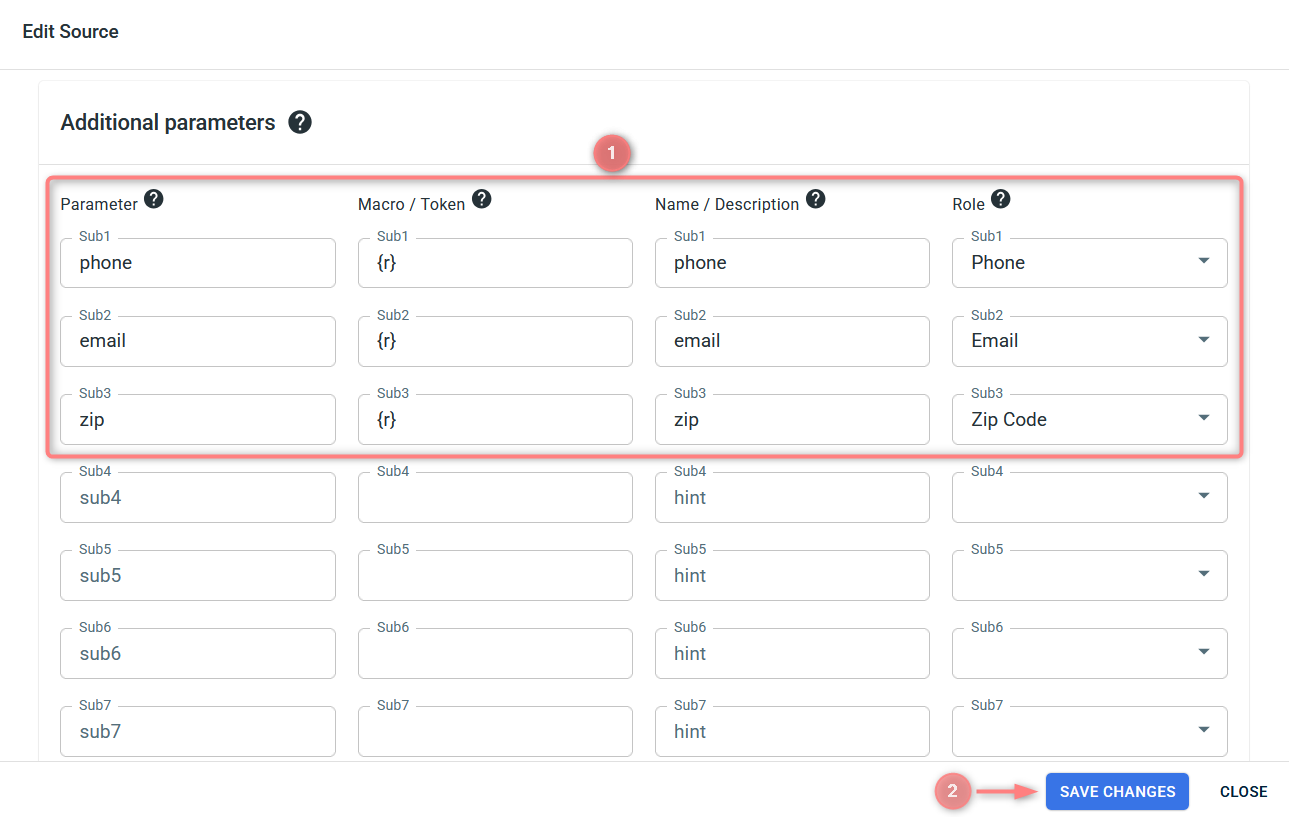
2. For better conversion attribution in the added Offer source/ Store template, go to Additional parameters → assign the roles:
- Phone
- Zip
- Country
Here you can find the general principle of the PII data enrichment process in RT.
4. Add the AppLovin traffic channel to RedTrack
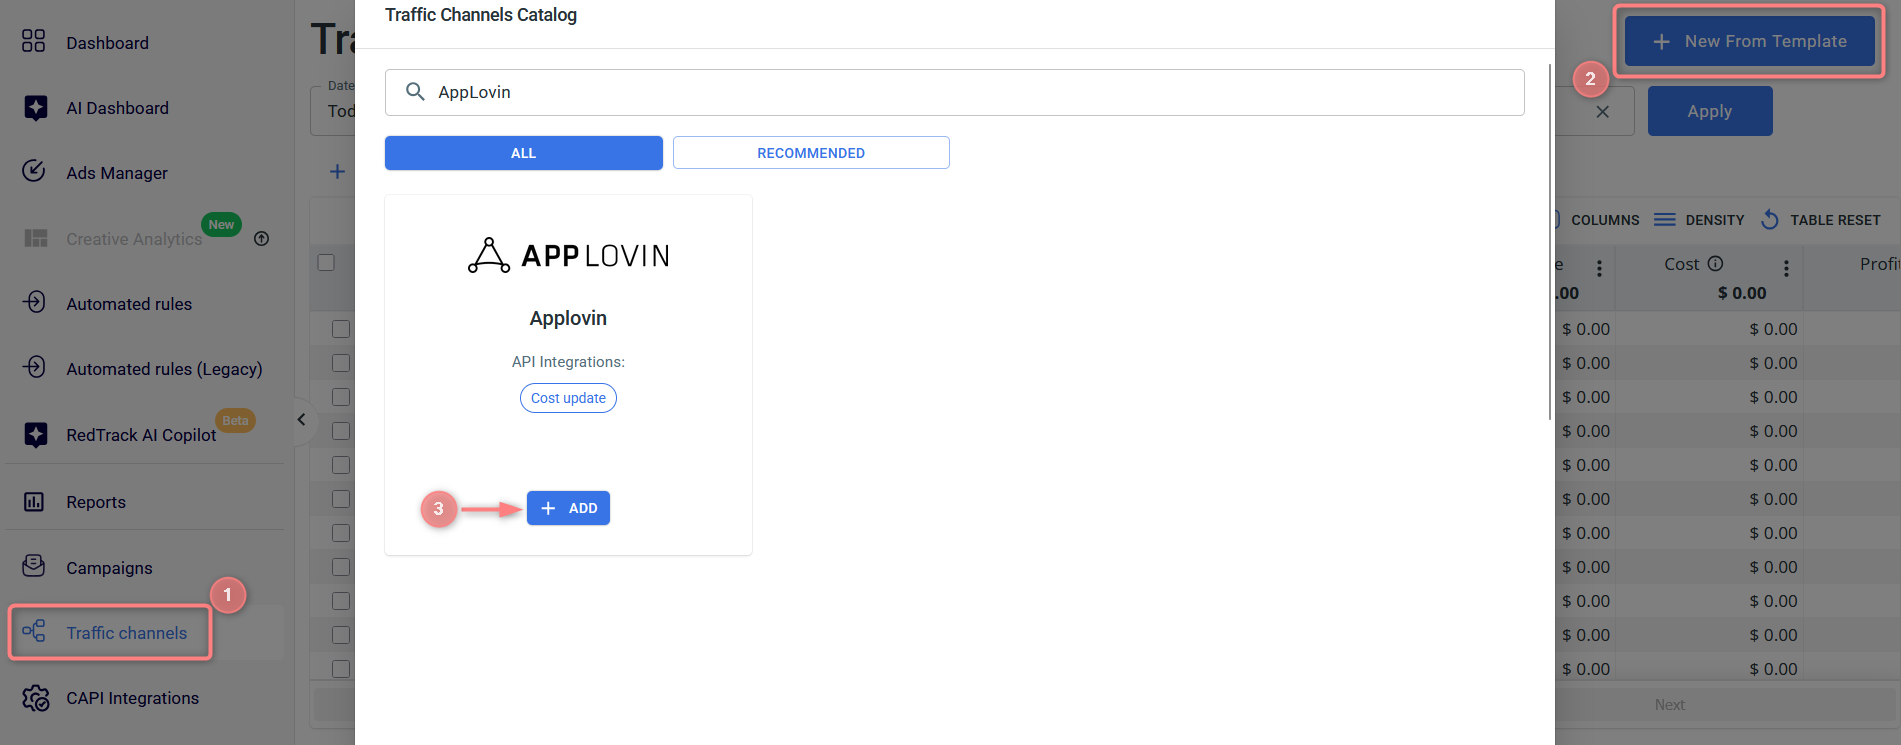
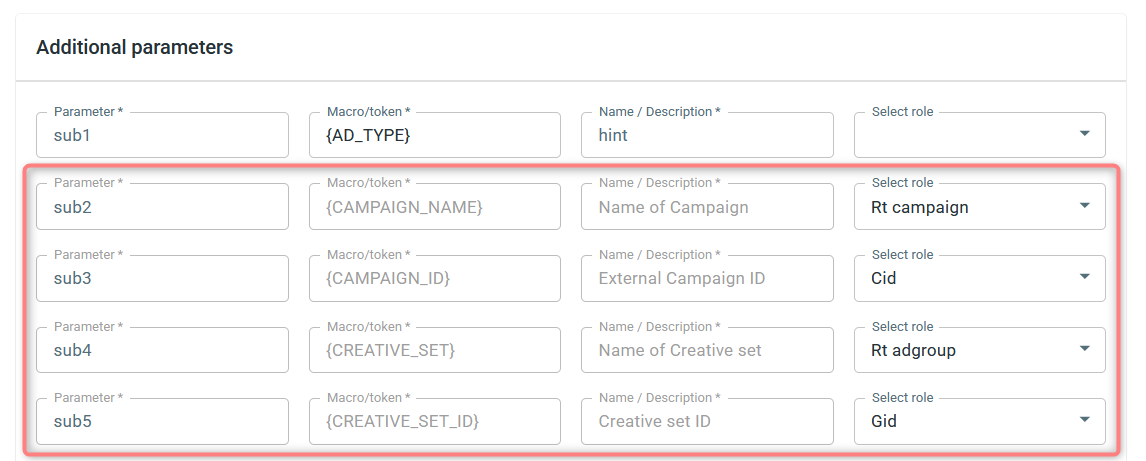
1. Traffic channels → New from template → AppLovin → Add → Save the template:

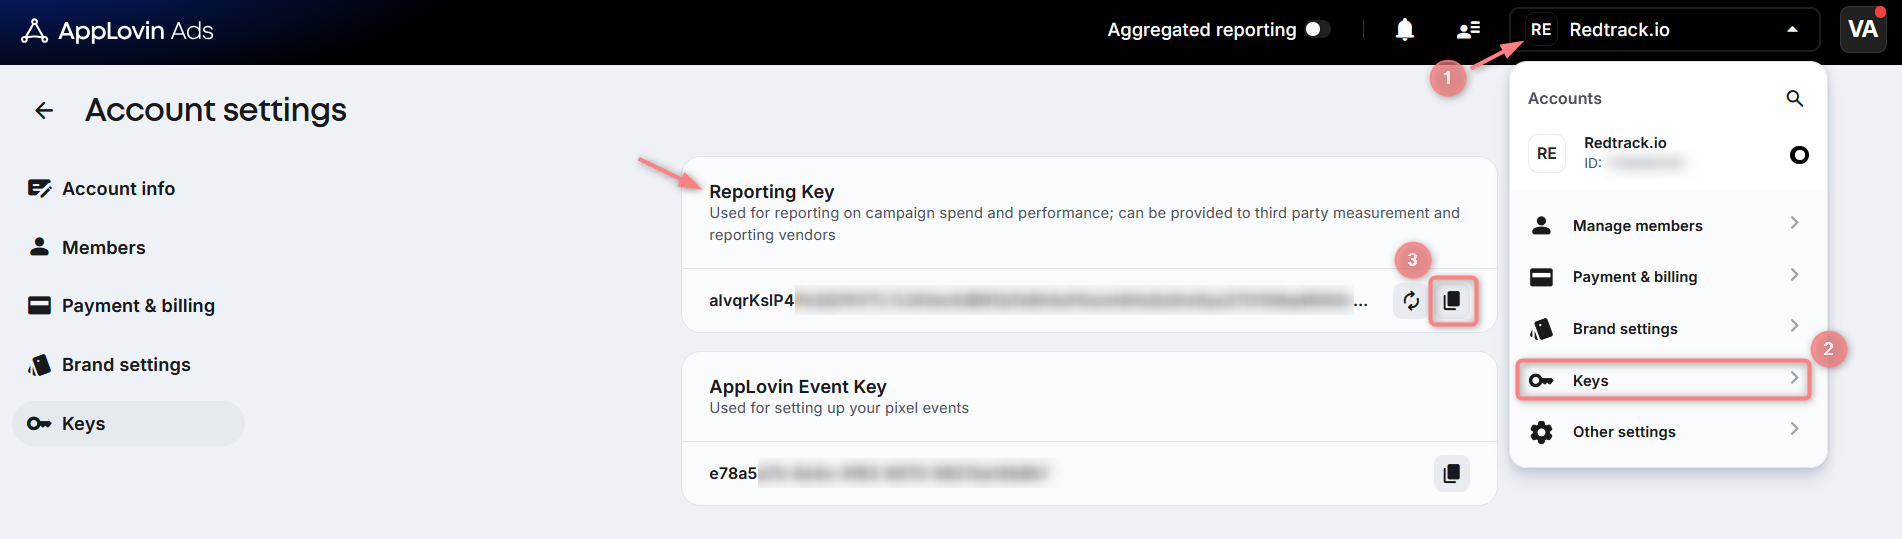
2. In your AppLovin account, click on your account name in the top-right corner → select Keys → find the Reporting Key section → Copy your Report key:
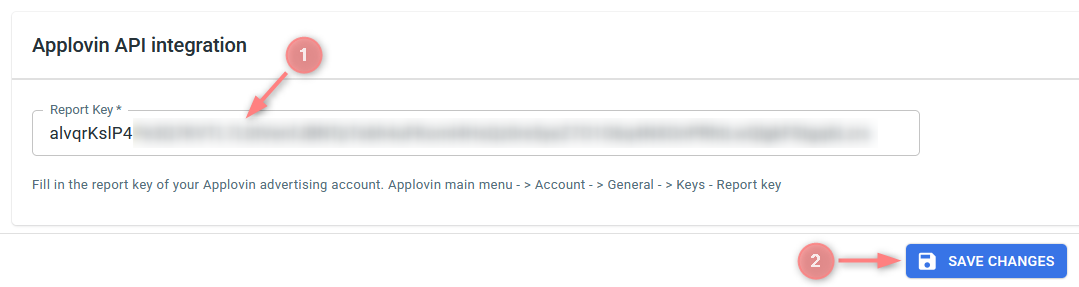
3. Add the copied AppLovin key to the Report Key field → Save changes:
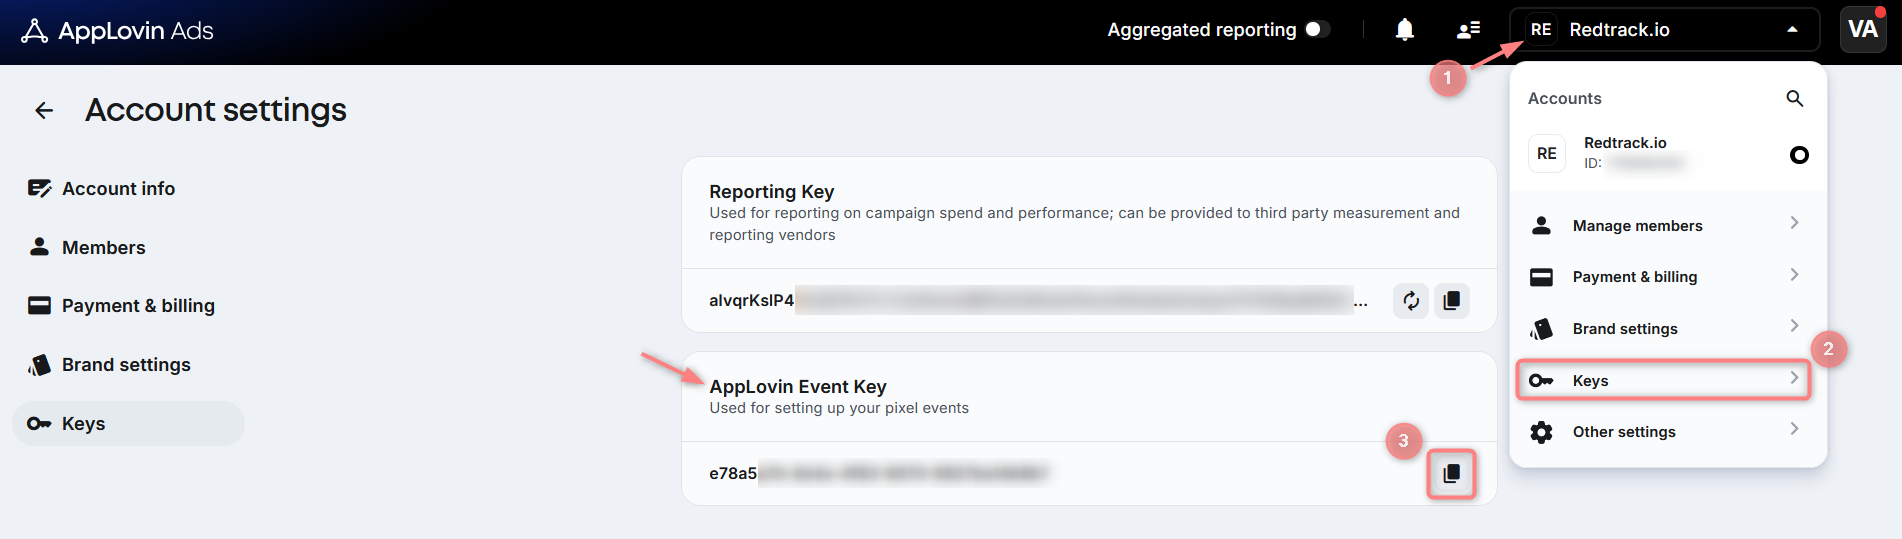
5. Get Pixel ID from AppLovin Ads
In your AppLovin account, click on your account name in the top-right corner → select Keys → find the AppLovin Event Key section → Copy your Pixel ID (Event Key):
6. Add AppLovin’s Pixel ID to RedTrack
In your RedTrack account, you should:
- Add the copied Pixel ID to CAPI Integrations.
- Assign the added pixel details to your offer/store.
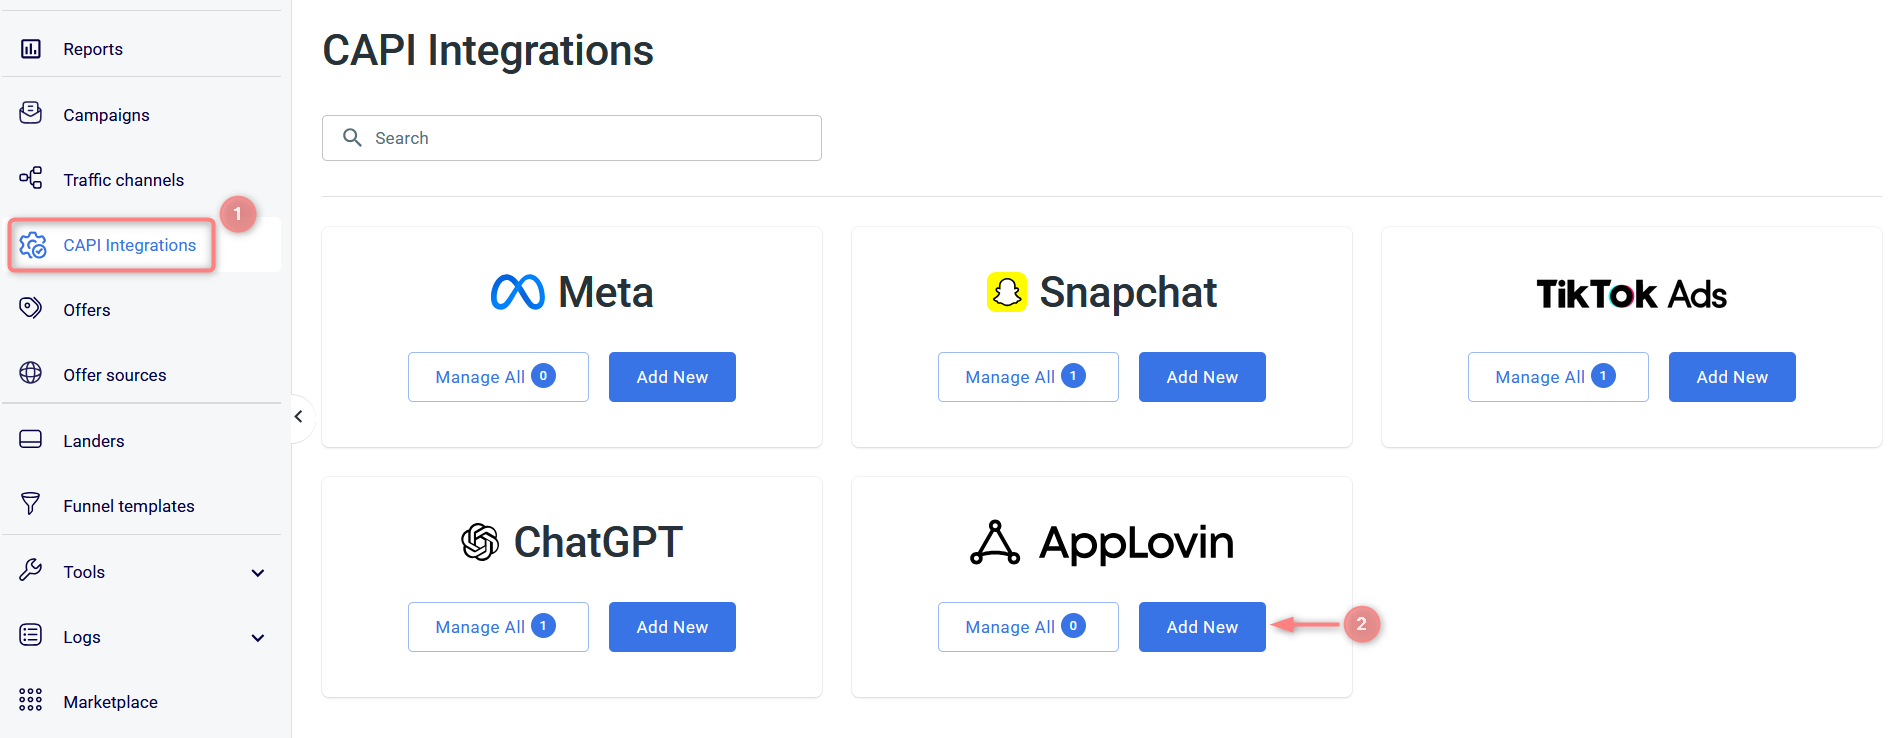
1. RedTrack → CAPI Integrations → AppLovin → Add New:
2. Fill in the mandatory fields → match RT conversion event types with the ones in AppLovin → Save:
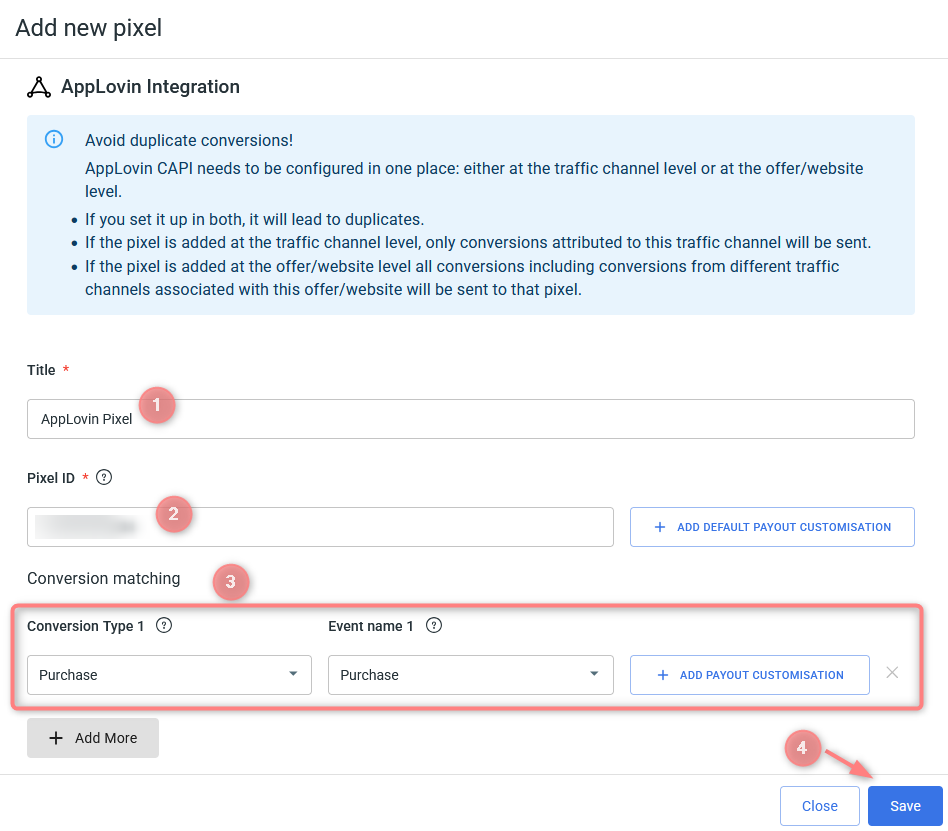
Fields explained:
Give your AppLovin pixel a name to distinguish it from the other added pixels in the list.
Here goes your Pixel ID copied from your AppLovin account (step 5).
In this section, you will map your RedTrack conversion events to the corresponding AppLovin’s events. This tells RedTrack which conversions to send to AppLovin and ensures your tracking data is correctly reflected in both platforms.
To set up conversion matching, act as follows:
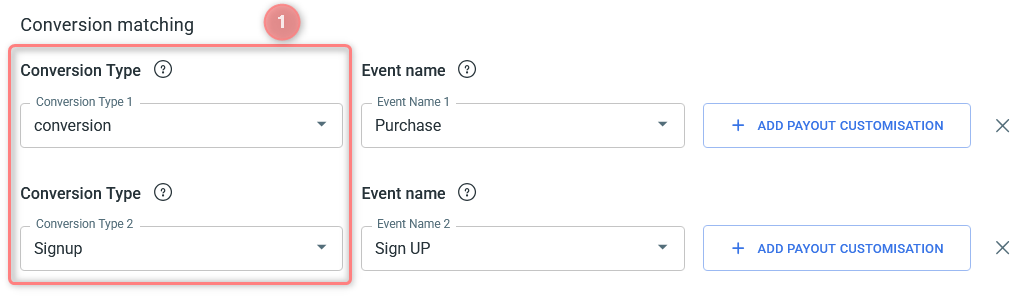
1. Under the Conversion Type column, select the RedTrack event you want to send to AppLovin. The list shows the conversion types you’ve added to RedTrack within step 2.
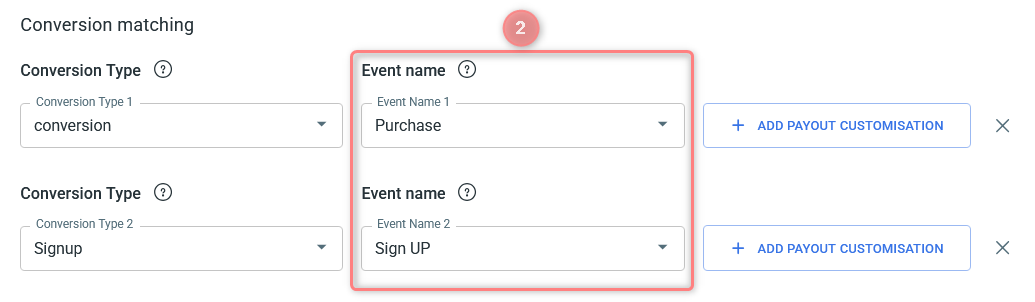
2. Under the Event name column, select the corresponding AppLovin event to map it to.
3. Optionally, you can set up Payout customisation for the matched events.
3.1 Payout customisation → Payout type & Value
Why use payout customisation
Payout customisation for the matched Conversion Type & Event Name controls the financial data associated with this conversion event. You can define a concrete payout type and value that RedTrack will associate with that conversion event when reporting to AppLovin. This is useful when you want to report a different value than the one originally recorded.
How to set up payout customisation
Press Add payout customisation → select the Payout type → define the payout value for the matched event:
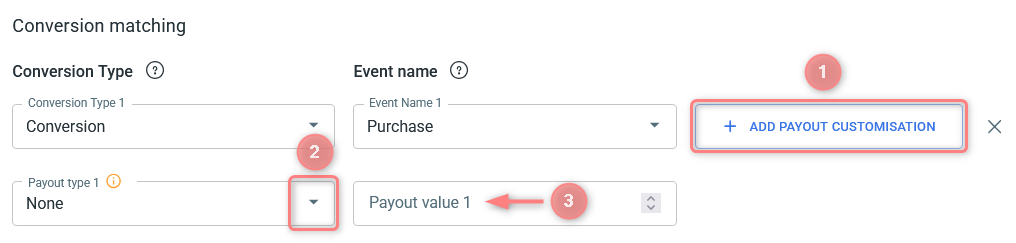
– None: RedTrack will send the full revenue amount associated with the conversion event.
– Numeric: RedTrack will send this fixed amount as the revenue.
– Percentage: RedTrack will calculate and send the specified percentage of the revenue.
Examples
What’s given:
You receive 3 conversions with different payouts:
- Conversion 1 → $20
- Conversion 2 → $10
- Conversion 3 → $30
Payout setup example 1:
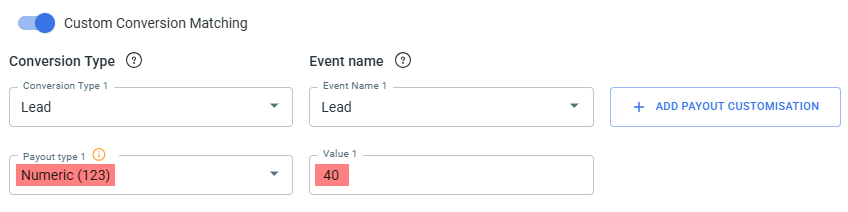
What it means:
You want every conversion sent to AppLovin with a fixed payout of 40, regardless of its actual payout. RedTrack ignores the original payout and replaces it with 40 for reporting.
Outcome for payout setup example 1:
- Conversion with $20 → sent as 40
- Conversion with $10 → sent as 40
- Conversion with $30 → sent as 40
Payout setup example 2:
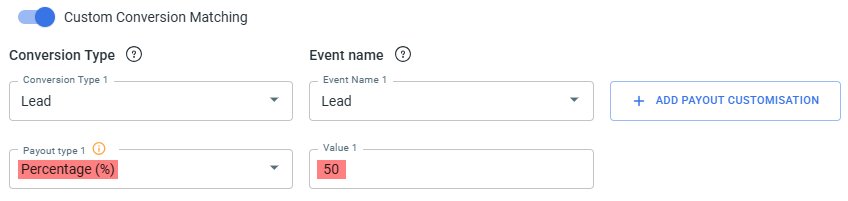
What it means:
You want to send 50% of each conversion’s actual payout to AppLovin. RedTrack calculates half of the real payout and uses that number for reporting.
Outcome for payout setup example 2:
- Conversion with $20 → sent as 10
- Conversion with $10 → sent as 5
- Conversion with $30 → sent as 15
3.2 Payout customisation → Postback when conversion payout values
Why set up a conditional postback for the matched events
This feature provides control over the conversion data shared with your AppLovin pixel by adding a financial filter for each matched conversion type. By defining specific payout or revenue thresholds, you ensure that only high-value or desired conversions are used by AppLovin’s ad optimization algorithms, while all conversions are fully tracked in RedTrack.
How to set up a conditional postback for the matched events
To activate this feature, press Payout customisation next to the matched events → select the Postback when conversion payout measurement and define the value for it:
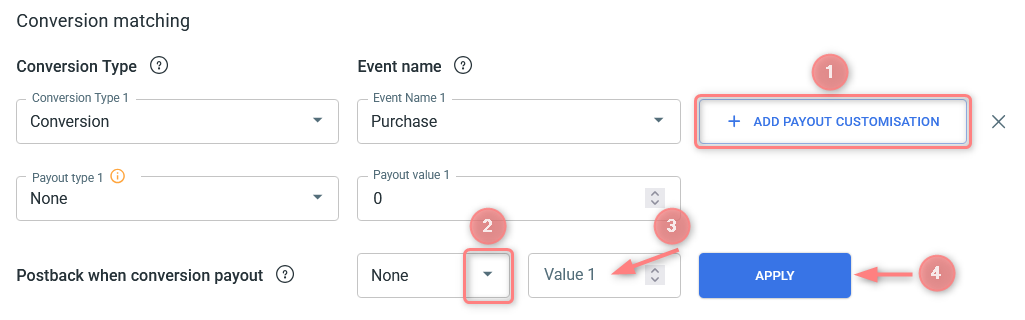
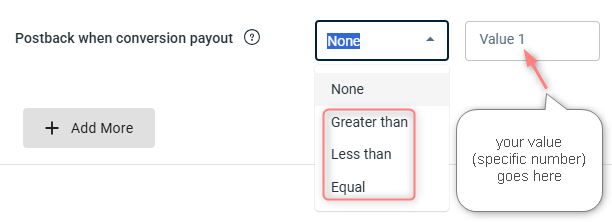
Select the logical relationship that must be true between the conversion’s actual payout and the specific value. The options govern how the system filters the conversion:
* Higher than: The conversion is sent only if its payout is strictly greater than the specific value.
* Less than: The conversion is sent only if its payout is strictly smaller than the specific value.
* Equals: The conversion is sent only if its payout matches the specific value exactly.
The system will check if the conversion meets the selected criteria:
– If it does, the conversion will be sent to the AppLovin pixel.
– If it does not meet the criteria, the conversion will not be sent to AppLovin, though it will still be registered in RedTrack.
Remember to click “Save” to ensure the changes are saved properly.
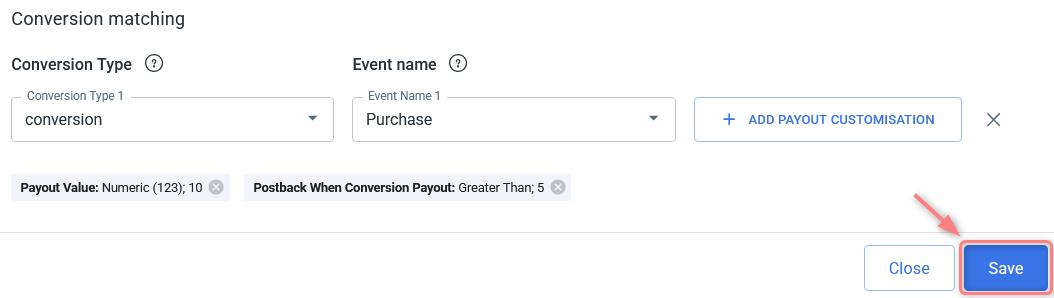
Example
What’s given:
You receive 3 conversions with different payouts:
- Conversion 1 → $20
- Conversion 2 → $10
- Conversion 3 → $30
Setup for Postback when conversion payout:
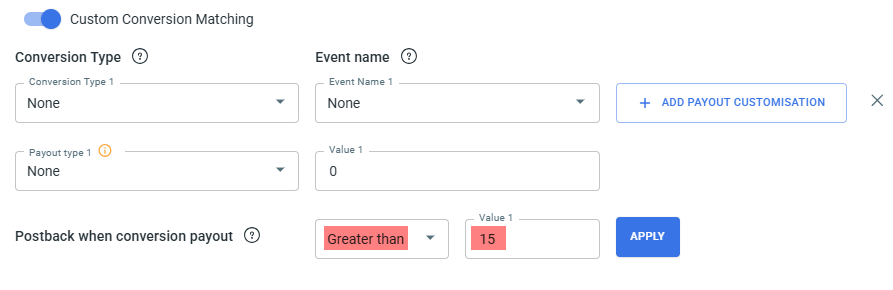
What it means:
Only conversions with a payout above 15 will be sent to AppLovin via CAPI.
Conversions with a payout of 15 or lower will stay in RedTrack but won’t be forwarded.
Outcome in this setup:
- $20 → sent
- $10 → not sent
- $30 → sent
So, only conversions 1 and 3 match the rule and are forwarded to AppLovin.
3. To assign this pixel: View details → select Traffic Channels or Offers/Stores → Add new → select destination → Save:


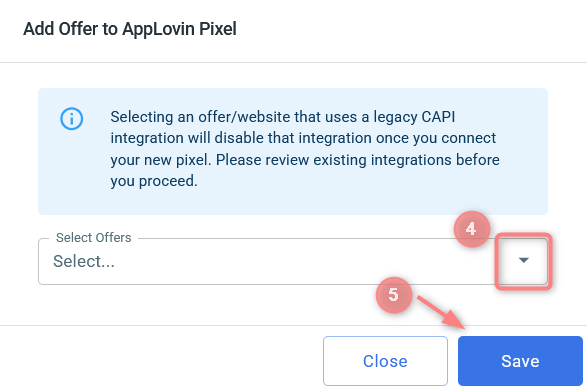
7. Create a campaign/ad tracking in RedTrack
To create a campaign/ad tracking in RT act depending on your account type:
1. Campaigns → Create new campaign → fill in the info in all the sections and tabs:
- General: Give it the name, and choose the traffic channel, tracking domain, and cost-tracking method.
- Funnels: Choose the type of funnel you are using and add the elements from the drop-downs.
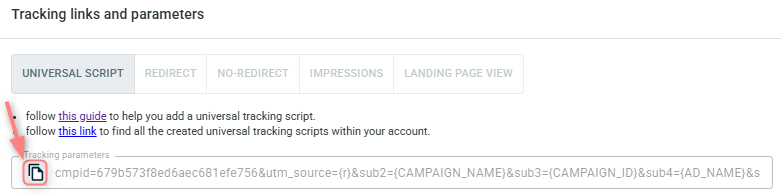
2. Once the Campaign is saved go to Tracking links and parameters → copy the campaign’s tracking parameters to paste them in AppLovin:
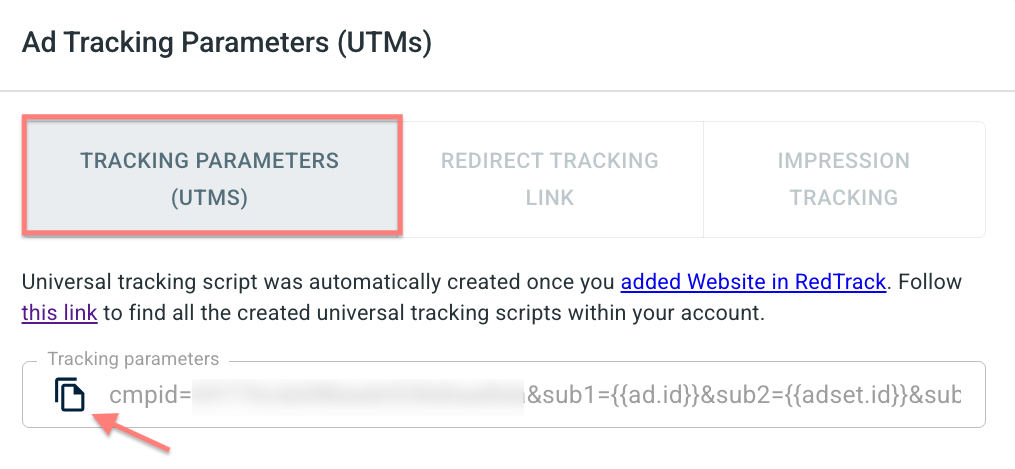
1. Ad Tracking → New Ad Tracking → Fill in the info in all the sections and tabs:
- General: Give it the name, and choose the traffic channel, and cost-tracking method.
- Funnels: Choose the type of funnel you are using and add the elements from the drop-downs.
2. Once the Ad Tracking is saved go to Ad Tracking Parameters (UTMs) → copy the tracking parameters from the Tracking parameters (UTMs) tab:
8. Create a campaign in AppLovin with RT’s tracking URL
Set up the tracking in AppLovin:
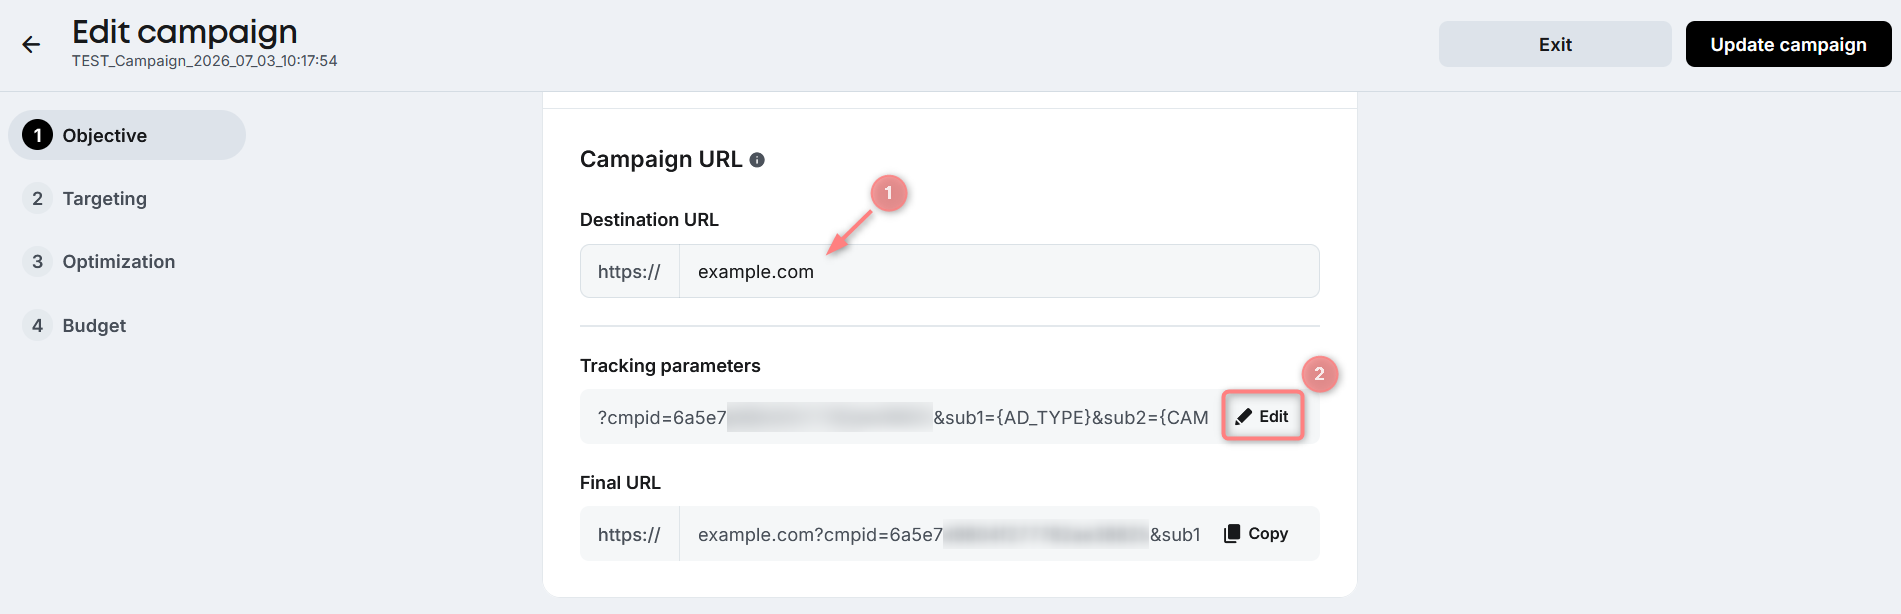
1. In your AppLovin account, open your campaign settings and go to the Campaign URL section → add your landing/website URL in the Destination URL field → go to the Tracking parameters field → click Edit to open the URL Builder:
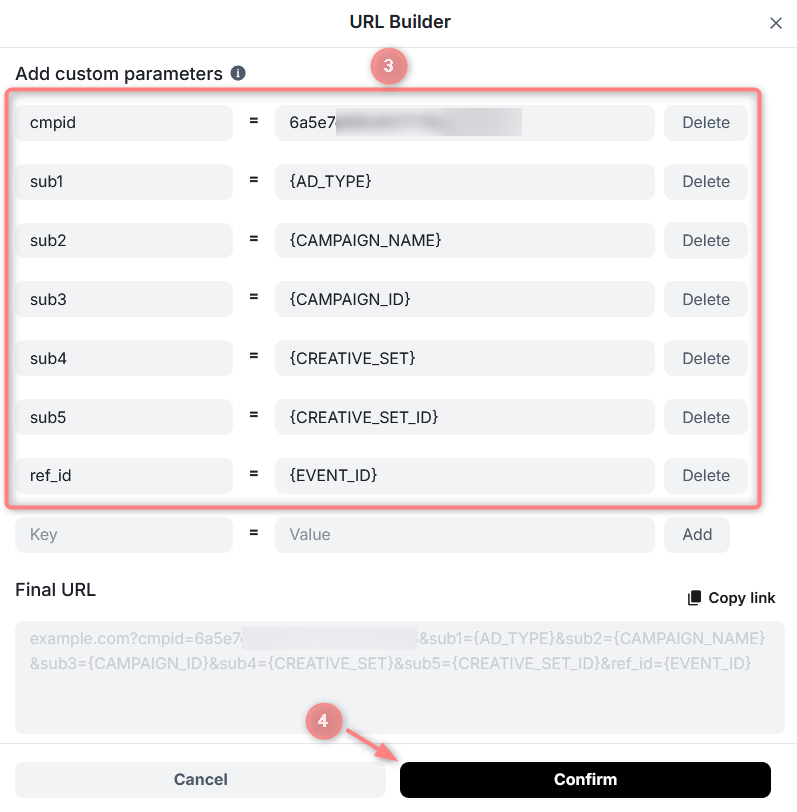
2. In the URL Builder screen → go to the Add custom parameters section → add the tracking parameters copied from your RedTrack campaign (step 7) as key/value pairs → check the Final URL preview → click Confirm:
3. Click Update campaign (or Launch campaign, if you are creating a new one) to save the changes:


