Facebook and RedTrack

Intro
Both Facebook (META) and Instagram have the same ad-managing interface (Facebook Ads Manager).
Our API Facebook integration enables you to:
- Pass all conversion data, including extra conversions, back to Facebook and link it to campaigns for better optimization.
- Automatically pause non-converting creatives and campaigns on Facebook, eliminating manual work.
- Keep cost data updated in real time.
There are limited cases when Facebook allows you to use the redirect link (e.g. RedTrack campaign tracking URL) but we as a service provider do not recommend it and cannot guarantee the safety of your tracking campaigns.
For all of your Facebook campaigns, no-redirect tracking with a custom tracking domain is better to be used.
Parameters sent to Facebook upon conversion creation
The following parameters are sent to Facebook when a conversion is created in RedTrack:
Parameter | Description |
FB click id | Facebook click ID, identifies the Facebook click that led to the conversion. Taken from sub 20 of the traffic channel. |
Browser id | Facebook browser ID, used to identify a user’s browser for Facebook tracking. Taken from sub 19 of the traffic channel. |
External id | External identifier for deduplication and attribution. Pulled from rtclickid. |
Email | Hashed email address taken from the parameter assigned the Email role in the Offer Source. |
Phone | Hashed phone number taken from the parameter assigned the Phone role in the Offer Source. |
FirstName | Hashed first name taken from the parameter assigned the First Name role in the Offer Source. |
LastName | Hashed last name taken from the parameter assigned the Last Name role in the Offer Source. |
Birthday | Hashed birth date taken from the parameter assigned the Birthday role in the Offer Source. |
Gender | Gender value taken from the parameter assigned the Gender role in the Offer Source. |
Zip | Postal code value taken from the parameter assigned the Zip role in the Offer Source. |
IP | IP address of the user at the time of the click, sourced from RedTrack click data. |
UserAgent | Browser user agent string captured during the click. |
City | Hashed city name derived from geolocation based on the click IP. |
CityUnhashed | Plain text city name derived from IP geolocation during the click. |
Country | Hashed country name based on IP geolocation at click time. |
CountryUnhashed | Plain text country name from IP geolocation at click time. |
State USA | Hashed U.S. state name based on click IP geolocation. |
State USAUnhashed | Plain text USA state name based on click IP geolocation. |
Currency | Currency for the transaction taken from click data. |
Event ID | Unique event identifier used for event tracking. Can come from either rtclickid or an assigned role. |
Event Name | Describes the type of conversion event (e.g., Purchase, Lead), based on conversion type. |
Event Time | Timestamp of the conversion event in UTC, based on the conversion’s created_at time. |
Event Source Url | URL of the page where the event occurred, defined in the offer form’s pixel settings. |
ActionSource | Describes the source of the event action (e.g., website, app), set in the offer form’s pixel settings. |
Revenue | Monetary value of the conversion taken from the conversion data. |
Content Category | Hashed value indicating the category of the content or product, based on the assigned Content Category role in the Offer Source. |
Content IDs | Product or content identifiers involved in the event, taken from the Content IDs role in the Offer Source. |
Product Name | Name or title of the product/content involved in the conversion, taken from the Product Name role in the Offer Source. |
Contents | Detailed list or array of products/content involved in the conversion, taken from the Contents role in the Offer Source. |
OrderID | Unique order identifier for the transaction, sourced from either the order ID or rtclickid. |
SubscriptionID | Identifier for a subscription or recurring event, based on rtclickid. |
Integration
1. Add a custom tracking domain
1. Add a CNAME record pointing to your RedTrack default domain in your domain registrar.
2. On the left menu go to Tools → Domains → Create new domain.
3. Add the integrated domain to your RedTrack account → activate the Free SSL toggle.
2. Add the offer/website you are promoting
This is the target destination link where you plan to run the traffic: it can be an affiliate offer, a direct link to your website, or the shop.
1. Add the offer source: New from template/New from scratch → find the affiliate network you work with/add your custom name → Save.
2. Add the offer link: Offers → New → choose the offer source from the list, add the offer URL → save the changes.
For example: &affsub={clickid} where {clickid} is RedTrack parameter
1. Go to Brands → New → Add your brand (it is the name of your shop or your website).
2. On the same page, add the purchase data parameters – Name/Description is what you will see in reports – Roles define their use with CAPI.
3. Go to Websites → New → Add your website URL (this is your e-commerce shop/website link).
4. Follow the suggested steps to generate the scripts. You will need it later for your e-commerce platform.
3. Add Facebook traffic channel
1. Go to Traffic Channels → New from template → find Facebook → Add → Save:


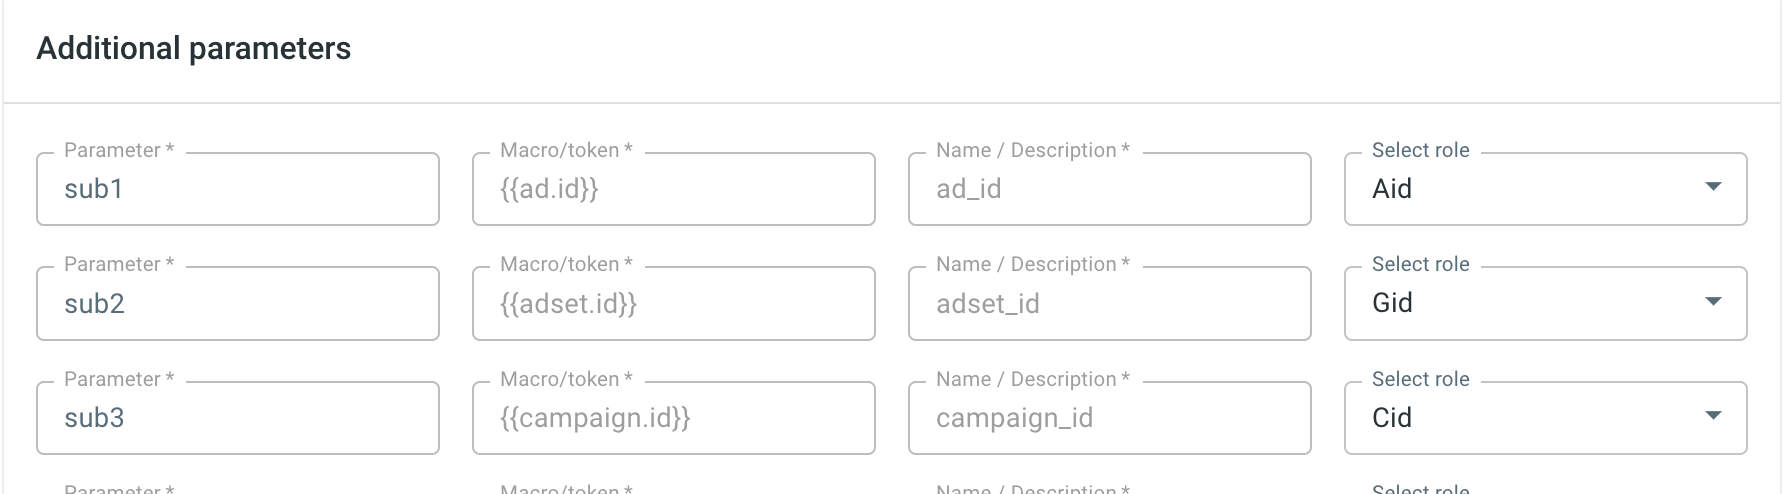
IMPORTANT INFO ABOUT ADDITIONAL PARAMETERS SECTION:
You can modify some Facebook parameters in the opened template. Blocked (greyed) parameters should be used under the same sub-values with the same roles assigned as provided in the initial template.
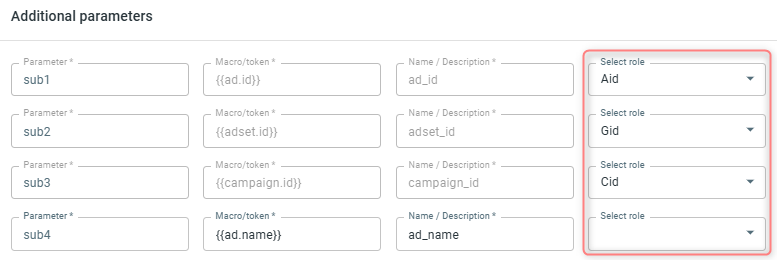
The following parameters and their roles are essential for the API cost integration:
{{ad.id}} should always be with Aid role
{{adset.id}} should always be with Gid role
{{campaign.id}} should always be with Cid role
“fbclid” parameter is required for sending the conversion data back to Facebook. This parameter should always be the last in the line, meaning, that there should be no other parameters when you will add the parameters string to Facebook:

DO NOT edit sub 19 or sub 20 parameters in the FB template, since they have the hardcoded fbp and fbc in these places.
- fbp identifies a visitor’s browser session when they come to your site from Facebook.
- fbc stores the Facebook Click ID when a user clicks a Facebook ad, allowing attribution back to that ad.
These parameters are required by Facebook’s Conversions API and must stay in their exact format. Altering them can break attribution, causing inaccurate tracking and unreliable reporting.
2. In the added template:
- Go to Facebook API Integration section → Connect Facebook → verify your ad account:

- Once you are redirected to your RedTrack account settings and see the Connected button, it means Facebook accepted the integration → Save changes to the template:

4. Create a campaign in RedTrack
Creating campaign in RedTrack
To create a campaign in RT act depending on your account type:
Campaigns → Create new campaign → fill in the info in all the sections and tabs:
- General: Give it the name, and choose the traffic channel, tracking domain, and cost-tracking method.
- Funnels: Choose the type of funnel you are using and add the elements from the drop-downs.
- S2S postback: This field will be filled in automatically based on the data you have added to your traffic channel settings.
- Auto update costs: Do not forget to turn the toggle on if you are working with the API-integrated traffic channel
Campaigns → Create new campaign → use this guide to help you set up campaign for the organic traffic.
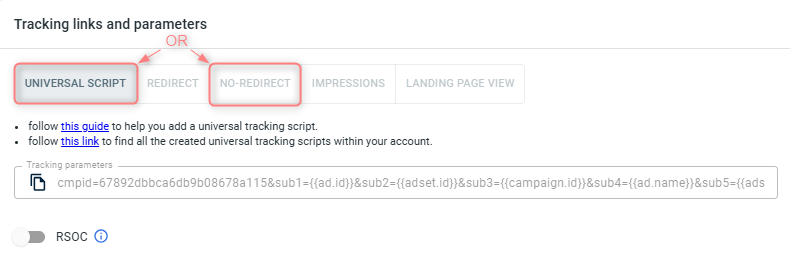
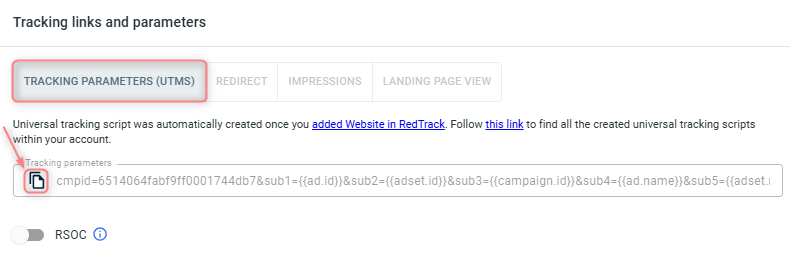
2. Once the Campaign is saved go to Tracking links and parameters → copy the corresponding tracking parameters and the script depending on tracking method you decided on:
– Use Universal Script when you’re working with the same landing page across multiple traffic channels.
– Use No-Redirect Script when you’re working with one landing page and one traffic channel.
IMPORTANT!
– If you choose the No-Redirect tab: once the campaign is saved, both the tracking parameters and the script are generated automatically. You only need to copy and apply them.
– If you choose the Universal Script tab: once the campaign is saved, only the tracking parameters are generated automatically. You’ll need to create the universal tracking script manually (follow this guide).
3. Apply Script & Parameters.
- Paste the script into your landing page code.
- Add the tracking parameters to your Facebook campaign (see Step 9 of this guide “Create an ad on Facebook”).
1. Campaigns → Create new campaign → Fill in the info in all the sections and tabs:
- General: Give it the name, and choose the traffic channel, tracking domain, and cost-tracking method.
- Funnels: Choose the type of funnel you are using and add the elements from the drop-downs.
- S2S postback: This field will be filled in automatically based on the data you have added to your traffic channel settings.
- Auto update costs: Do not forget to turn the toggle on if you are working with the API-integrated traffic channel
2. Once the Campaign is saved go to Tracking links and parameters → copy the tracking parameters from the Tracking parameters (UTMs) tab:
3. Apply Script & Parameters.
- Paste the script into your landing page code.
- Add the tracking parameters to your Facebook campaign (see Step 9 of this guide “Create an ad on Facebook”).
Special case: redirect tracking and fbc,fbp parameters
When using redirect tracking with Facebook in RedTrack, the fbc and fbp parameters are not captured by default. This leads to incomplete data tracking.
To make it work act as follows:
1. burger menu → Settings → enable the toggle Redirect for Meta → Save changes:

2. Place the following script to your offer/landing/pre-landing page at the end of the body:
<script src="https://{{domain}}/clickupd_fbp_fbc.js" defer></script>Make sure the offer/landing/pre-landing page domain matches the Facebook cookie domains.
5. Verify the domain for Facebook
Due to the new Facebook policy, you should now verify the domain you will be using for your Facebook campaign. This is an action that should be done on your Facebook account.
– via meta tag
– via the uploaded HTML file
– via DNS record
For the domain verification procedure details on Facebook, check out the following guides:
– Domain verification in Meta Business Manager
– Methods of domain verification on Facebook
The steps below will demonstrate the DNS record management method.
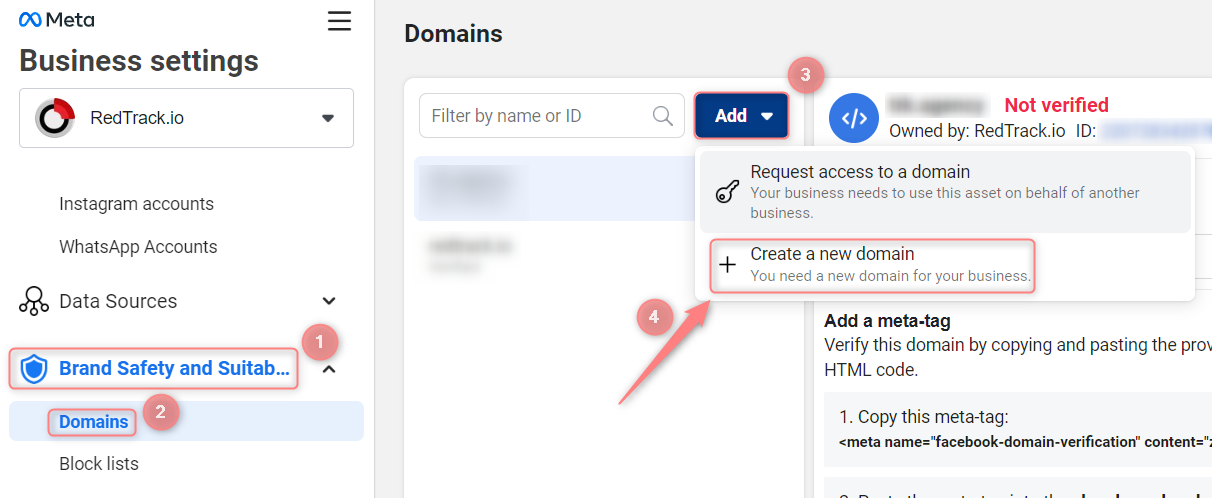
1. Business Manager → Brand Safety and Suitability → Domains → Add → Create a new domain:
2. Paste your domain → Add:
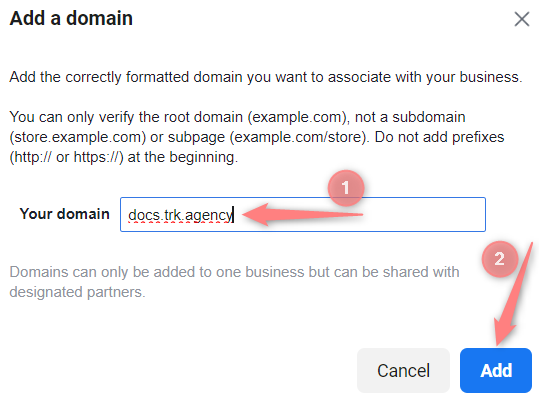
Correct: website.com.
Incorrect: www.website.com or https://website.com.
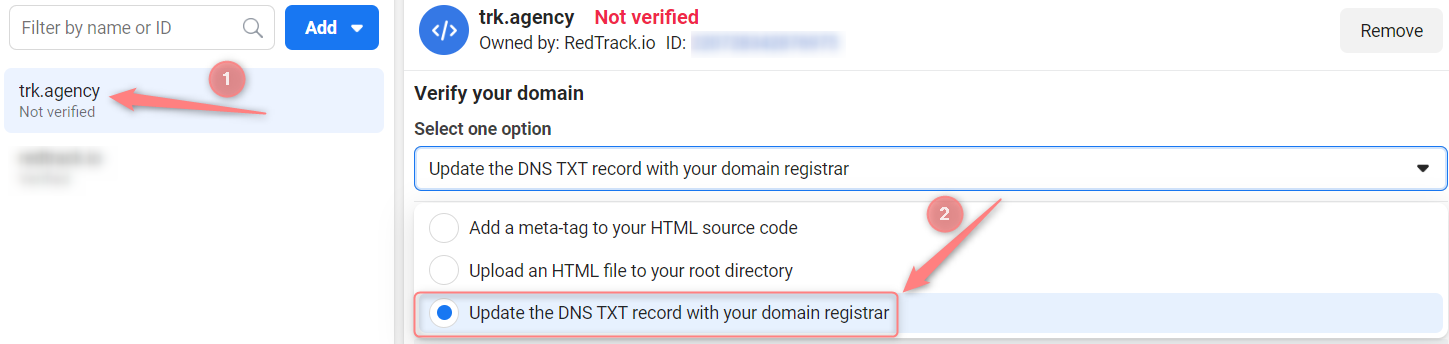
3. Select the target domain → choose the DNS verification method:
4. Copy your unique TXT value:

5. Go to your domain registrar → open DNS settings and add a new record with the following values:
- Host: @
- Points to: your unique TXT record from point 4
- TTL: the lowest possible
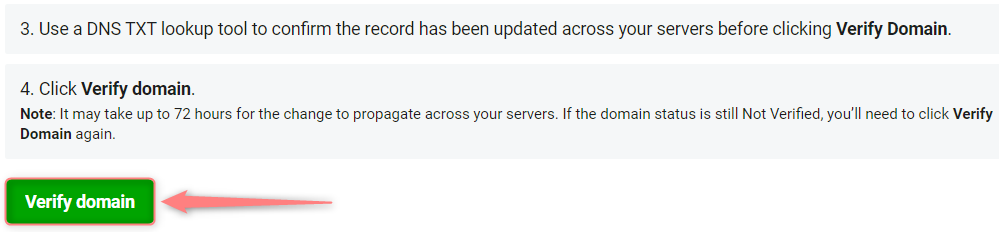
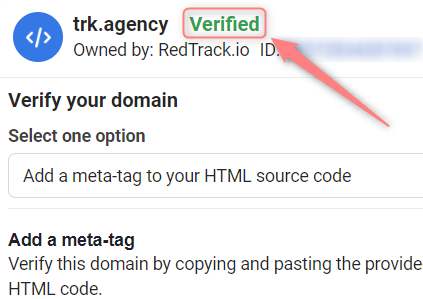
6. Give it some time for the data replication to happen (approximately 1 hour), then verify the domain in your Facebook domain settings:
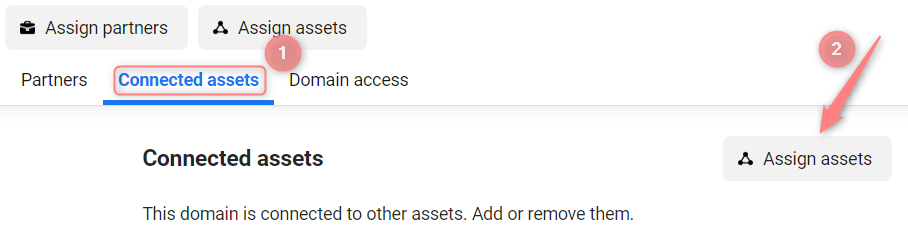
7. Associate the domain with your page:

8. Get back to RedTrack → settings of the added Offer (for Affiliates)/ Website (for Advertisers) → CAPI (Maximize signals) → add the values for Default Action source and Default Event URL → Save changes to the template:
- In the Default Action source select from the drop-down the type of the conversion to be set for Facebook API.
- In the Default Event URL add the verified domain. The domain should be secure, use the following link format: https://your.domain.com.

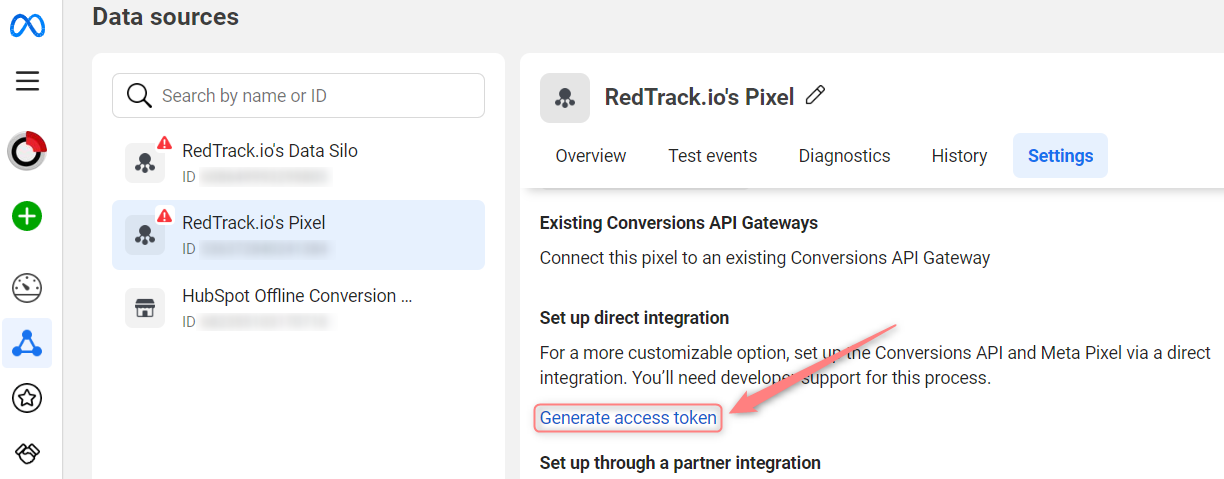
6. Get Conversion API Key & Pixel ID from your FB account
In your Facebook account, copy the following:
7. Add the copied FB Conversion API Key & Pixel ID to RedTrack
Now in your RedTrack account, you should:
- Add the copied Pixel ID and Conversion API Token to CAPI Integrations.
- Assign the added pixel details to either Snapchat traffic channel or your offer/website.
1. RedTrack → CAPI Integrations → Meta → Add New:

2. Fill in the mandatory fields → Save:
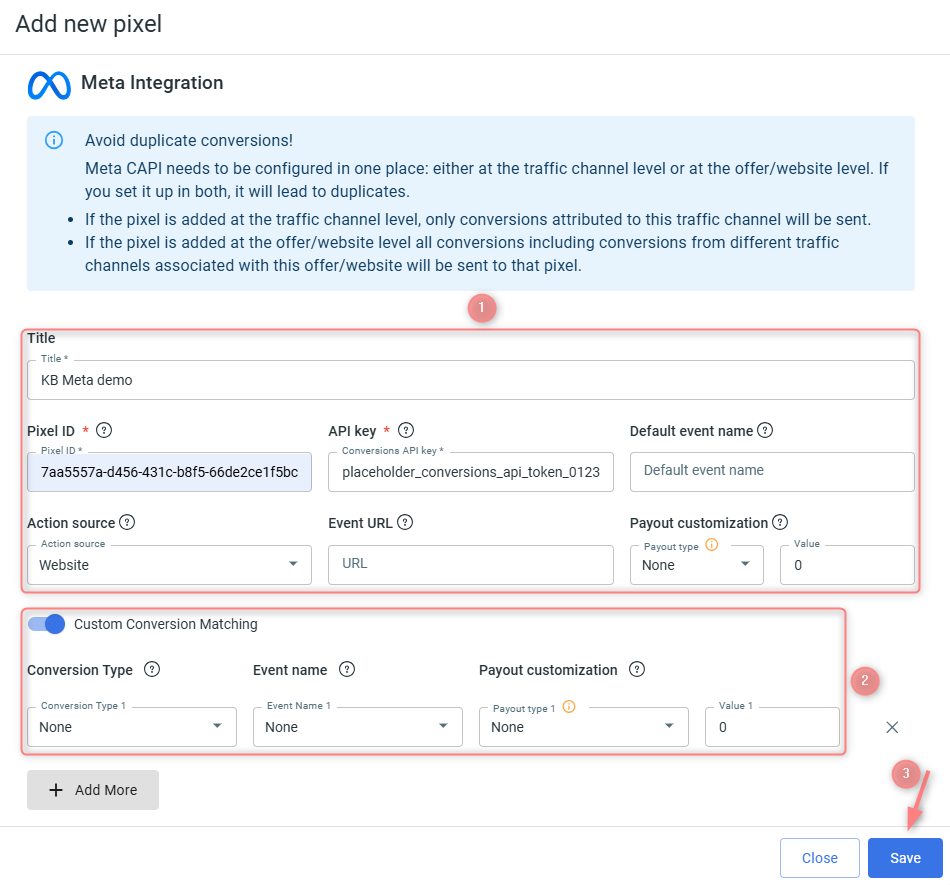
Give your pixel a name to distinguish it from all the other added pixels.
That’s where your Facebook pixel goes.
That where your Facebook access token goes.
1. Here goes the event name for the default conversion in RedTrack, when no type= is used in the postback.
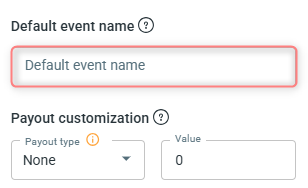
– If the field remains empty, the default conversion is sent with the event under the name Purchase.
– If the field is filled in, the default conversion is sent with the name specified in that field.
2. Define the payout value for the default event:
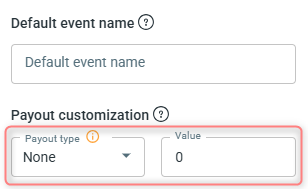
– None: RedTrack will send the full revenue amount associated with the conversion event.
– Numeric: RedTrack will send this fixed amount as the revenue.
– Percentage: RedTrack will calculate and send the specified percentage of the revenue.
Example
Let’s break down the revenue configuration from the screenshot:
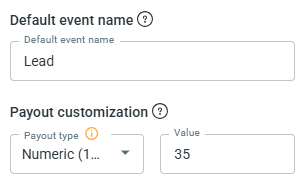
Once the Lead conversion type is triggered, regardless of the actual payout value associated with the conversion (e.g., whether it’s $100 or $10), RedTrack will send exactly 35 as the revenue value for this Lead event to Facebook via the Conversion API.
This is where your event originates from. We recommend using the Website option.
This is the domain verified for Facebook. In other words, the URL where the event occurs. Use the https://domain.name URL structure.
– We recommend keeping a Purchase name for one of your conversions so that you do not need to make any adjustments on the Facebook side since Facebook knows this name very well and will optimize the traffic better for a Purchase than a custom name (Sale, Conversion, etc.).
To set up conversion matching act as follows:
1. Add conversion events you want to track with RedTrack.
Tools → Conversion tracking → Conversion type → add the events you want to track → Save.
The system will automatically send your conversion types to Facebook exactly as you name them.
2. Enable the Custom Conversion Matching toggle → match the events from the Conversion Type column with the events from the Event name column:
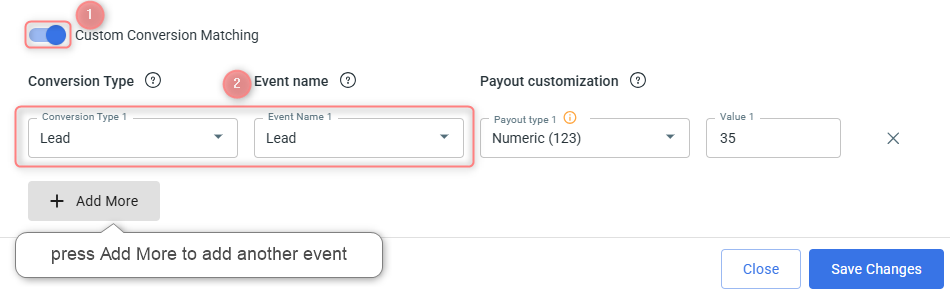
3. Define payout value for the matched event(s) → Save Changes:
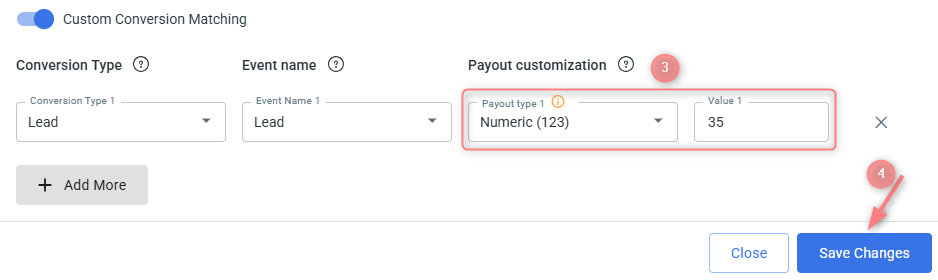
– None: RedTrack will send the full revenue amount associated with the conversion event.
– Numeric: RedTrack will send this fixed amount as the revenue.
– Percentage: RedTrack will calculate and send the specified percentage of the revenue.
Example
Let’s break down the revenue configuration from the screenshot:

Once the Lead conversion type is triggered, regardless of the actual payout value associated with the conversion (e.g., whether it’s $100 or $10), RedTrack will send exactly 35 as the revenue value for this Lead event to Facebook via the Conversion API.

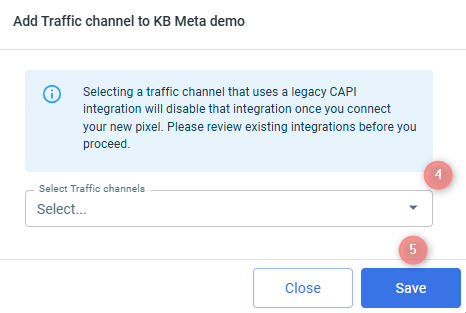
3. To assign this pixel: View details → select Traffic channel or Websites → Add new → select destination → Save:
– If you activate your pixel via FB traffic channel, only conversions attributed to this traffic channel will be sent to that pixel.
Adding pixel to both the offer form and FB traffic channel will lead to duplicates.


8. (if you haven’t done it yet) Create an ad on Facebook
Ads Manager → Create Ad → create a new campaign or use an existing campaign → set up campaign parameters → copy paste your LP URL/Website URL (the link without tracking parameters) under the website URL → add additional tracking parameters (universal script or tracking parameters (UTMs)) in the “URL parameters” section
– If you need to be sure you receive the correct names, add them to the tracking parameters manually or analyze the data by IDs instead:
cmpid=5f92a30bc860ee0001fa9996&sub1={{ad.id}}&sub2={{adset.id}}&sub3={{campaign.id}}&sub4=myad&sub5=myadset&sub6=mycampaign&sub7={{placement}}&sub8={{site_source_name}}
– If there are already some UTM parameters in the URL parameters field, you do not have to delete them, just append the parameters taken from your campaign in RedTrack to the already existing parameters with the help of the ampersand symbol: “&”.
Use this tutorial to help you add your LP URL and tracking parameters properly in Facebook Ads Manager.
9. (optional) Warm up your Facebook account with test conversions
To start running a live campaign, you need to make sure everything is up and running. And at this point, we will need to warm up your account with some fake conversions.
1. Once you’re done with the integration and have created a Facebook campaign, you need to run some live clicks from Facebook.
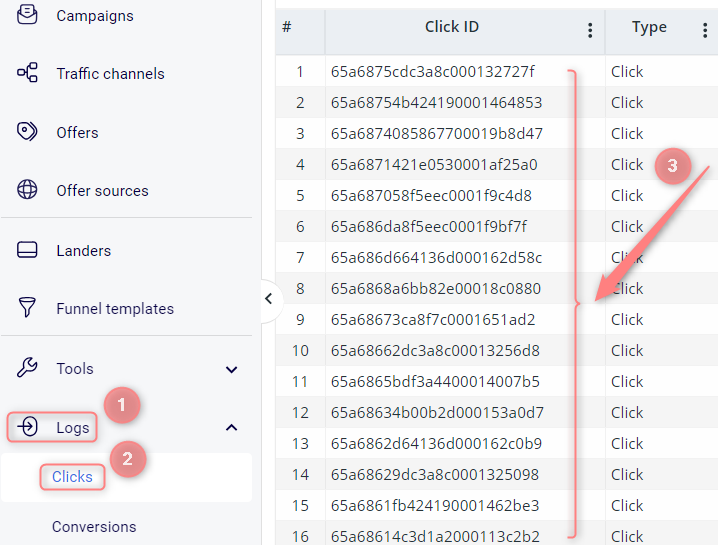
We will need them for conversion generation. To find your clicks, go to Logs → Clicks:
2. Tools → Conversion tracking → copy the link from the S2S conversion tracking field:

3. Put the clickid from step 1 instead of the replace_me part in the postback URL you copied within step 2.
4. Paste the link to the browser and press enter. You should get this successful message:
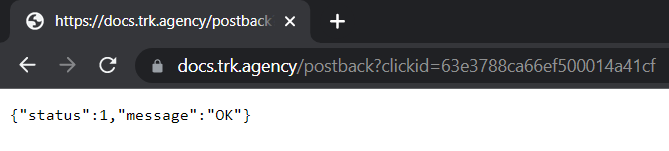
5. The conversion will appear in your RedTrack account. Do the same with different click ids within a day. You will need approximately 20 conversions to warm up the account.
Facebook needs a bit more time to attribute the conversions to your campaigns. It can take 48 to 72 hours to see the data.
10. Set up the automation
Set up the automation.
- Use this guide to help set up rules.
- Use this guide for setting up the auto-update cost feature.
11. Increase the event match quality
If you work with an affiliate offer, having a 10/10 match quality is impossible. There is a list of parameters Facebook wants to receive, but only half of them can be covered by any third-party tool. This causes the match quality to be at a low level. And it’s not something you should struggle with.
However, RedTrack has a feature that can help you to improve the event match quality with Facebook. It does not take any additional values from Facebook, but if you have them on your website/affiliate network side (for example, order ID at Shopify) or store them on your side, you can send them to RedTrack and then to Facebook to increase the event match quality.
For the cases where you do not work with any offer source and promote your offers, this feature can be used only if you store the data on your side and have the technical capabilities to add this data to the conversion triggered.
1. Make RedTrack identify and accept this data with a postback first.
Offer sources / Brands → Additional parameters → add the required parameters, macro, name and assign the roles → Save changes to the template:
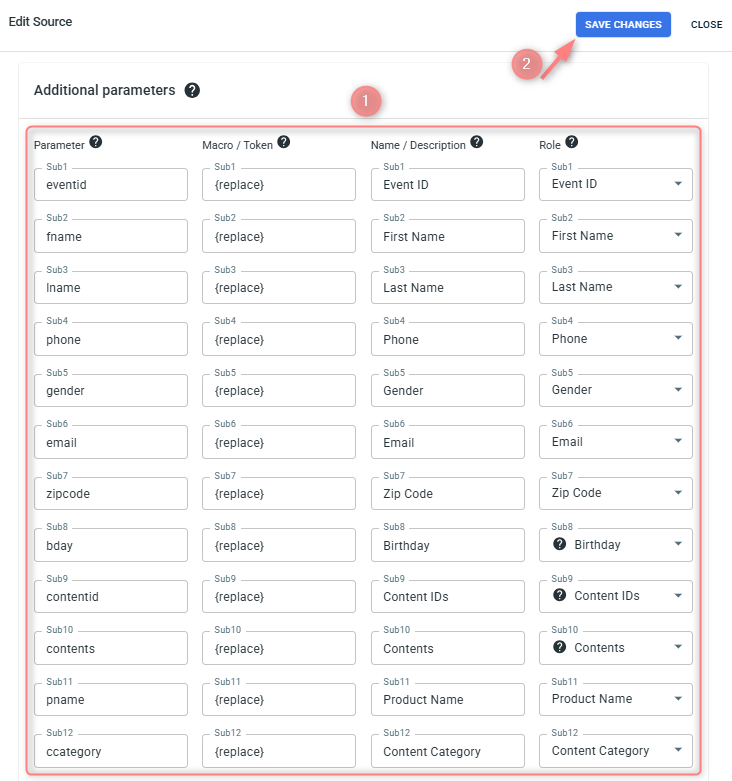
◉ Macro/Token where you have to insert {r} or {replace}.
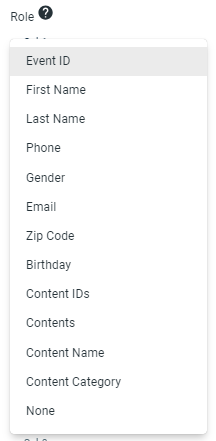
◉ Role where you assign your parameters a certain role. The list of supported roles can be viewed in the dropdown:
Data in the following columns is OPTIONAL but useful:
◉ Parameter: that’s where you give your parameter a name, but can leave it empty and in the tracking URL your parameters will be called sub1,2,3 etc.
◉ Name / Description: that’s the name you’ll see in the reports instead of sub1,2,3. For your convenience you can customize these names as you wish.
2. The added parameters will be appended to the Postback URL which you should copy:

3. Paste it to your offer source S2S postback settings as usual (or in any other postback option you use on your side).
Once the conversion postback containing those values is sent to RedTrack, we will grab it → attribute it to the appropriate campaign → send it to Facebook with the specified role.
Troubleshooting
Possible errors
Sometimes, Facebook can disconnect your account randomly for security reasons (you will notice that almost immediately since the cost data stops coming at that point). All you need to do in that case is to reconnect.
“One or more of your Purchase events is missing a value and currency parameter. This may affect your return on ad spend calculation.”
If you have the value optimization on, some conversions still do not get the value. We always send the currency and value by default. This issue can be observed with test conversions. So it’s essential to send all values during the test.
Most probably, you are using Conversion API and pixel at the same time (for example, send the same data from RedTrack and your website or use RedTrack CAPI and some other system CAPI). In this case, you might see both server and pixel type under the event in your Facebook account.
Use only the RedTrack Conversion API to solve the issue.
Another reason can be a duplicate from a pixel or Conversion API without any unique event value, Facebook can recognize. What can be done? Check out this guide.
Conversion attribution may differ due to the FB algorithms (for example, they can be sent to different adsets if Facebook considers attributing some particular conversion to another adset)
Facebook has a 7-day attribution window. If there are less than 7 days between click and conversion, Facebook will attribute it. If the conversion is older than seven days, FB can exclude it from your statistics.
You cannot do anything with the conversion attribution.
Make sure you have followed the Facebook integration guide, verified your domain, and added it to your RedTrack offer settings.
Cost-related issues
No costs
Here is what you need to check on your side:
1. The traffic channel should be connected from the Facebook template. No error is shown.
If it is not connected or you are not sure, re-connect it.
2. The correct account is connected.
3. The dynamic parameters such as campaign id, adset id and ad id are received by RedTrack (Logs → Clicks → check sub values).
If there are no parameters in click logs, that means we are not receiving them from Facebook. Either these are your test clicks, or you need to check the Facebook campaign settings to have the parameters string in place.
4. The correct roles are assigned to the dynamic parameters.
For the cost update to work properly, the following roles should be mandatorily assigned to the Facebook IDs in your traffic channel settings:
5. Check the cost model you use in the campaign settings. It should be CPC.
Incorrect costs
What you can check to understand why the cost data is incomplete (higher or lower than the one you have on Facebook):
The first thing you need to compare is the IDs. RedTrack takes the cost data per ID (campaign, adset or ad, depending on your subscription level), so if some of the ID is missing, its cost data will not be taken to your RedTrack report.
Check if all IDs are received in RedTrack (campaign report → group by (target ID used for the cost update) → check the list). If not, check this campaign, adset or ad in Facebook and ensure the dynamic parameters are added to pass the ID.
Check if the correct roles are assigned to the Facebook IDs in RedTrack. This can be checked in your traffic channel settings:
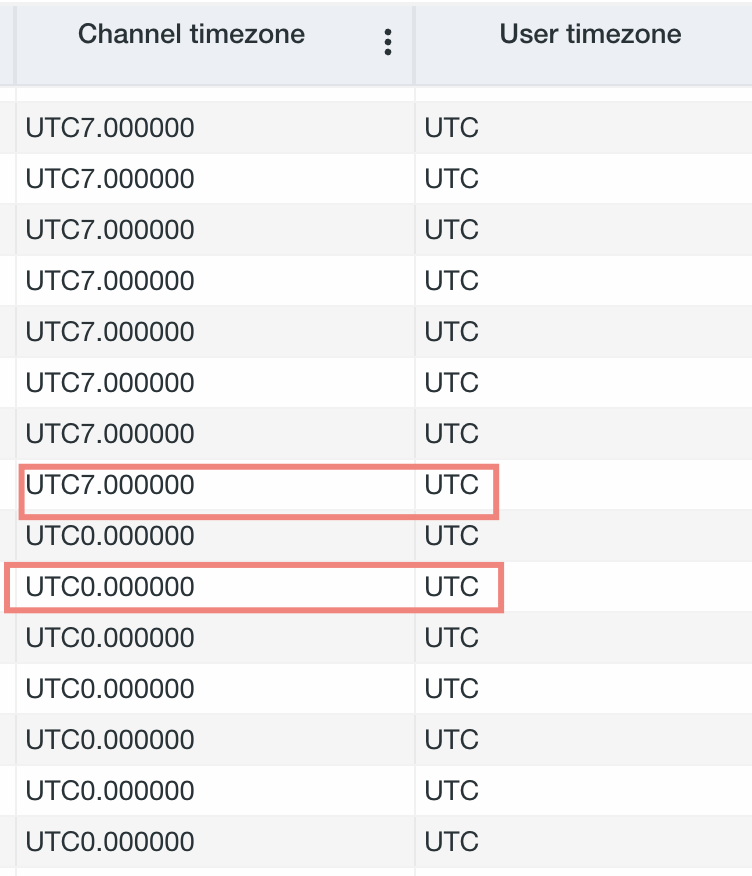
Check if the time zones match in your RedTrack account setting and in Facebook.
If the timezones of your traffic channel and RedTrack don’t match or the timezone within your ad accounts in the traffic channel do not match (for the cases when you run traffic from different ad accounts to one RedTrack campaign), the cost data matching is impossible.
Check the cost logs in RedTrack: if costs stopped coming for some time and caused this discrepancy, you might need to reconnect Facebook.
Make sure the currency matches in both systems.
Issue:
RedTrack click costs are 2–3x higher than expected.
Cause:
Meta recently introduced a “Site Links” feature that is enabled by default on new campaigns. When active, this feature:
- Automatically adds multiple landing page links to your ad.
- Redirects traffic to multiple URLs, each potentially associated with different campaign or ad IDs.
As a result, the same click can be logged multiple times across different RedTrack campaigns, inflating reported cost and traffic metrics.
How to Identify It:
→ In RedTrack, look for duplicate Adset IDs across active and paused campaigns.
→ Check your UTM parameters. If you see something like sub9=facebook-SiteLink, this feature is likely enabled.
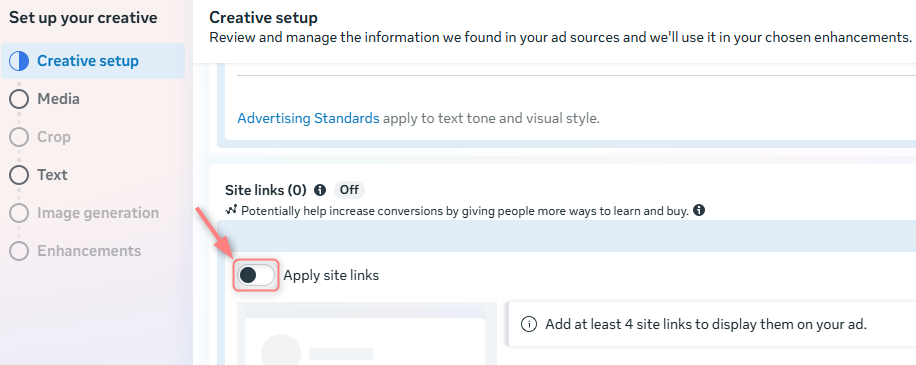
Solution:
Go to your Meta ad settings → navigate to the Ad Creative section → under Creative Setup disable the Apply site links toggle → Save your changes and monitor if the duplicate tracking stops:
Lost events
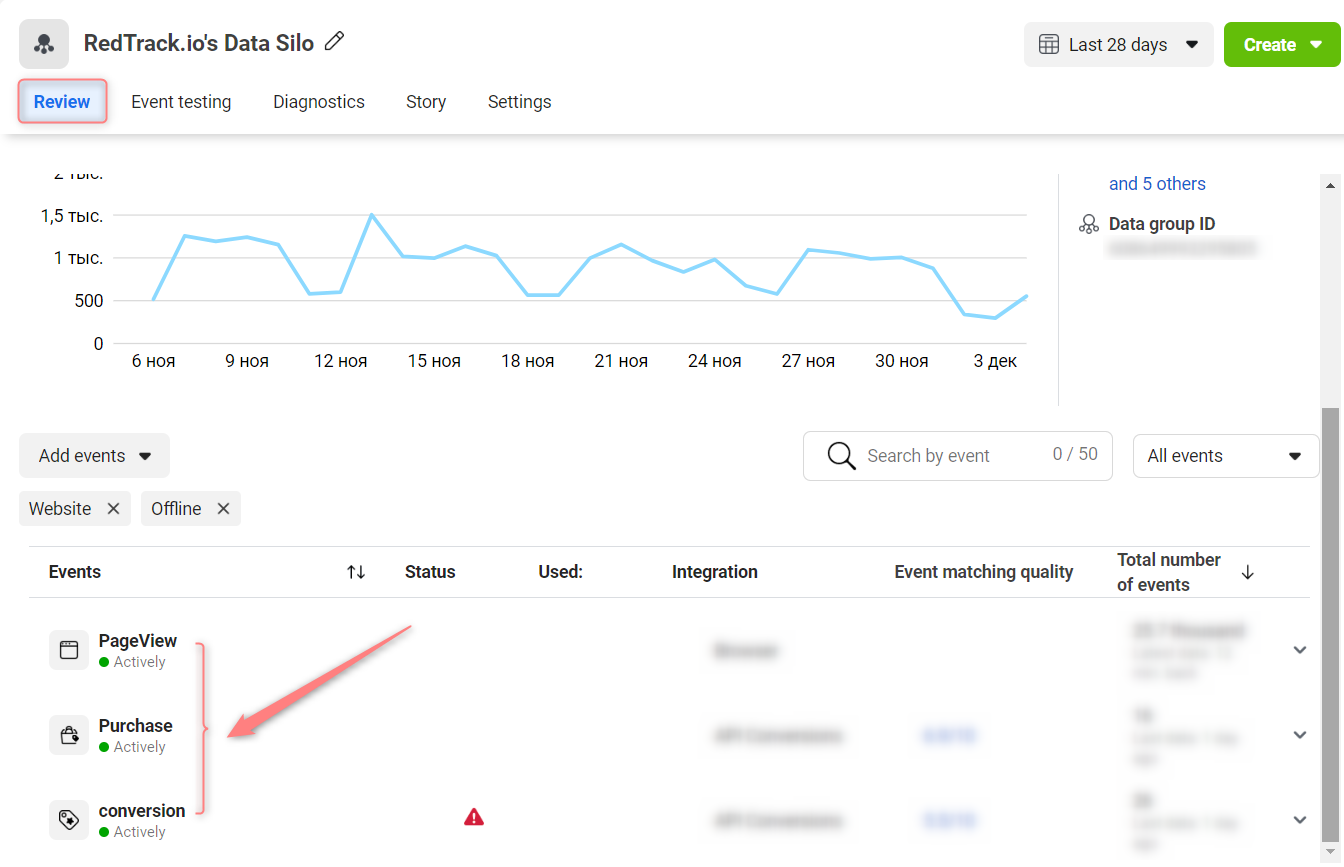
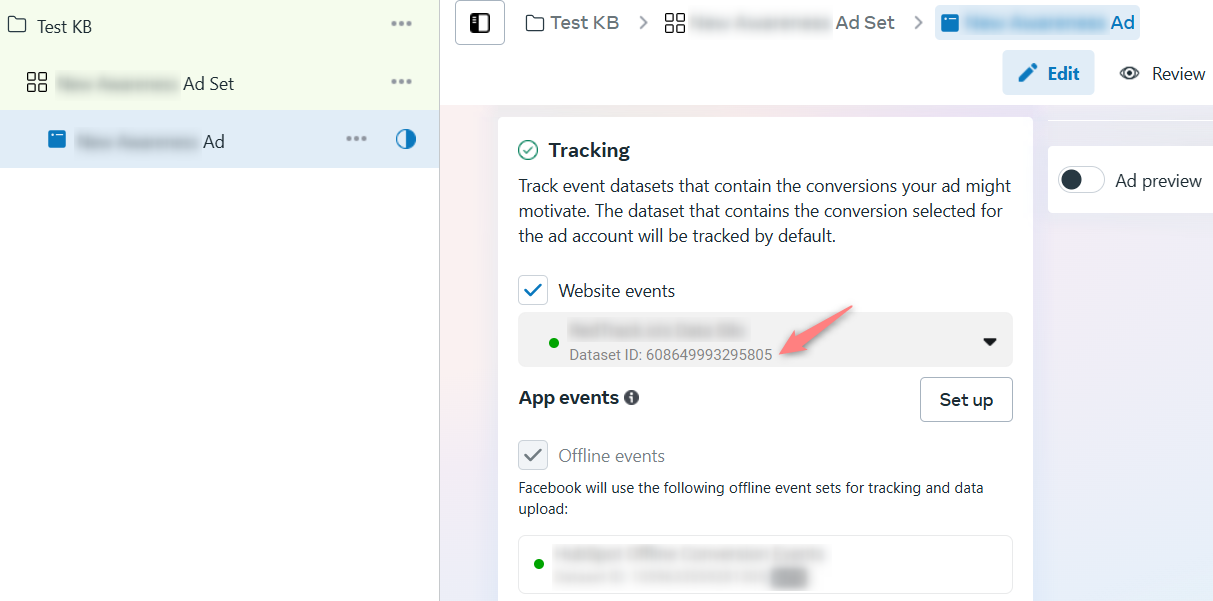
Sometimes, you might need to check if there are events coming to Facebook and how they come to understand if anything goes wrong.
Business Manager → Data Sources → Datasets → choose the pixel → Open in Event Manager:
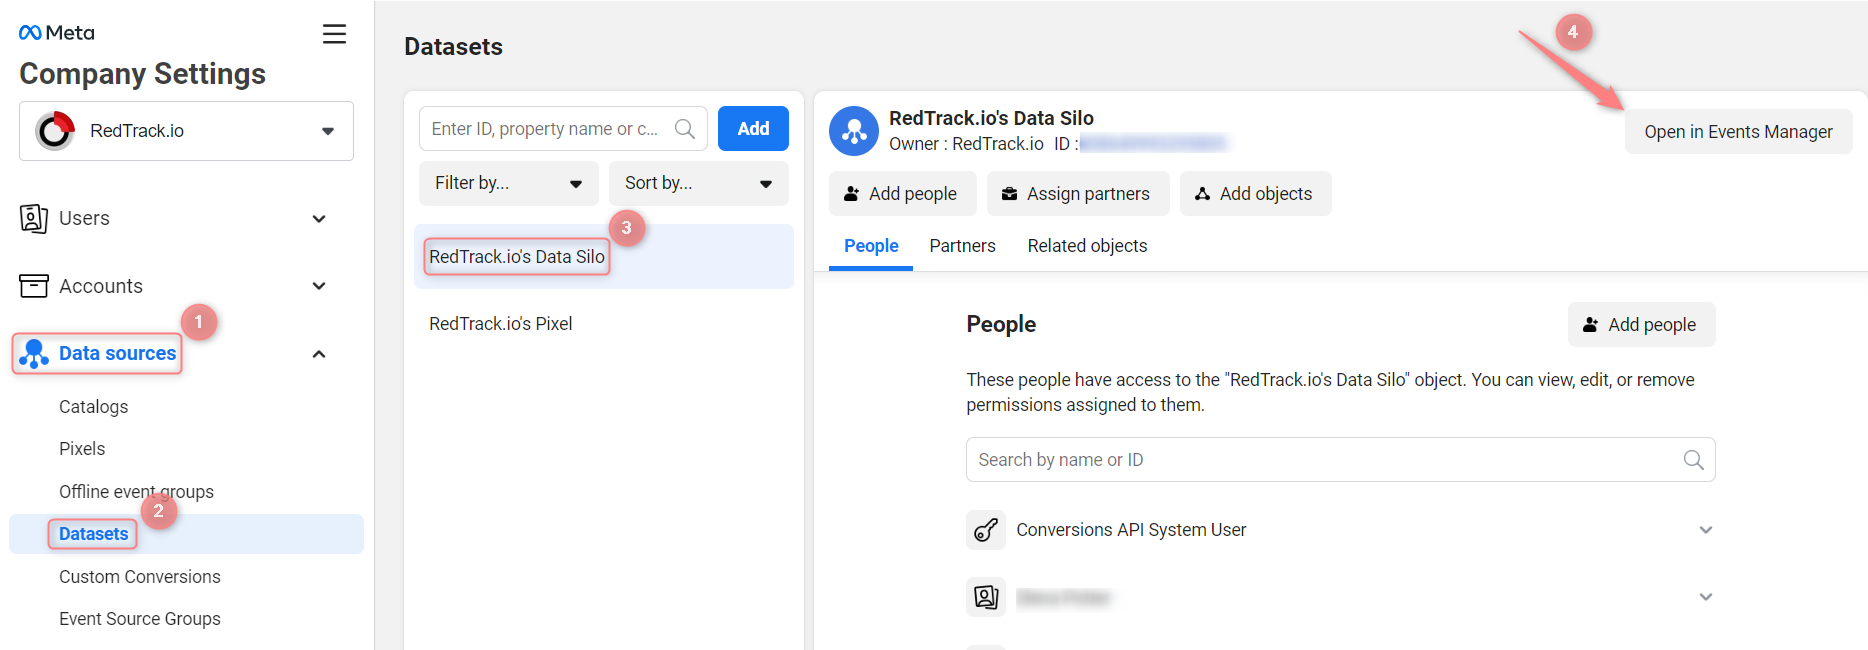
Your events are displayed under the Review: