
Conversion tracking: types, statuses, duplicates
In RedTrack conversion events tracking can be set up via types or statuses. Each way has its peculiarities:
| Type | Status |
|---|---|
| – allows custom naming – has extended analytics – works with API integrations – extended Clickbank, Google and Tiktok mapping supported – needs additional setup in the interface | – no custom naming – limited analytics – is not suitable for API integrations and conversion mapping – works without any additional setup – works for COD offers |
Act depending on the preferred event tracking way:
Conversion tracking via Types
How to set up conversion types
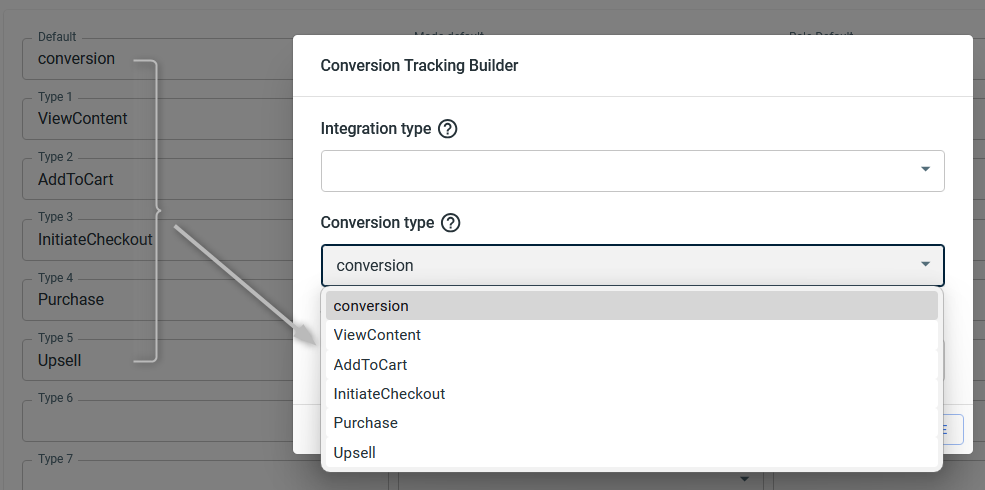
1. Tools → Conversion tracking → Conversion type → add the events you want to track → Save:
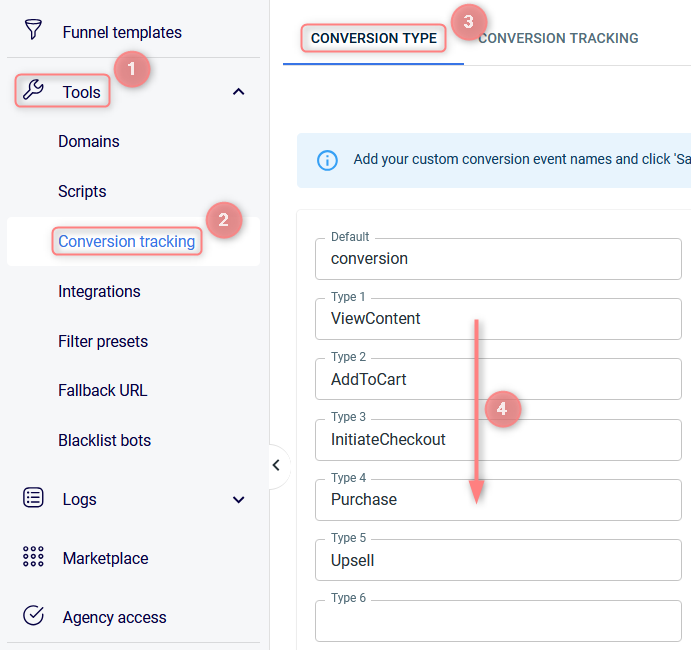

The names remain the same and will be sent to the traffic channel exactly as you’ve added them to RedTrack.
2. For the added event to be tracked, you need to add the resulting postback URL/pixel/script with this event to the page code or thank you page where this conversion should be tracked.
If your flow differs, turn to the specific guide on KB or email support@redtrack.io for assistance.
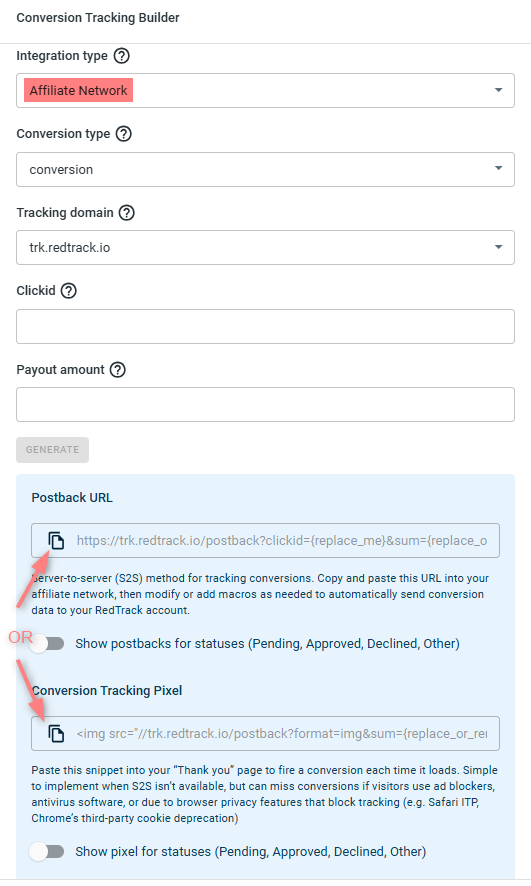
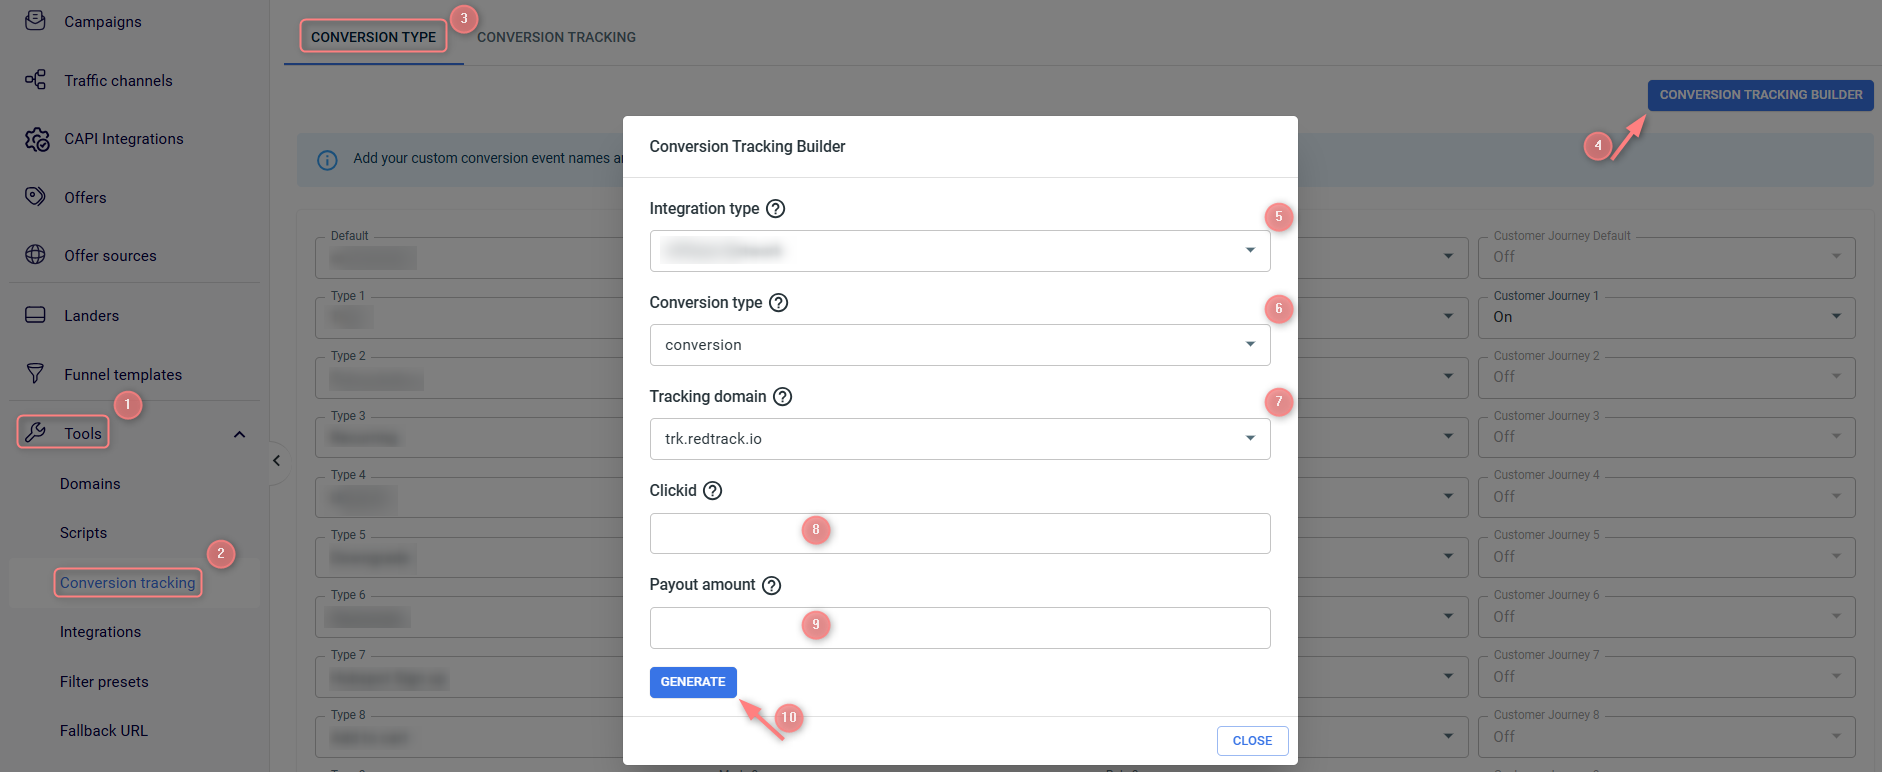
2.1 Conversion Tracking Builder → fill in the mandatory fields → Generate:
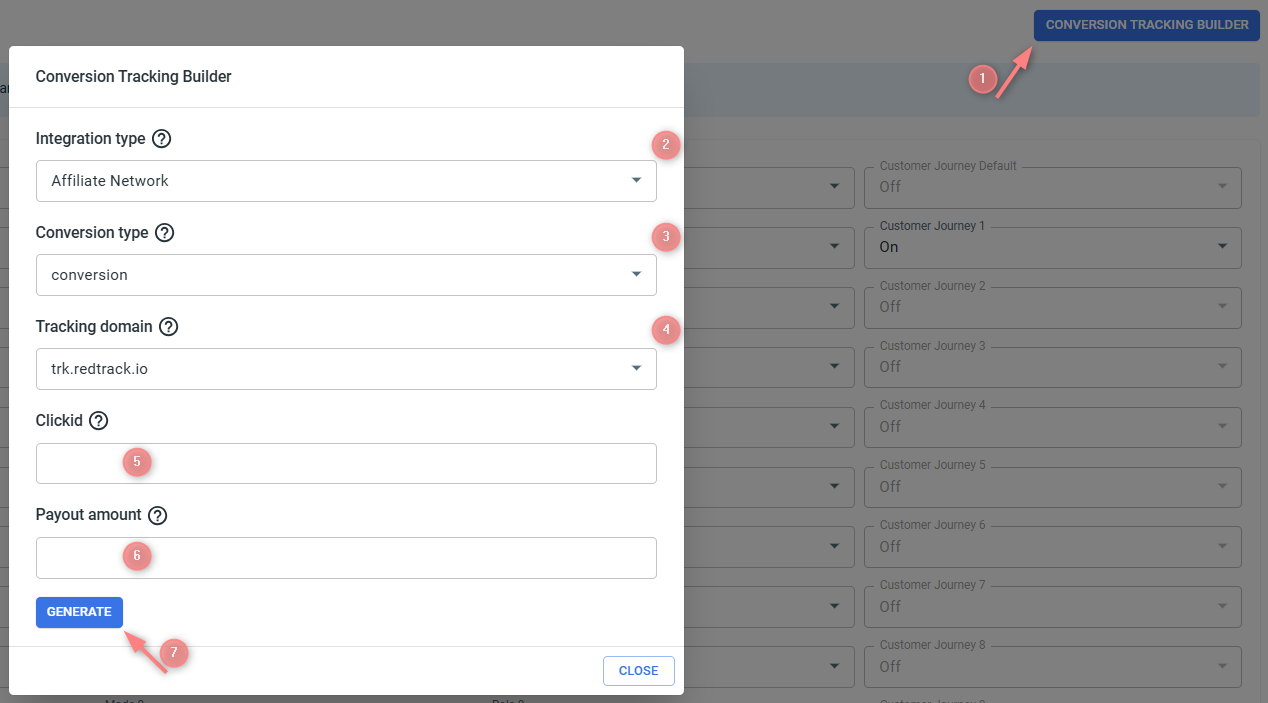
Fields explained:
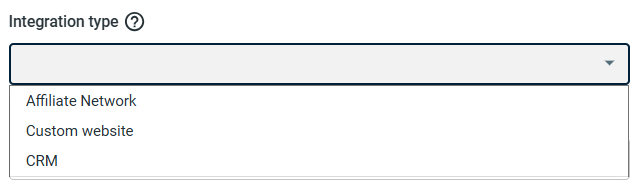
Select where you’ll install the tracking (your integration type):
- Type options for Affiliates:
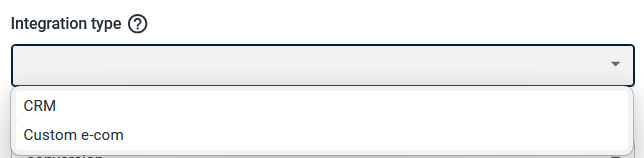
- Type options for Advertisers:
Pick the specific conversion event you want to track (e.g., ViewContent, AddToCart, InitiateCheckout, etc.). This event type will be appended to the generated postback URL/pixel/script.
In the drop-down there will appear only the events you’ve added in step 1:
By default, it pulls your primary account domain. Meaning, it’s the domain used in your campaign tracking URLs, postbacks, etc. If you want to change it, select the needed one from the dropdown.
Get this from your selected platform, the one you chose in Integration type:
- For Affiliates, it’s Affiliate Network, Custom website, or CRM.
- For Advertisers, it’s CRM or Custom e-com.
Add the payout amount parameter from the platform you selected in the Integration type field:
- Affiliate Network, Custom Website, or CRM (for Affiliates)
- CRM/Custom E-commerce (for Advertisers).
Alternatively, you can enter a fixed value (e.g., 10).
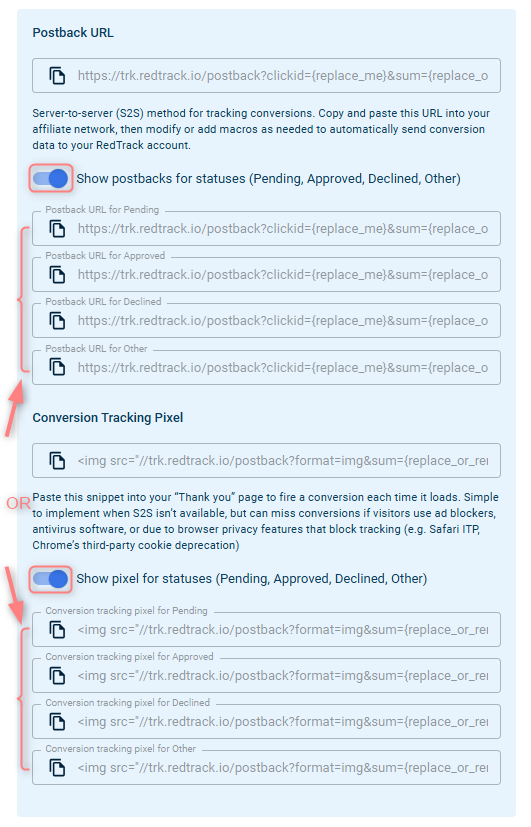
2.2 Depending on your selected integration type, copy the generated Postback URL, Pixel code, or Script → insert it into the correct place (affiliate network settings, website code, or “Thank You” page) → replace any {replace_me} or {replace_or_remove} placeholders with actual values from your platform.
For other Integration types, the generated options will vary.
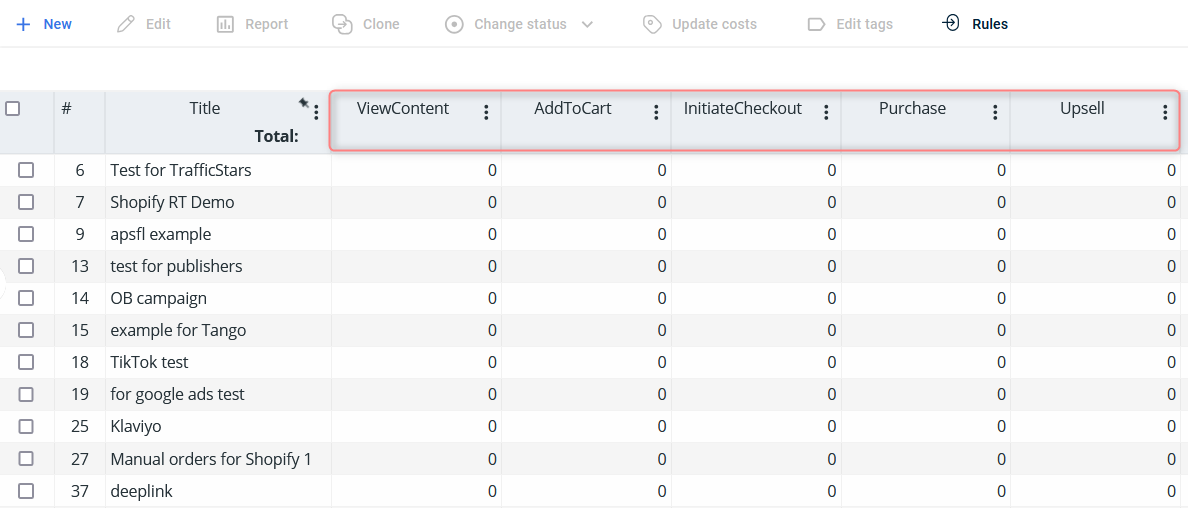
Tracking added conversion types in RT Reports
Data on conversions recorded in RedTrack can be viewed in the reports:
If you want the assigned events to be counted and shown in the Customer Journey report, you have to enable the report next to the event:

You can check the data on the added conversion events as follows:
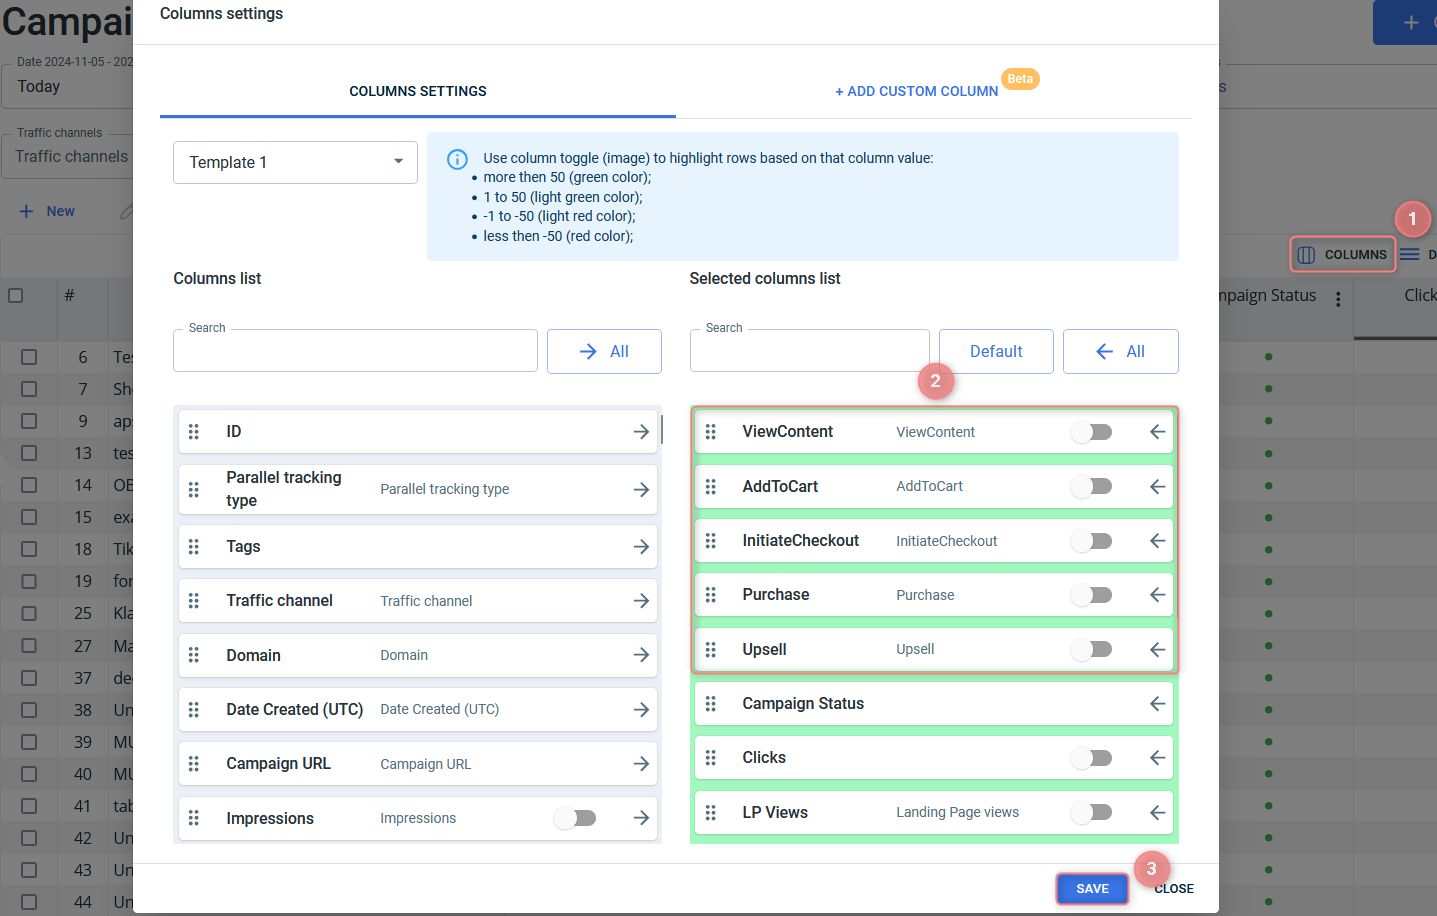
- In reports, once you’ve added the columns with the names of your conversion events:
- In logs by conversions, you can check out the data on the duplicate status of the conversion event with the assigned duplicate postback mode Create new conversion: new or repeated:
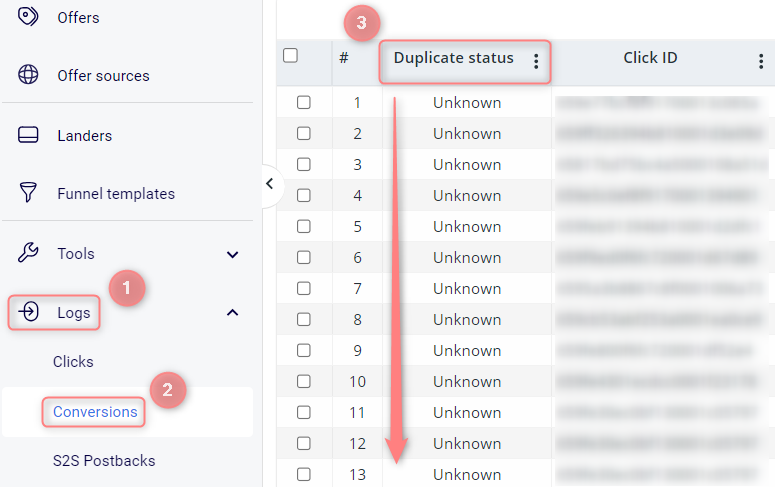
Repeated for the repeated (duplicated) conversions.
Unknown for conversions with this postback mode not configured.
Conversion tracking via Statuses
Statuses: overview
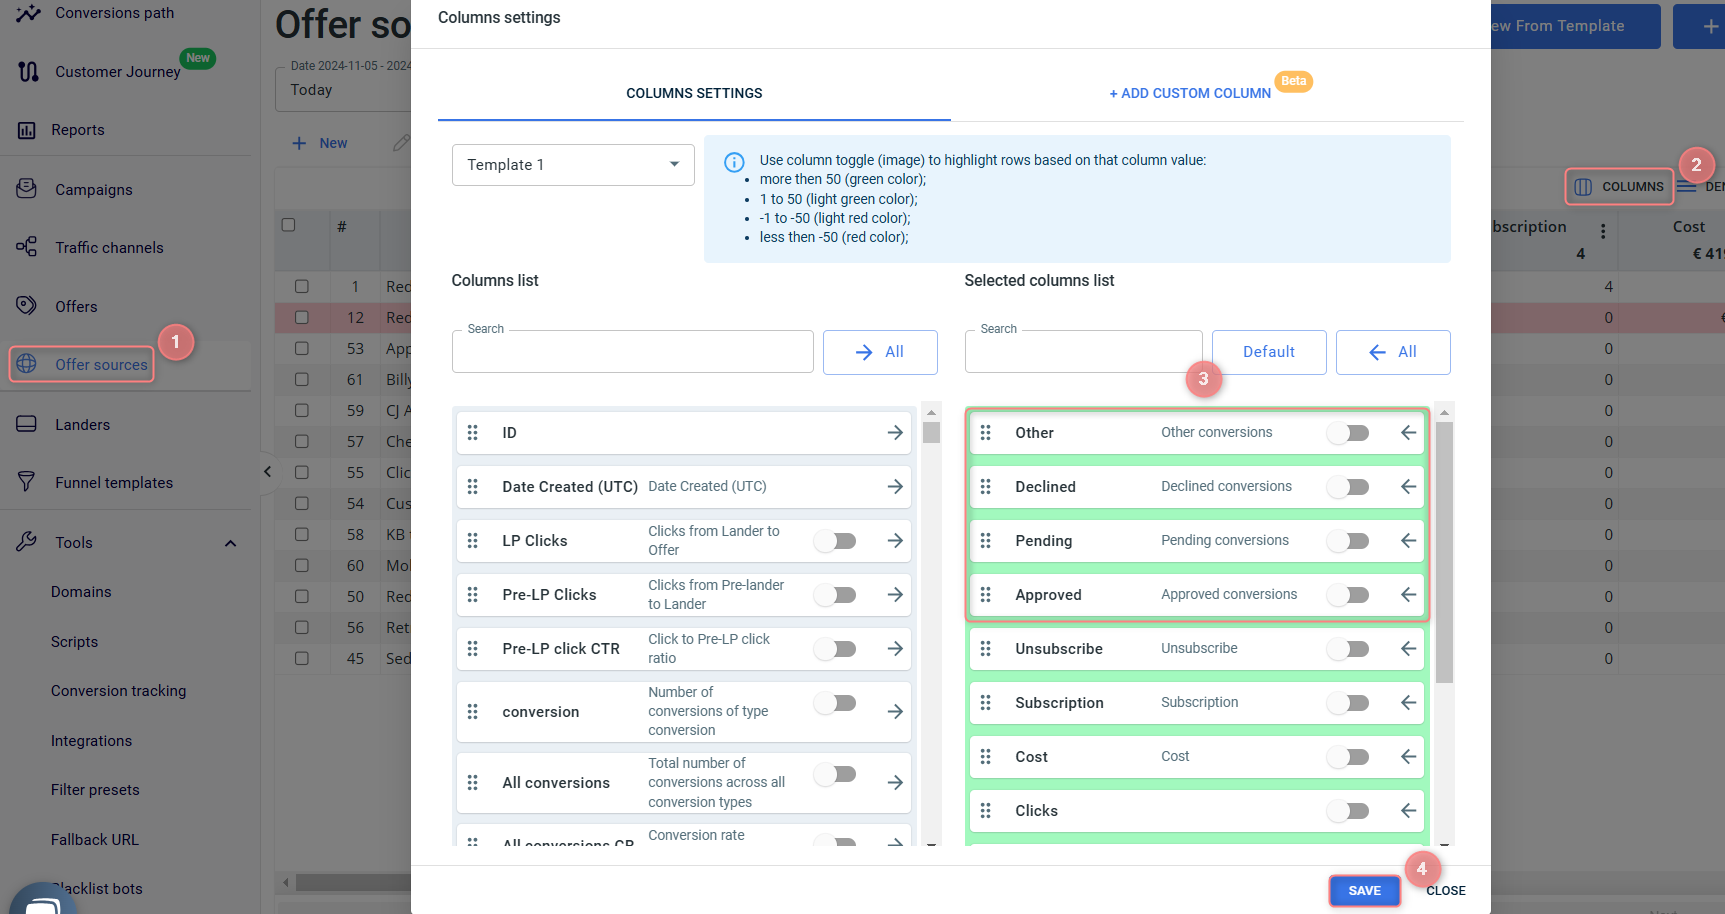
Conversion statuses are used in cases where using simple naming is enough for you. They are added within the Offer source/Brand template in RT, we have 4 types of Statuses:
- other
- approved
- pending
- declined
Worth knowing when working with statuses:
- If we do not receive any status data with the conversion, by default, we record all conversions with the status you have set in the offer source/brand settings, which can easily be changed.
- Change the status manually per postback if you need to send another one. Use lowercase.
- All of the statuses are available as separate columns with separate statistics. The main difference between types is that you cannot change the status naming, it is only like that.
How to set up statuses
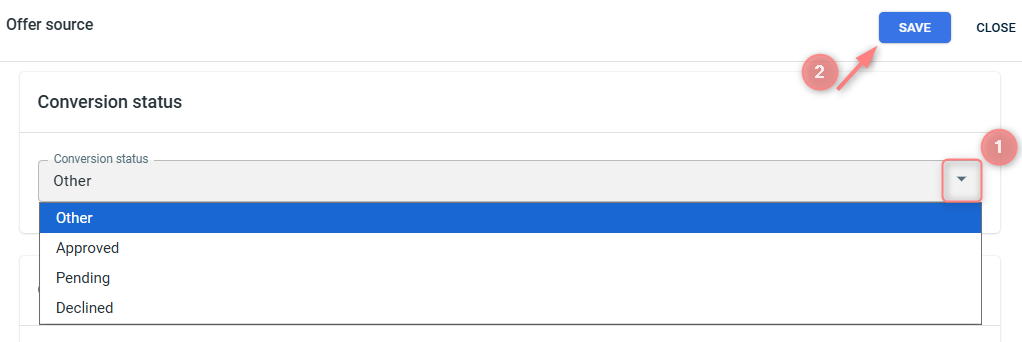
1. Within the added Offer source/Brand template select the needed status from the Conversion status drop-down → Save:
2. For the chosen conversion with the assigned status to be tracked, you need to add the resulting postback URL/pixel/script with this status to the page code or thank you page where the conversion with this status should be tracked.
2.1 Tools → Conversion tracking → Conversion Type → Conversion Tracking Builder → fill in the mandatory fields → Generate:
Fields explained:
Select where you’ll install the tracking (your integration type):
- Type options for Affiliates:
- Type options for Advertisers:
Pick the specific conversion event you want to track (e.g., ViewContent, AddToCart, InitiateCheckout, etc.). This event type will be appended to the generated postback URL/pixel/script.
In the drop-down there will appear only the events you’ve added in step 1:
By default, it pulls your primary account domain. Meaning, it’s the domain used in your campaign tracking URLs, postbacks, etc. If you want to change it, select the needed one from the dropdown.
Get this from your selected platform, the one you chose in Integration type:
- For Affiliates, it’s Affiliate Network, Custom website, or CRM.
- For Advertisers, it’s CRM or Custom e-com.
Add the payout amount parameter from the platform you selected in the Integration type field:
- Affiliate Network, Custom Website, or CRM (for Affiliates)
- CRM/Custom E-commerce (for Advertisers).
Alternatively, you can enter a fixed value (e.g., 10).
2.2 Navigate to the generated postback/code options → enable the toggle Show postbacks for statuses / Show pixel for statuses → copy the needed ones based on your integrated type and the assigned status → insert it into the correct place (affiliate network settings, website code, or “Thank You” page) → replace any {replace_me} or {replace_or_remove} placeholders with actual values from your platform.
For other Integration types, the generated options will vary.
Tracking assigned statuses in RT Reports
Conversions with the assigned statuses can be tracked in the offer source report, once you add the column with the status name to the report table:

Working with duplicated conversions
RedTrack offers a handy Duplicate postback mode functionality that manages how the platform processes multiple postback requests for the same conversion event. You can assign a dedicated duplicate postback mode to the chosen event type/ status and the system will act accordingly (create a new conversion, ignore the postback, edit conversion with new data, etc.).
Act as per your way of setting up the conversion tracking (types or statuses):
To apply a certain duplicate mode select it from the dropdown menu on the right next to the needed event type → Save:
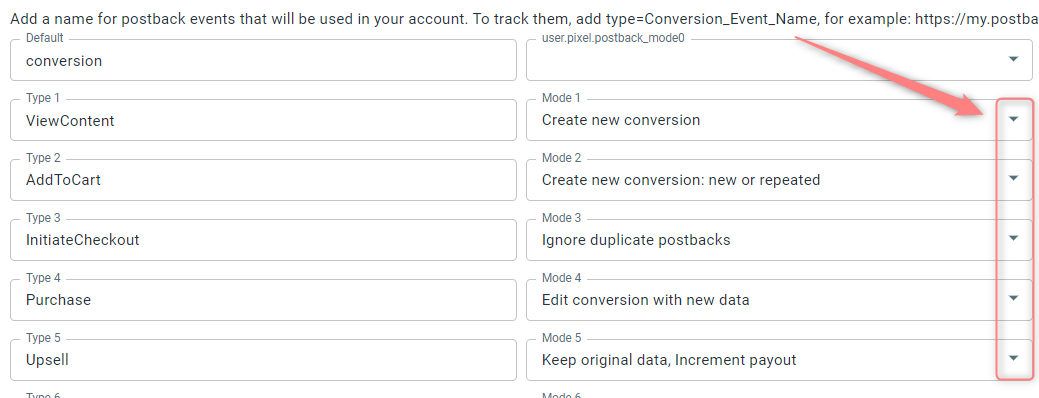
Duplicate postback modes explained:
How it works: chosen duplicate postback mode is applied → conversion is updated in RedTrack → the updated conversion is sent to the traffic channel where the system recognizes this conversion by its clickid and edits this very conversion without creating any duplicates.
- Create new conversion: duplicate postback data will be added as a separate conversion.
- Create new conversion: new or repeated: means duplicated postback data will be added as a separate conversion with different statuses.
– New for the first conversion.
– Repeated for the repeated (duplicated) conversions.
– Unknown for conversions in which this postback mode is not configured.
- Ignore duplicate postbacks: no data on the duplicate will be added.
- Edit conversion with new data: the original conversion will be edited with new data.
You have a lead conversion that can transform into either a purchase or rejection later. You want to receive first the Lead, and send the data about this to the traffic channel, then you want the Lead to be changed to Purchase, also with sending the data to the traffic channel. In that case, edit conversion with the new data is the postback mode you need.
- Keep original data, Increment payout: only revenue will be edited.
- Ignore duplicate postbacks by event id: to make this mode work, first, you need to send RedTrack the unique id for the system to be able to compare the data. For example, adding rdtk_event_id={replace} to the postback URL. It can be an order id/transaction id or something of this matter by which RedTrack will implement the deduplication. Once this mode is applied, no data by the mentioned event id will be added to the tracking report.
To set it up go to the added Offer source /Brand template → scroll down to the Default duplicate postback mode section → choose the needed mode → Save the changes to the template:
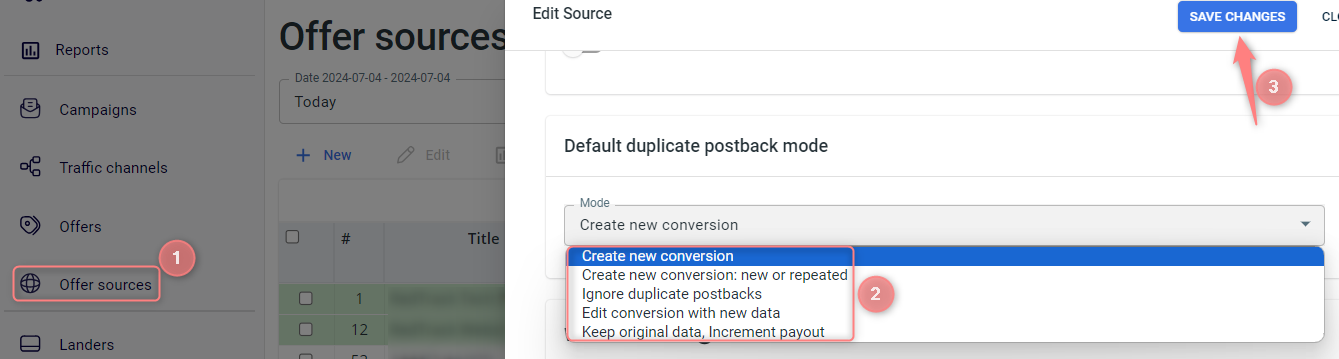
Default duplicate postback modes explained:
- Create new conversion: duplicate postback data will be added as a separate conversion.
- Create new conversion: new or repeated: duplicated postback data will be added as a separate conversion with different statuses.
– New for the first conversion.
– Repeated for the repeated (duplicated) conversions.
– Unknown for conversions in which this postback mode is not configured.
- Ignore duplicate postbacks: no data will be added to the tracking report.
- Edit conversion with new data: the original conversion will be edited with the new data.
You have a lead conversion that can transform into either a purchase or rejection later. You want to receive first the Lead, and send the data about this to the traffic channel, then you want the Lead to be changed to Purchase, also with sending the data to the traffic channel. In that case, edit conversion with the new data is the postback mode you need.
- Keep original data, Increment payout: only revenue will be edited.