Retreaver and RedTrack
Retreaver is a cloud based software that provides real-time, inbound call data by tagging, tracking and routing your callers to the best person, department, or agent.
Integration
Setup in RedTrack
1. Add the custom tracking domain.
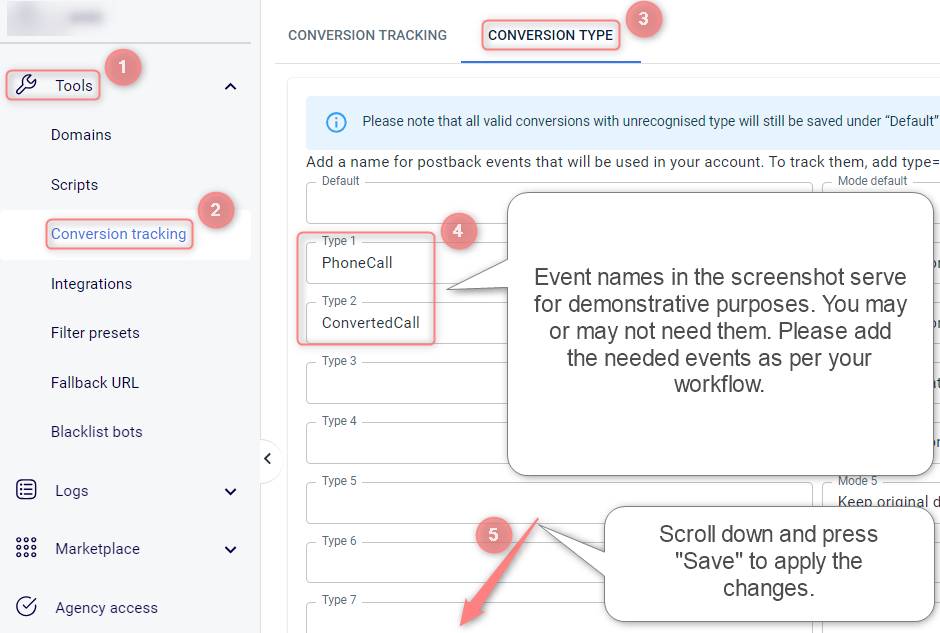
2. Add the tracking events.
Tools → Conversion tracking → Conversion type (this guide will help you) → Save.
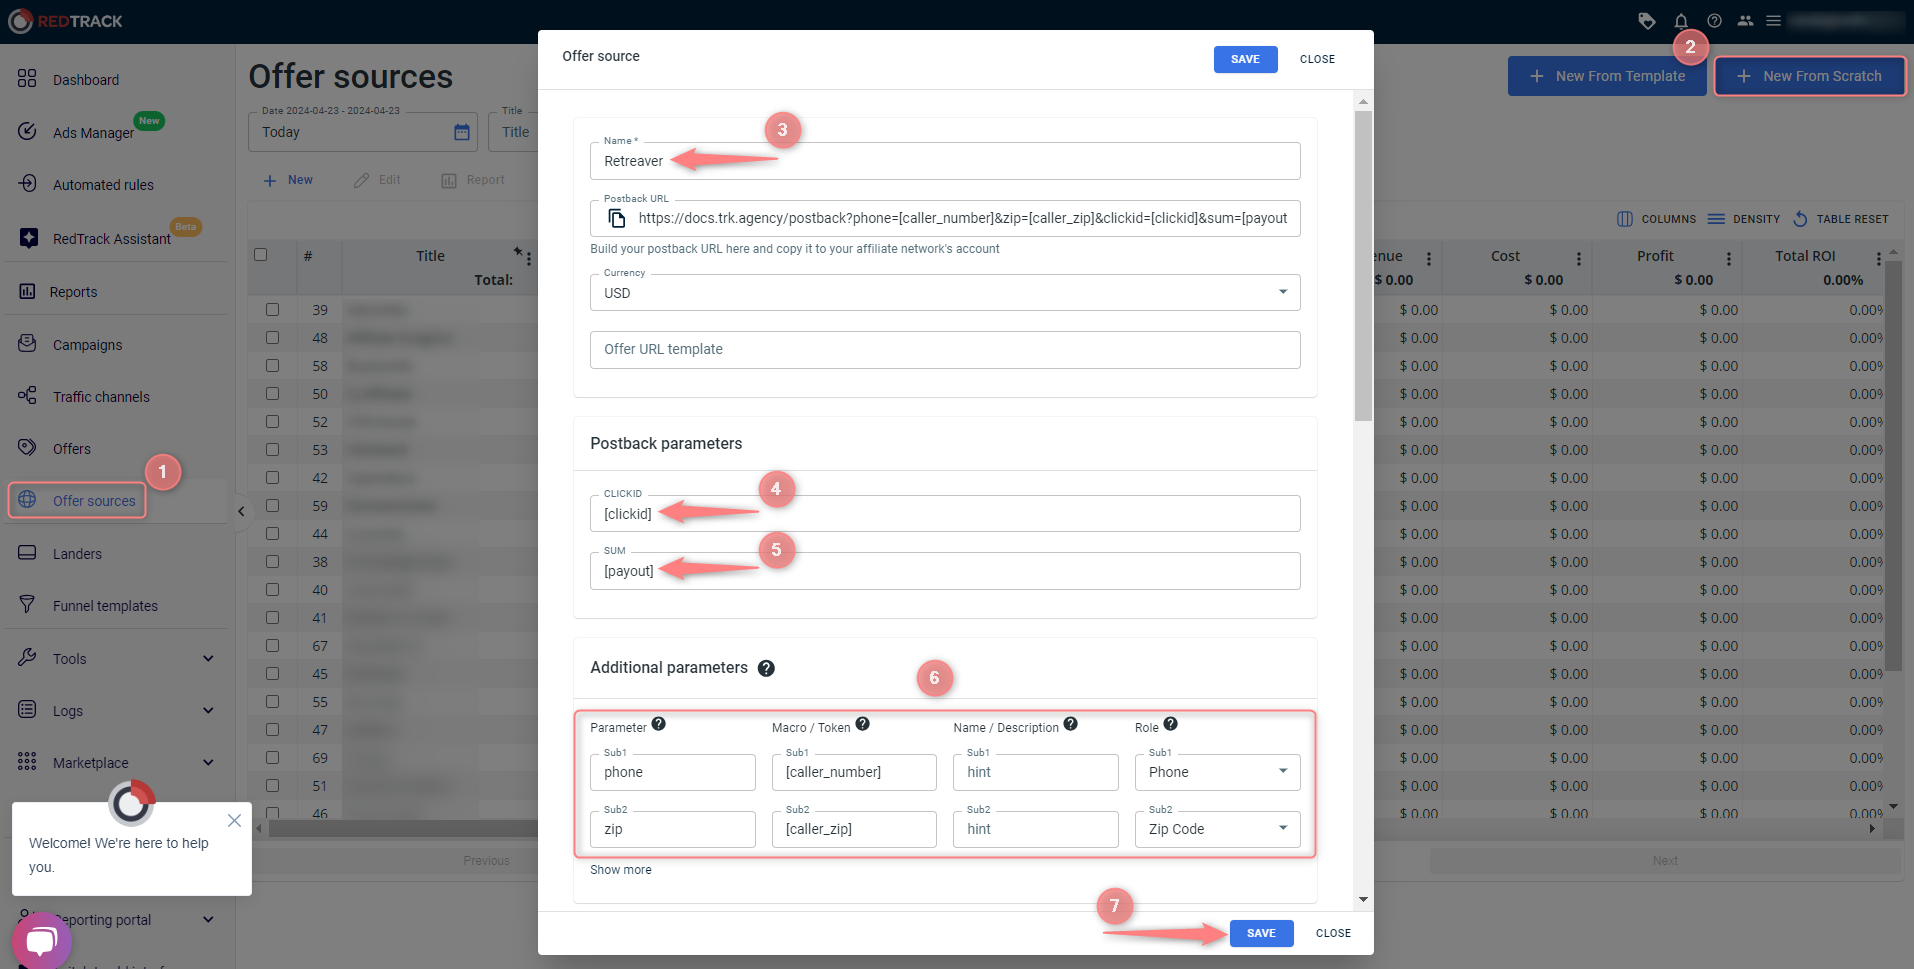
3. Add Retreaver as the Offer source in RedTrack.
Offer sources → New from scratch → name it Retreaver → In the Postback parameters section, add [clickid] and [payout] parameters → (if you work with Facebook) in the Additional parameters section add phone, zip parameters, and assign relevant roles → Save the template
4. Add the Offer to RedTrack.
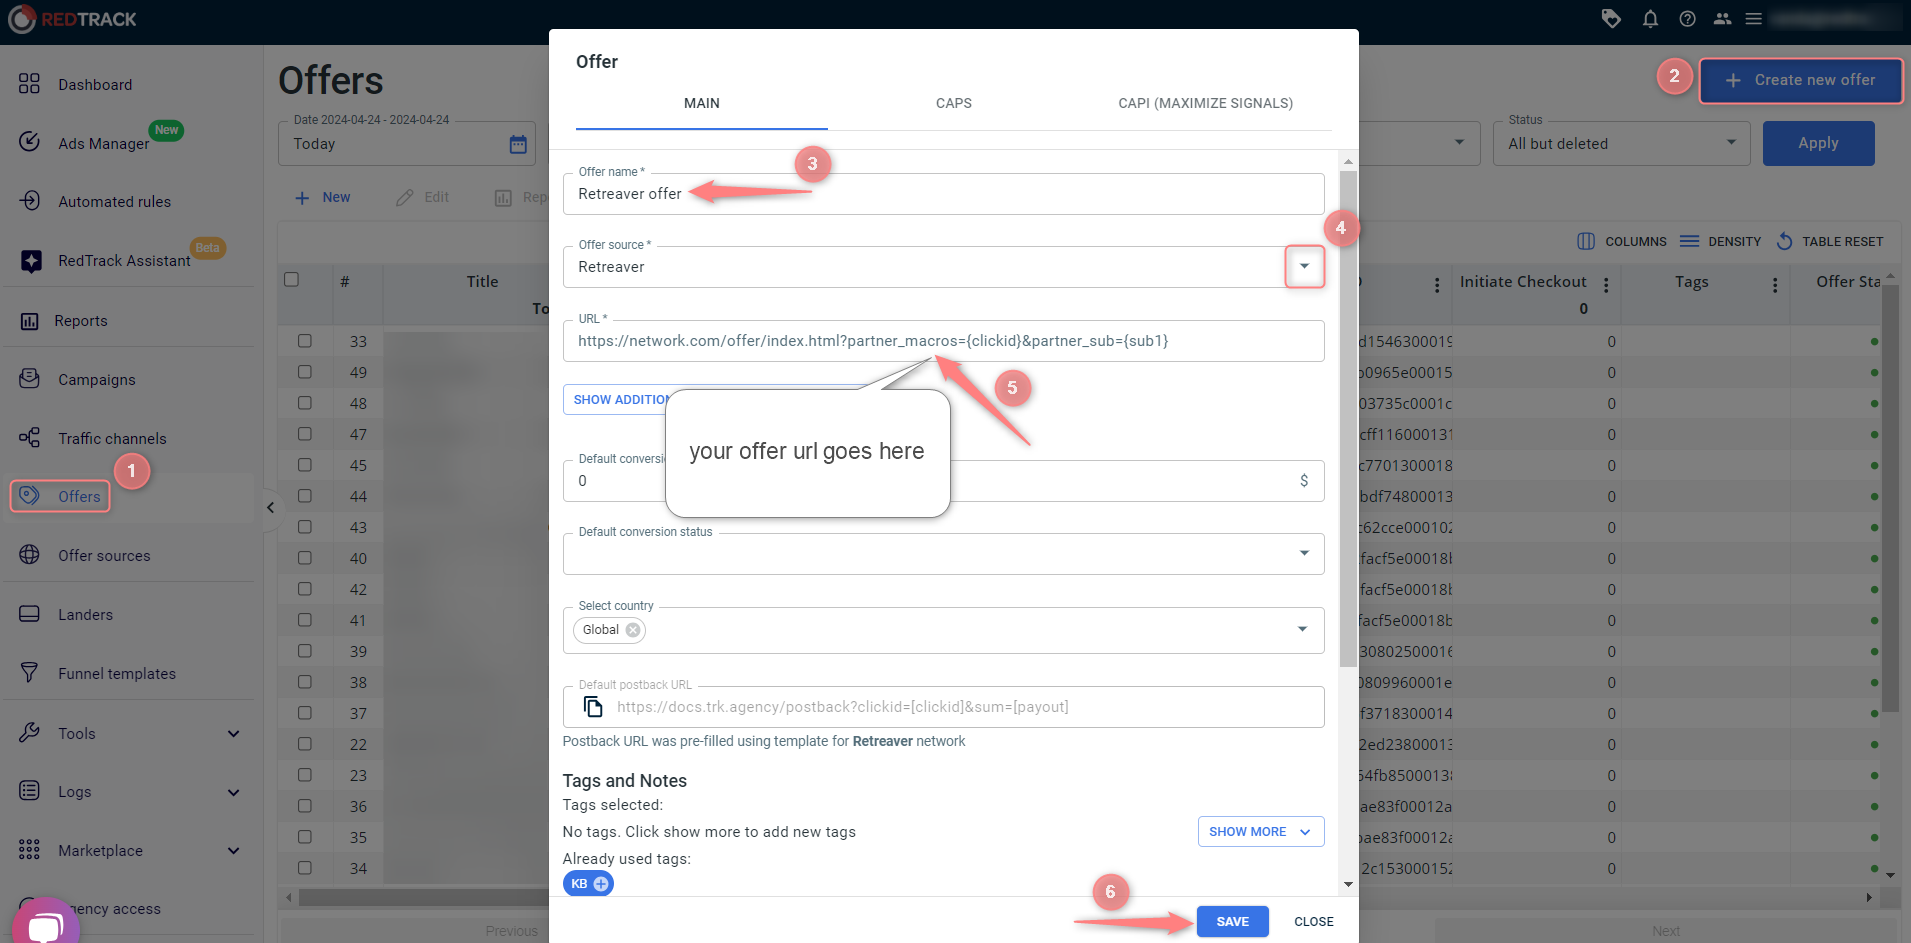
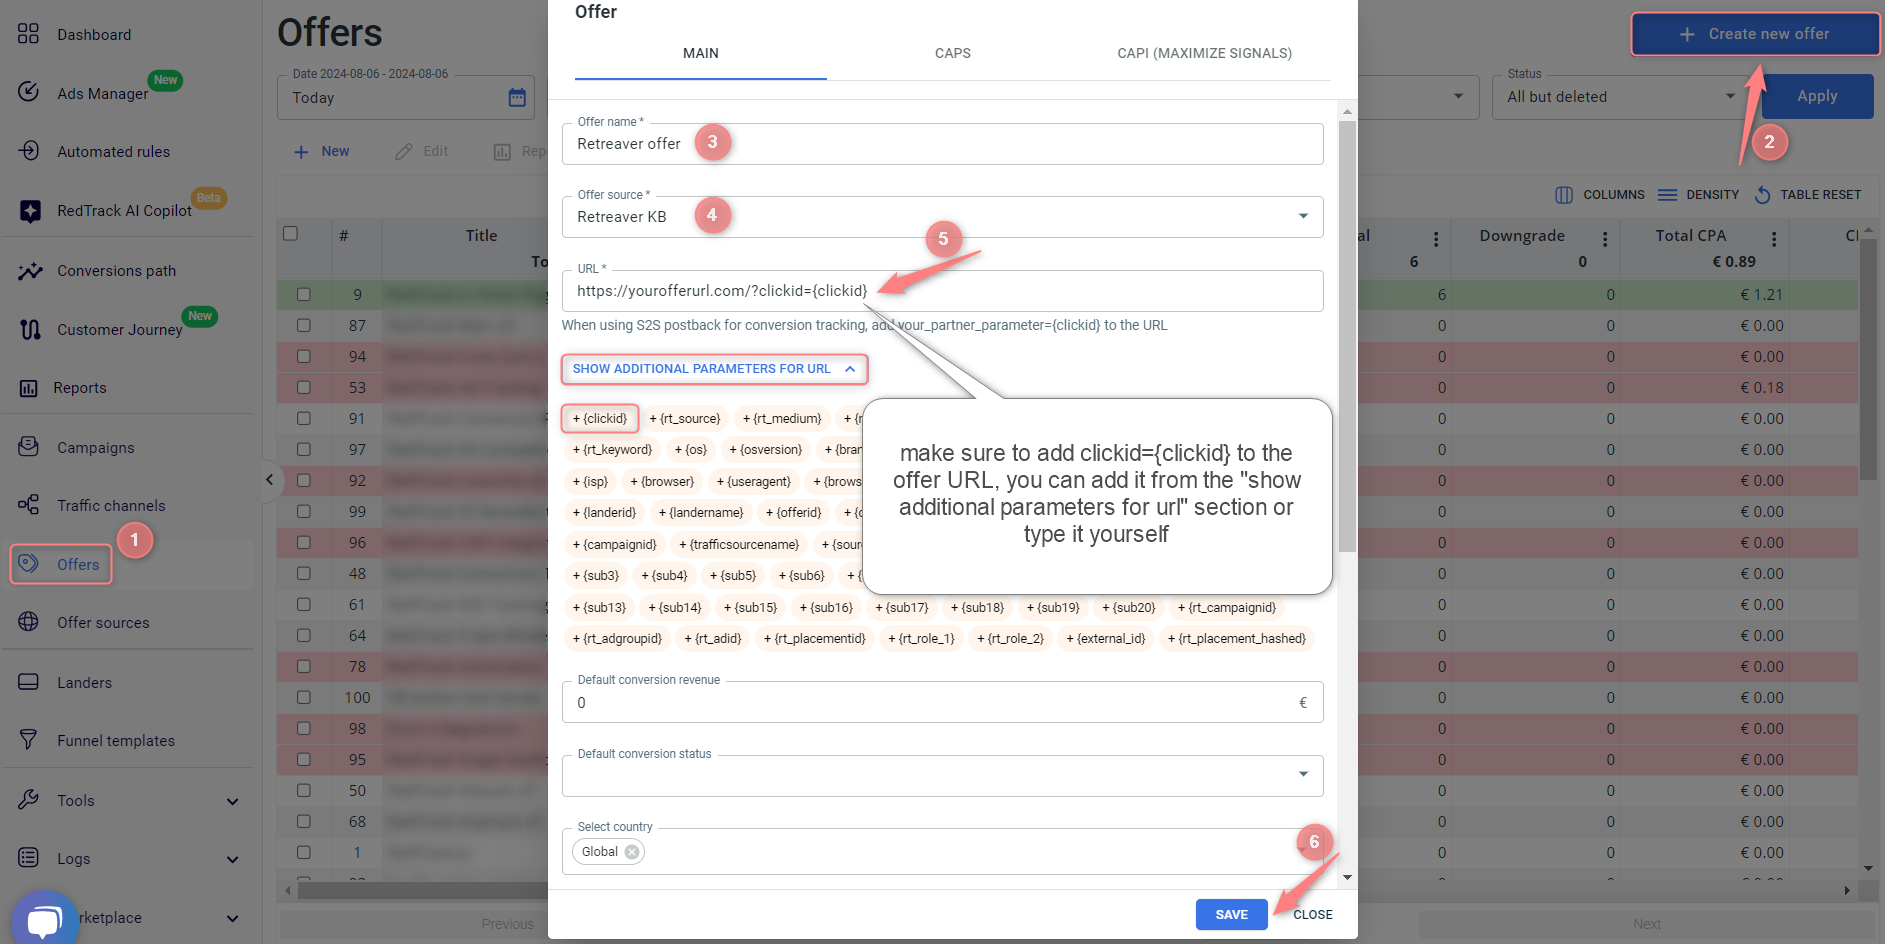
Offers → Create new offer → give your offer a name → select Retreaver offer source from the drop-down → paste your Offer URL → Save:
Offers → Create new offer → give your offer a name → select Retreaver offer source from the drop-down → paste your Offer URL and add clickid={clickid} to the end of the URL → Save:
5. Add the Traffic channel you work with.
6. Add the Landing page if you’re using one.
7. Generate a universal tracking script.
8. Create a Campaign.
Campaigns → Create new campaign → use this guide to help you fill in all the mandatory fields:

Values in the screenshot explained:
(1) Give your campaign a name
(2) Select the Traffic channel you created within step 5
(3) Select the custom tracking domain you added within step 1
(4) Select the Offer you added within step 4
1. Add the custom tracking domain.
2. Add the tracking events.
Tools → Conversion tracking → Conversion type (this guide will help you) → Save.

3. Add Retreaver as a Brand in RedTrack.
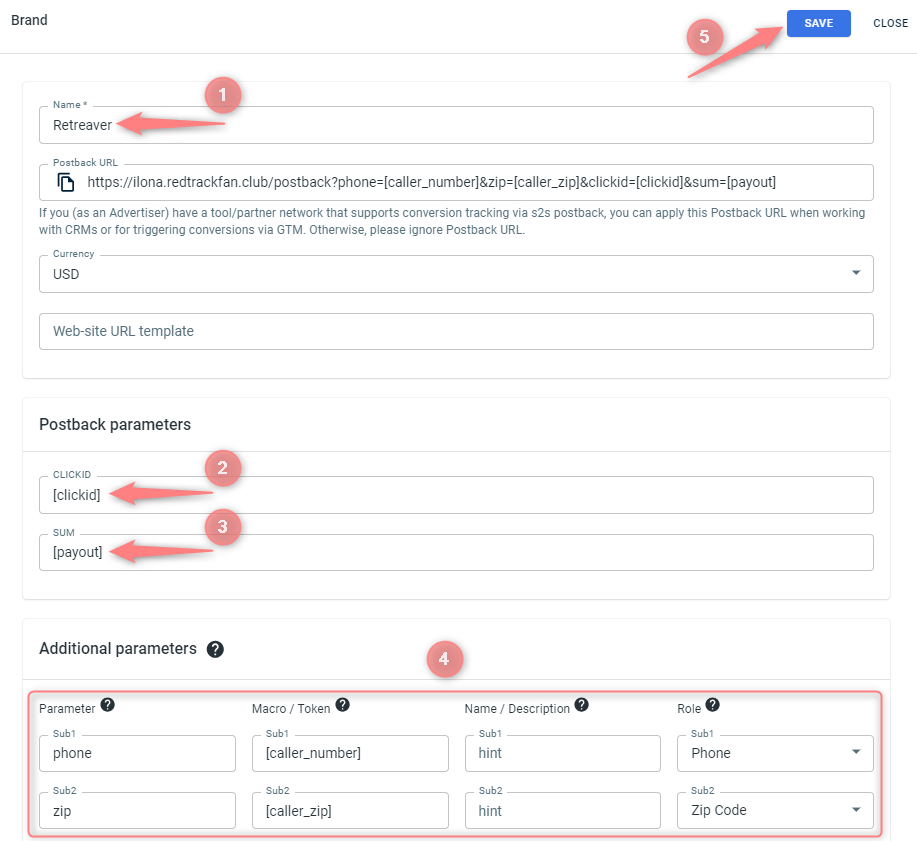
Brands → New from scratch → name it Retreaver → in the Postback parameters section, add [clickid] and [payout] parameters → (if you work with Facebook) in the Additional parameters section, add phone and zip parameters and assign relevant roles to them → Save the template:
4. Add your website/shop.
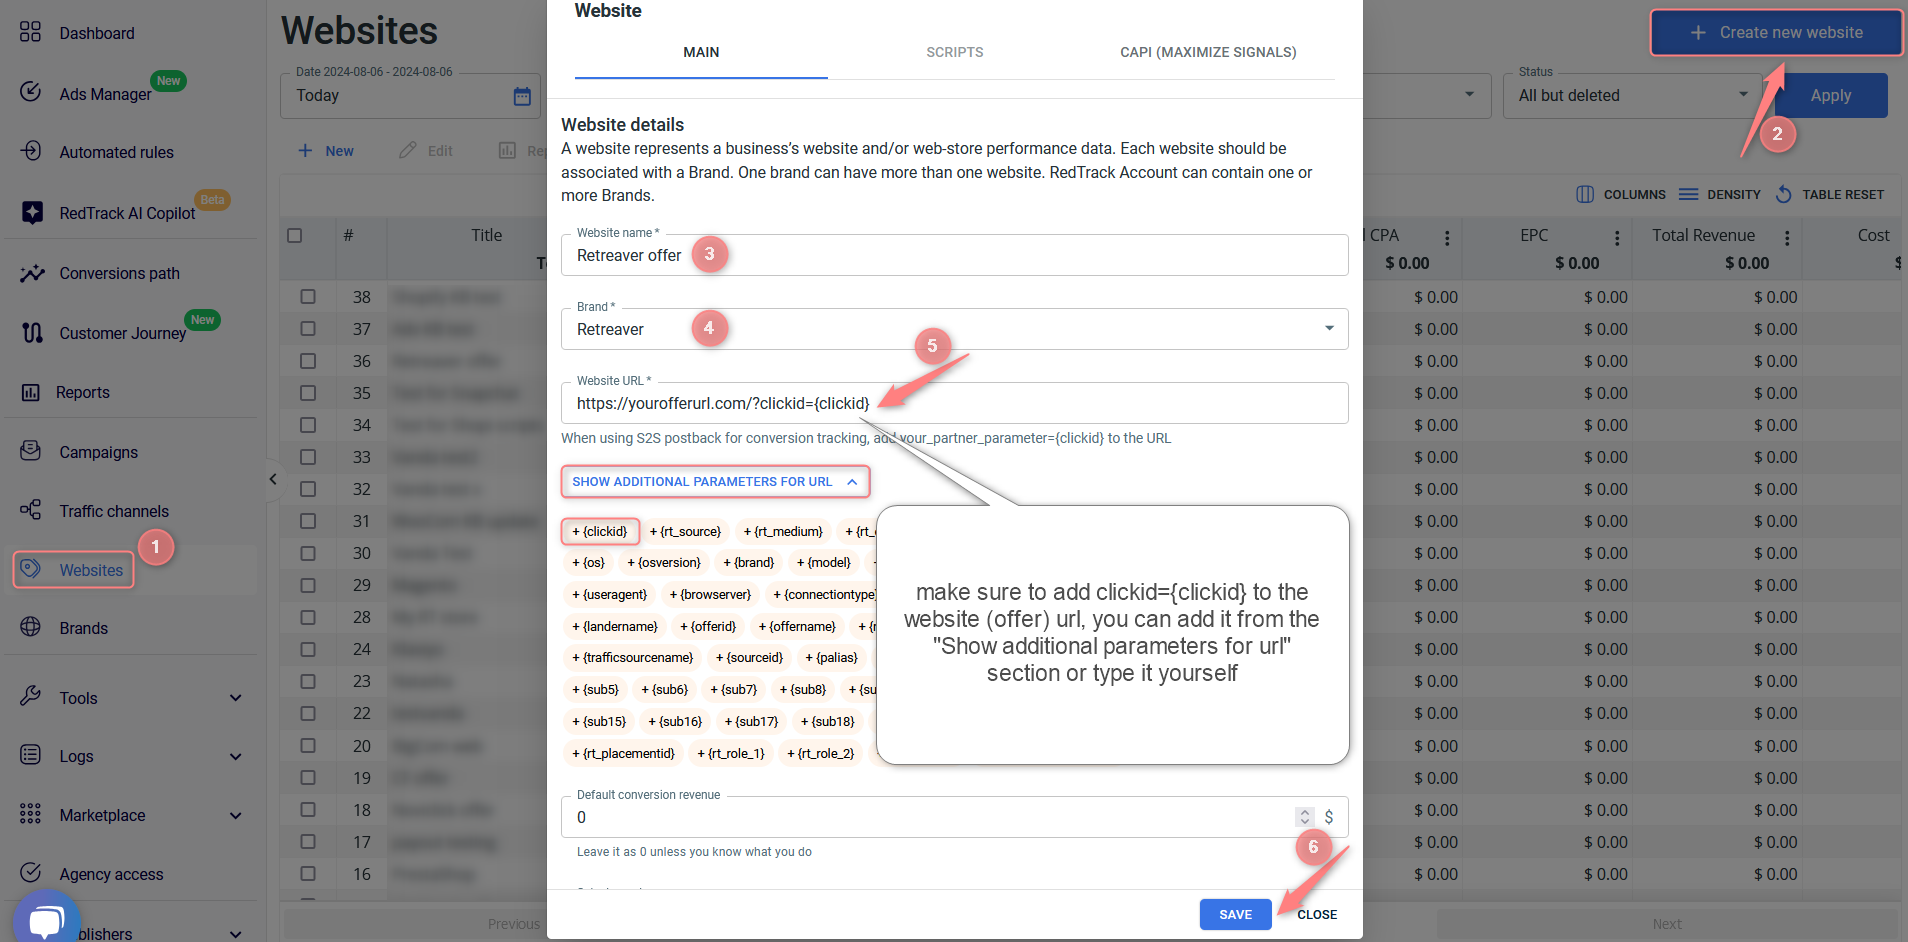
Websites → Create new website → give it a name → select Retreaver brand from the drop-down → paste your URL into the Website URL field → Save:
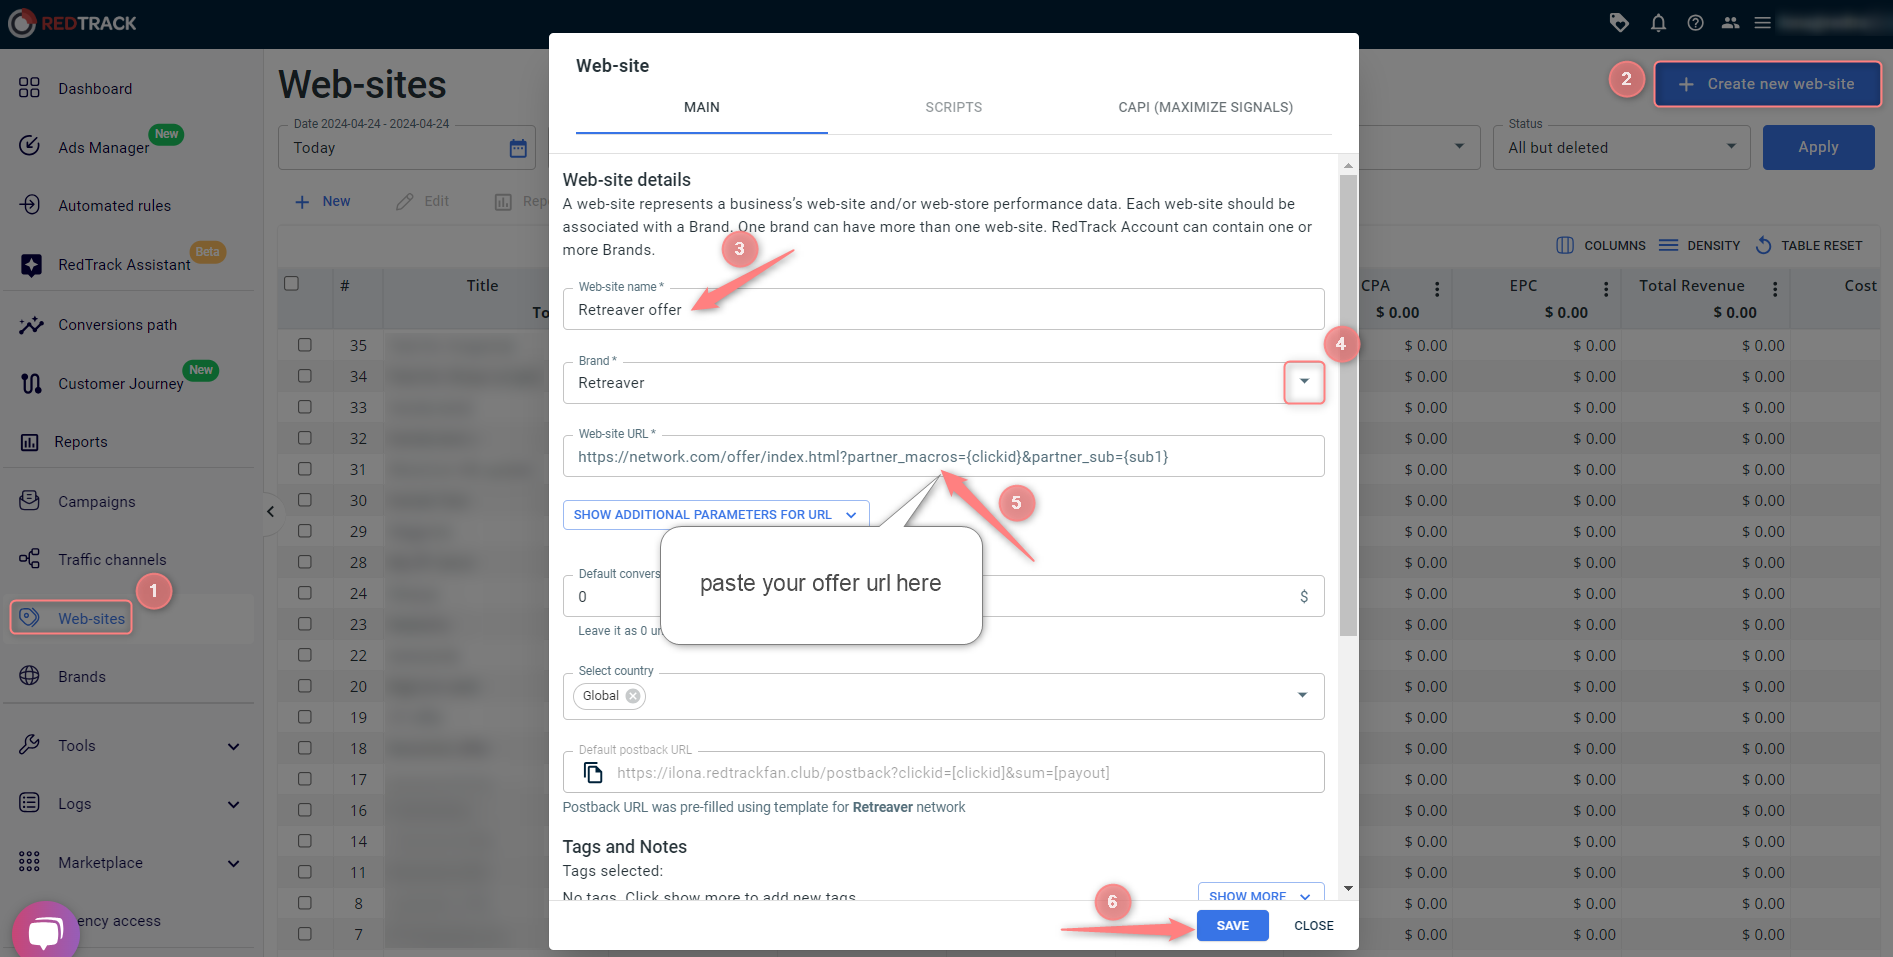
Websites → Create new website → give it a name → select Retreaver brand from the drop-down → paste your URL into the Website URL field → Save:
5. Add the Traffic channel you work with.
6. Create a Campaign.
Campaigns → Create new campaign → use this guide to help you fill in all the mandatory fields:

Values in the screenshot explained:
(1) Give your campaign a name
(2) Select the Traffic channel you created within step 5
(3) Select the custom tracking domain you added within step 1
(4) Select the Website you added within step 4
Setup in Retreaver
1. Add the following essential elements to your Retreaver account:
- Create a Retreaver Call Tracking Campaign.
- Create A Number Pool For Your Campaign (step 2).
- Configure Your Number Pool For Real-Time Tracking (step 3).
- Tell Retreaver Which Numbers To Replace On Your Landing Page (step 4).
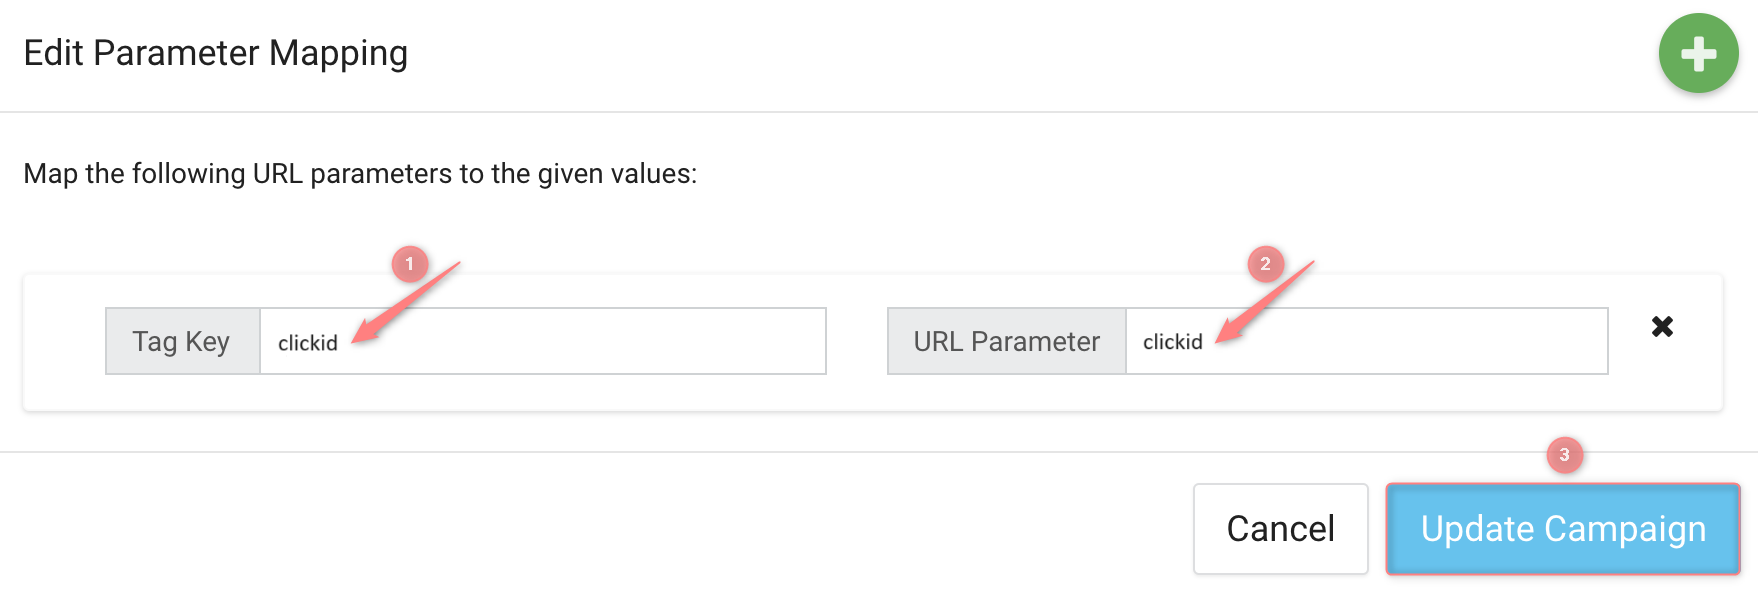
2. Set up parameter mappers for clickid.
Use this guide to adjust the parameter mapper settings → when editing Parameter Mapping, add clickid to Tag Key and URL Parameter fields → Update Campaign:
3. Add scripts to the head section of the page code.
The scripts you add depend on the tracking method you choose:
1. RedTrack universal tracking script:
Your universal tracking script was created when you did the Setup in RedTrack and can be found in RedTrack → Tools → Scripts. Click here for more info about the universal tracking script in RT.
2. Retreaver script:
Example of the script’s part with the replaced Retreaver Campaign Key:
var campaign = new Retreaver.Campaign({campaign_key: ‘e8d3223ad7cs4gdd59f672tc1ha158j5’});
<script type="text/javascript">
    (function () {
        var scriptElement = document.createElement('script');
        scriptElement.type = 'text/javascript';
        scriptElement.async = true;
        scriptElement.defer = true;
        scriptElement.src = document.location.protocol + '//dist.routingapi.com/jsapi/v1/retreaver.min.js';
        scriptElement.onload = scriptElement.onreadystatechange = function () {

            Retreaver.configure({
                host: 'api.routingapi.com',
                prefix: document.location.protocol == 'https:' ? 'https' : 'http'
            });

            var campaign = new Retreaver.Campaign({campaign_key: 'YOUR_CAMPAIGN_KEY'});

            function getRtckValue() {
                const clickid = document.cookie.split(";").map(x => x.trim()).filter(x => x.startsWith("rtkclickid-store"))[0];
                return clickid ? clickid.split("=")[1] : "";
            }

            console.log("clickid: " + getRtckValue());

            campaign.request_number(function (number) {
                // Store cookie as a tag
                number.add_tags({
                    clickid: getRtckValue()
                });
            });
        };
        (document.getElementsByTagName('head')[0] || document.getElementsByTagName('body')[0]).appendChild(scriptElement);
    })();
</script>
In Retreaver’s case redirect tracking method means adding only Retreaver default script to the head section of the page code. For guidance on how to find Retreaver.js Script go to this article → Accessing the Retreaver.js Script section.
4. Set up webhooks for Retreaver campaign with the condition for webhook to fire (the event).
4.1 In your RedTrack account, go to Offer source/Brand → copy the Postback URL:

4.2 In Retreaver account, go to Campaign settings → Webhooks → Add → choose the condition for the webhook to fire (the event) → paste the Postback URL:


