
Shopify and RedTrack

Shopify is the leading cloud-based, multi-channel commerce platform. Merchants can use the software to design, set up, and manage their stores across multiple sales channels, including web, mobile, social media, marketplaces, brick-and-mortar locations, and pop-up shops. The Shopify platform was engineered for reliability and scale, making enterprise-level technology available to businesses of all sizes.
RedTrack allows you to integrate with Shopify via an API. That means:
- All your conversion events are tracked on the backend automatically.
- The highest level of accuracy for conversion and revenue delivery.
Integration
1. Known limitations: check your setup first
Standard Shopify with native checkout works well. The cases below show up only when your store steps outside that native flow.
If your setup includes… | What to expect | What to check |
|---|---|---|
A third-party or off-Shopify checkout (Funnelish, for example) | The click ID is dropped at the redirect to the external checkout, so you’ll see clicks but few or no conversions. Forwarding it across takes custom developer work and differs per platform, some funnels in particular have no standard workflow or guide yet. | Confirm the click ID is passed into the external checkout’s URL. If it isn’t, plan for custom dev and tell support which checkout you use. |
A COD plugin (Releasit COD, xConnector, or similar) | The RedTrack Shopify app can conflict with the COD app, so the purchase webhook may not fire. | Name the COD app to support before relying on tracking, and confirm orders reach “Processing” so the webhook fires. |
A call-center COD funnel (form → phone confirmation → approved order) | No built-in flow links the form-submit click ID to the eventually confirmed purchase. RedTrack takes S2S postbacks at each step, but tying them together needs custom work. Without it you’ll see leads, not paid orders. | Capture the click ID at form submit, pass it through your CRM to the agent, and fire a postback when the order is confirmed. |
An upsell app (Rebuy, MOTIO) running alongside the tracking script | The script can interfere with the app’s cart logic and throw off upsell counts or free-gift promotions. | If upsell numbers look off, tell support which app you run. |
Two click ID fields on the same order (e.g. __clickid vs clickid with different values) | Matching breaks and the purchase won’t register. | Make sure exactly one click ID field maps to the click RedTrack expects, and install the /click script for the lander domain. |
2. RedTrack steps
1. Create custom conversion events.
Tools → Conversion tracking → Conversion types → add the events for Shopify → Save. Use this guide to help you add the events, set up postback modes for them, etc.
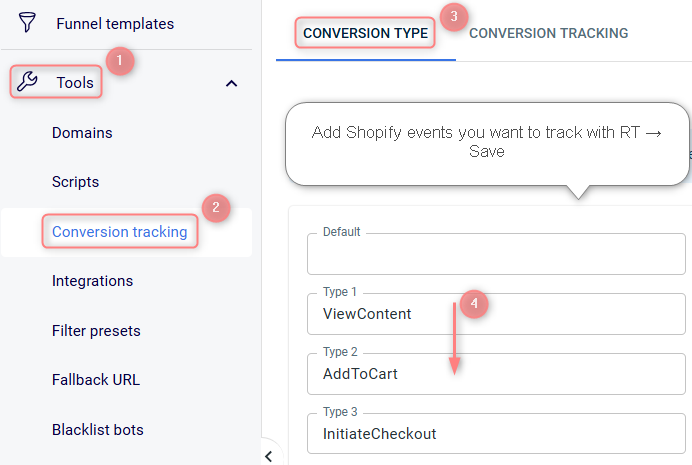
Here’s the list of Shopify events you can track with RT:
- ViewContent
- AddToCart
- InitiateCheckout
- Purchase
- Upsell
To track this event properly, add it in RT + set up a Webhook in Shopify (Webhook setup is described in the Shopify steps section of this guide → step 2). - Cancelled
This event type presupposes manually and automatically cancelled orders from Shopify. To track this event properly, add it in RT + set up a Webhook in Shopify (Webhook setup is described in the Shopify steps section of this guide → step 2). - Shipping
This event type presupposes the cost of shipping minus the cost of purchase and the Payout value for this event type is counted with a minus.
2. Create a custom Brand.
Brands → New from scratch → use this guide to help you set up your brand properly.
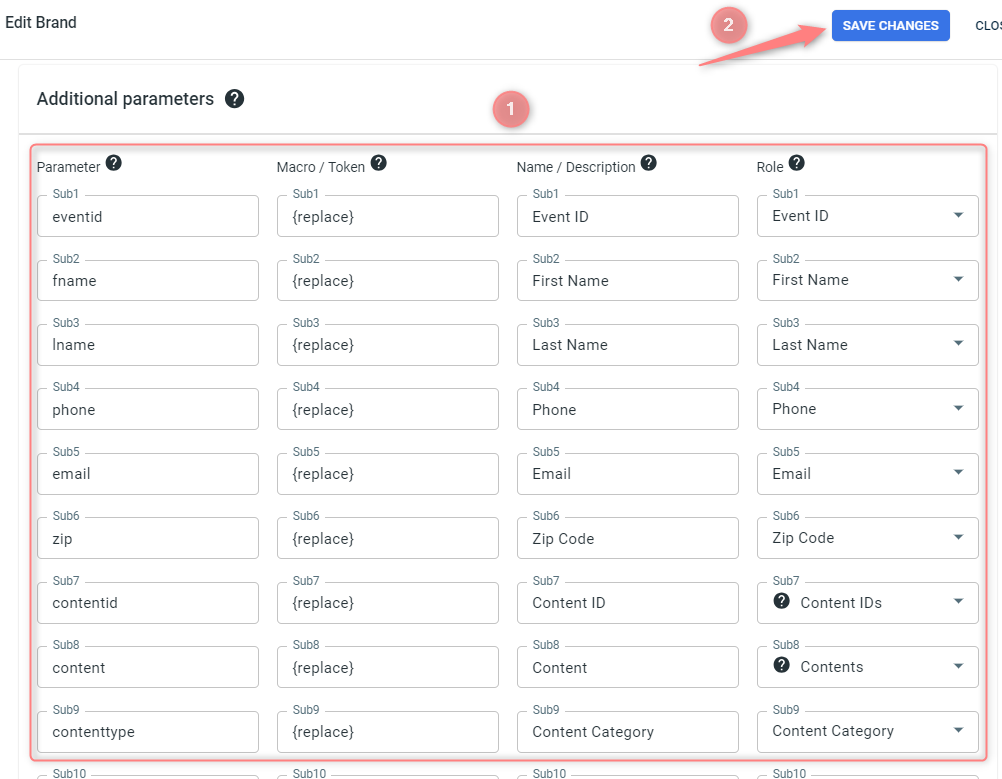
3. To send the PII data for better attribution go to the added Brand settings → Additional parameters → add the following parameters with the corresponding roles:
Parameter | Macro / Token | Name / Description (what you will see in reports instead of subx) | Role | Info we receive under these parameters |
|---|---|---|---|---|
eventid | {replace} | Event ID | Event ID | Your order ID or the external ID for the conversion |
fname | {replace} | First Name | First Name | Customer First Name from the order |
lname | {replace} | Last Name | Last Name | Customer Last Name from the order |
phone | {replace} | Phone | Phone | Customer phone number from the order |
email | {replace} | Email | Email | Customer email from the order |
zip | {replace} | Zip Code | Zip Code | Customer zip code from the order |
contentid | {replace} | Content ID | Content IDs | External product ID |
content | {replace} | Content | Contents | Product title |
contenttype | {replace} | Content Category | Content Category | The type of product |
4. Add your Website.
Websites → New → use this guide to help you add your website.
You will need them later to connect to Shopify.
5. Create a paid traffic campaign.
The campaign for the unattributed (organic) traffic is already in place. Now you need to create the one for the paid traffic. Follow these simple steps:
- Add the Traffic channel. Most of them have a preset template in RedTrack.
- Launch a campaign for the paid Traffic channel. Your website/shop will be the main link added to the traffic channel.
3. Shopify steps
1. Add the needed scripts from RedTrack to Shopify:
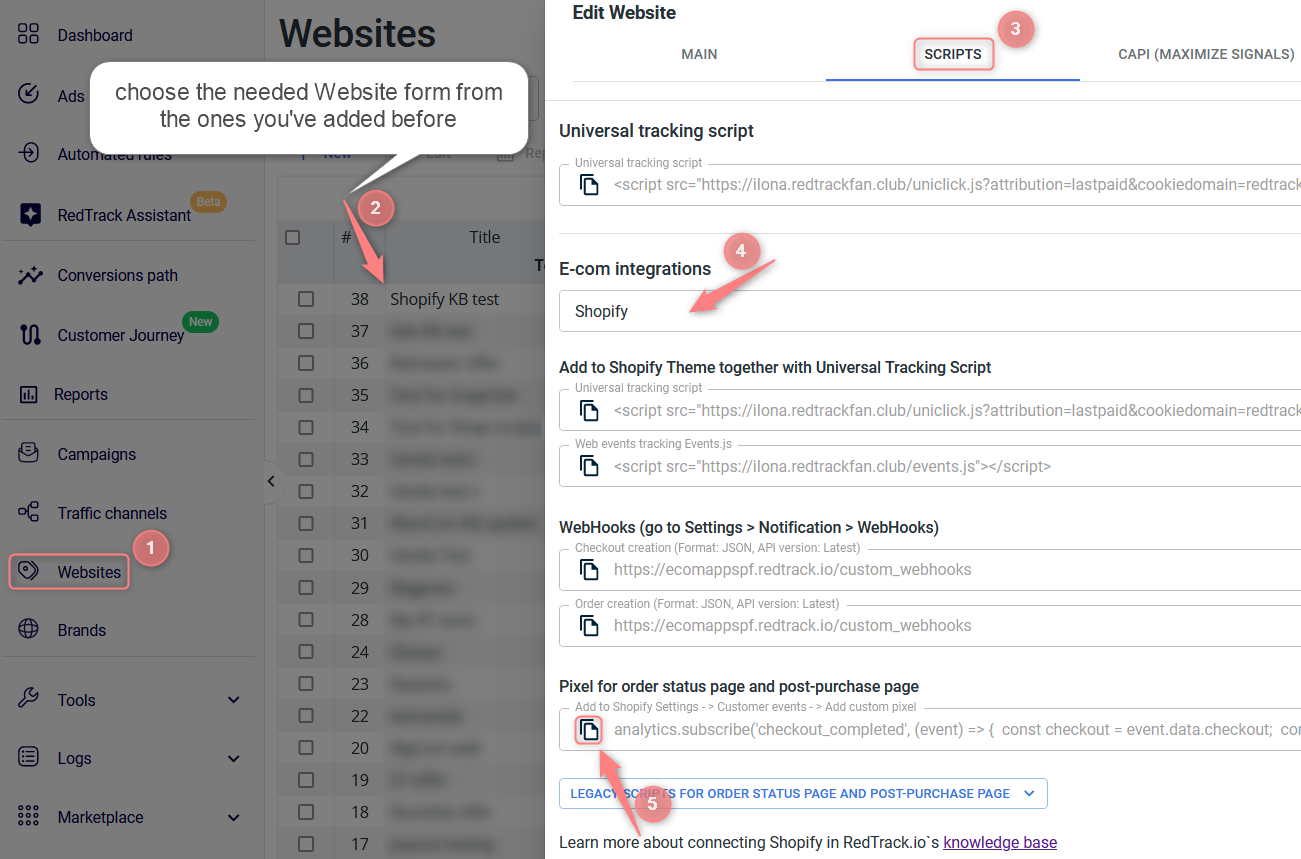
1. Copy the scripts from the added Website form.
Websites → edit Website form → Scripts → select Shopify → copy the scripts:
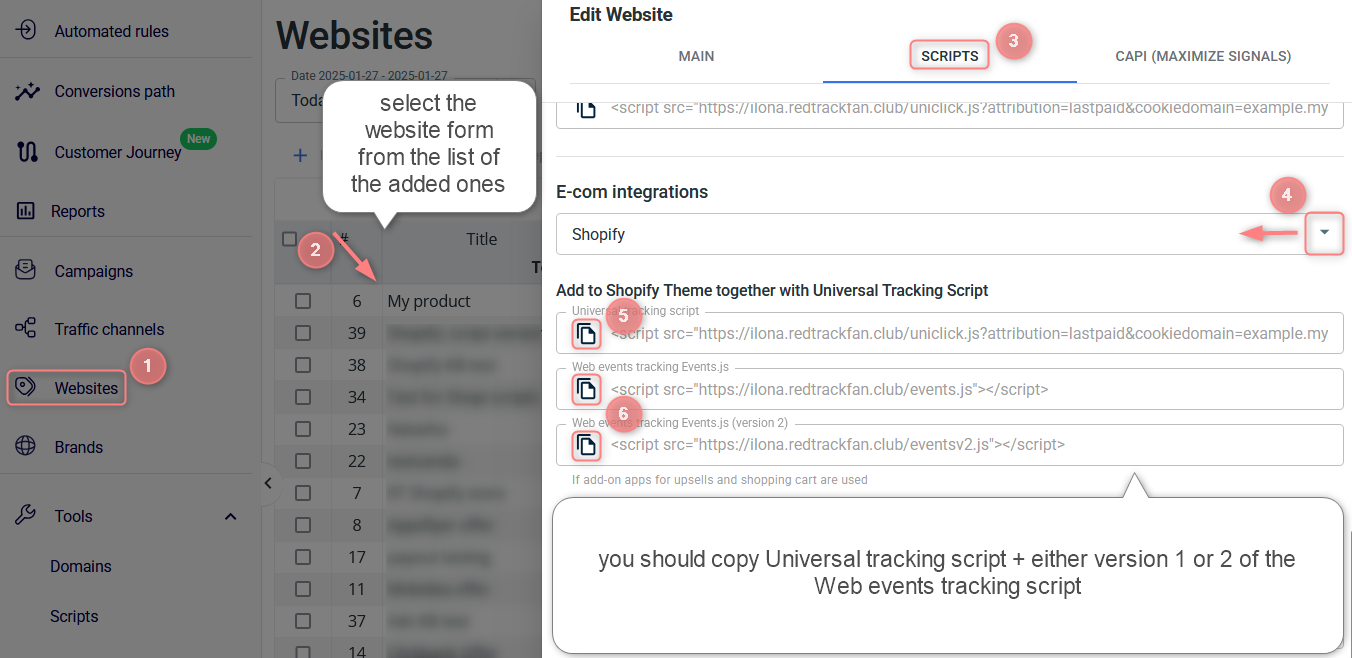
DO NOT install both versions of the script, as it will lead to conflict.
Open this if you don’t have the generated scripts in your account
If you have the Offer form and no automatically generated scripts, then you need to:
- Create and copy the universal tracking script. Use this article → I’m affiliate section.
- Copy this Web events tracking Events.js script:
<script src="https://yourtrackingdomain.com/events.js"></script>2. Add the copied scripts to your Shopify account.
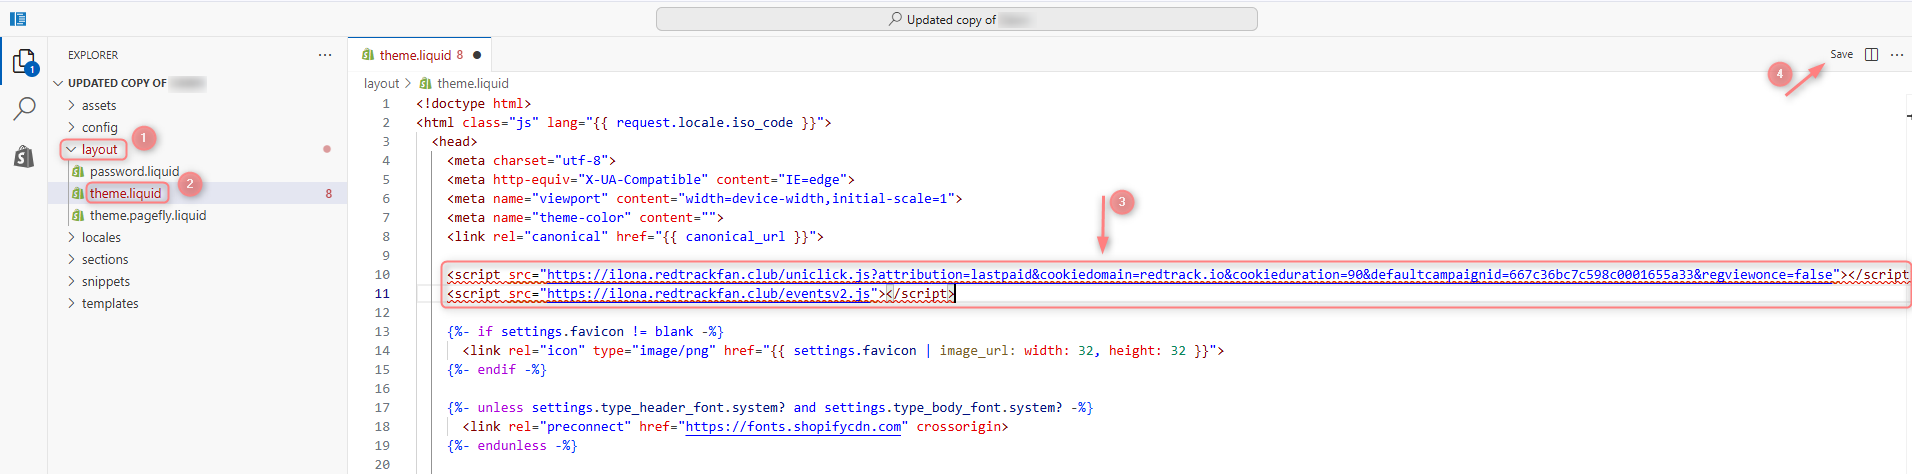
2.1 Sales channels → Online Store → Themes → three dots → Edit code:
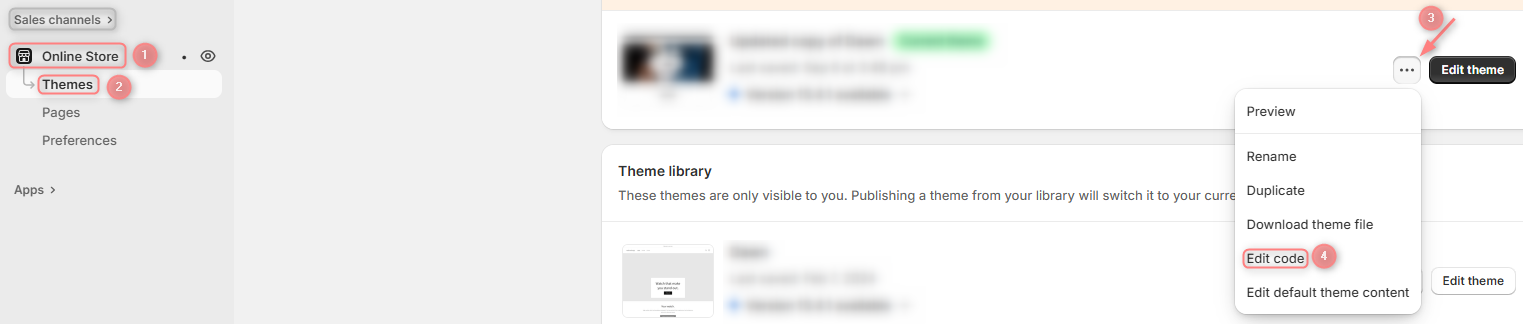
2.2 Layout → theme.liquid → add the copied scripts to the end of the <head> tag → Save:
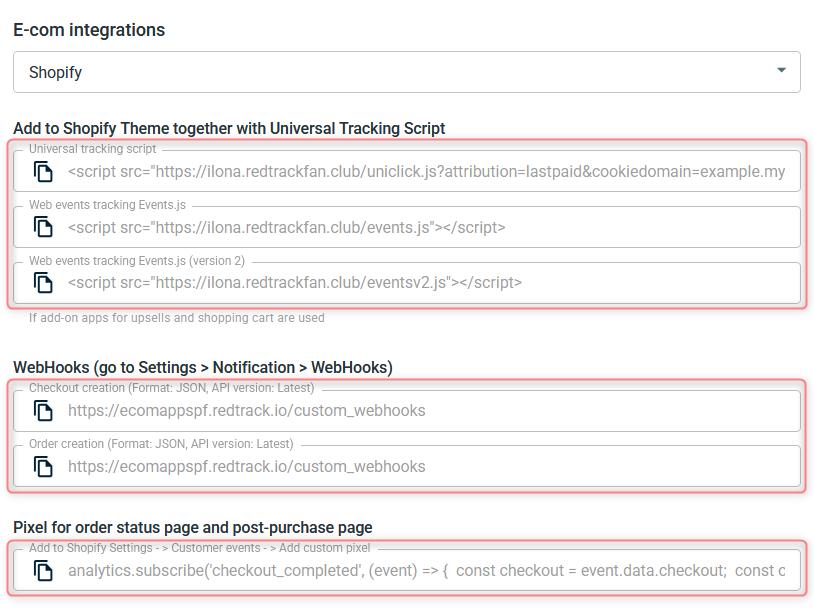
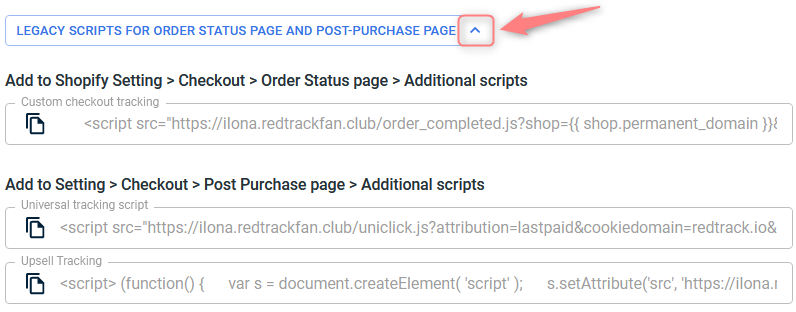
1. Copy the pixel from the Website form.
Websites → choose the needed one → Scripts → choose Shopify → copy the Pixel for order status page and post-purchase page:
Open this if you don’t have the generated pixel in your account
If you have the Offer form and no automatically generated pixel, copy it from here:
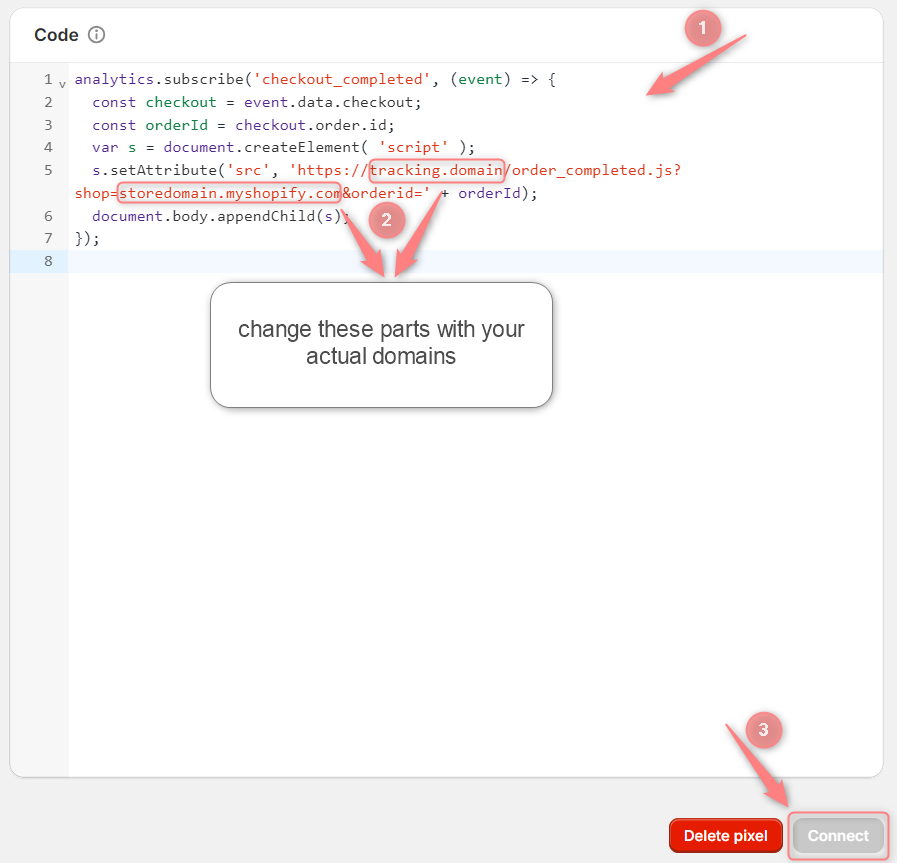
analytics.subscribe('checkout_completed', (event) => {
  const checkout = event.data.checkout;
  const orderId = checkout.order.id;
  var s = document.createElement( 'script' );
  s.setAttribute('src', 'https://tracking.domain/order_completed.js?shop=storedomain.myshopify.com&orderid=' + orderId);
  document.body.appendChild(s);
});
2. Add the copied pixel to your Shopify account.
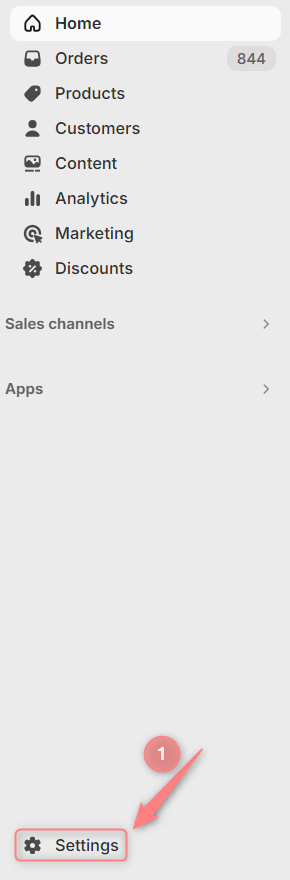
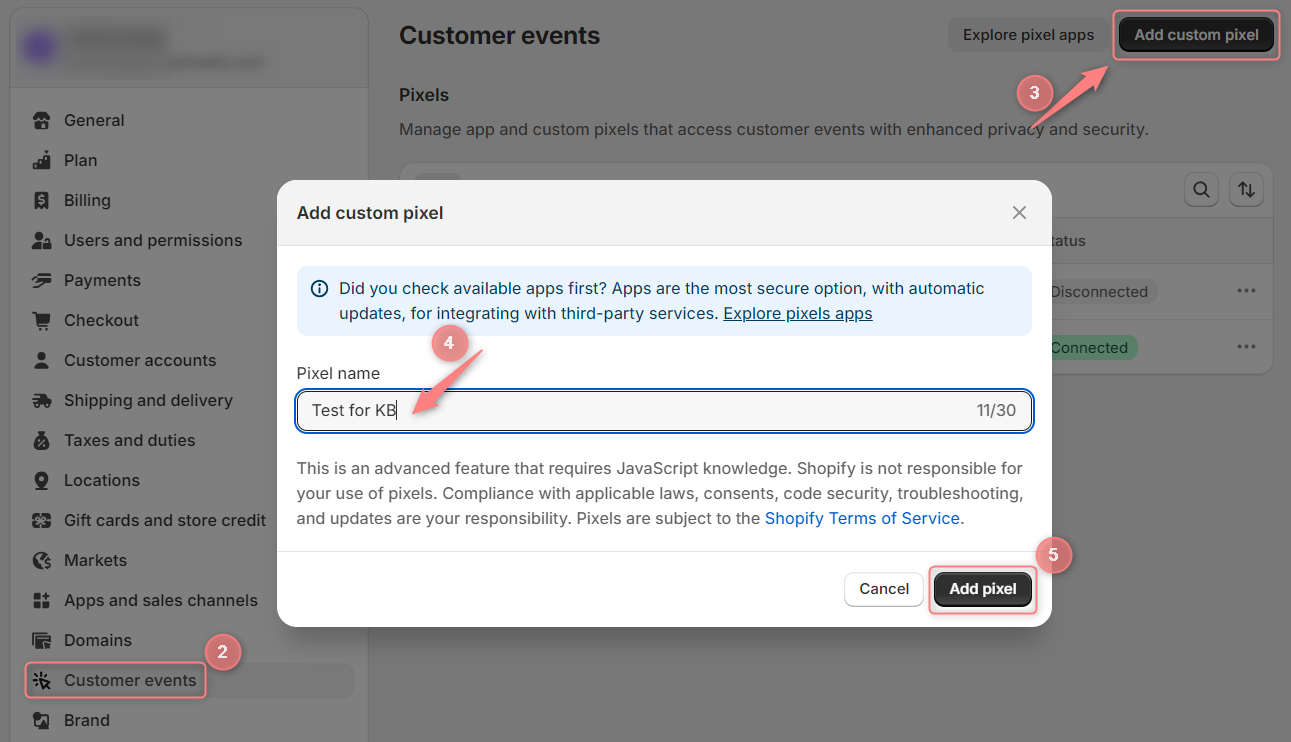
2.1 Settings → Customer events → Add custom pixel → give it a name → Add pixel:
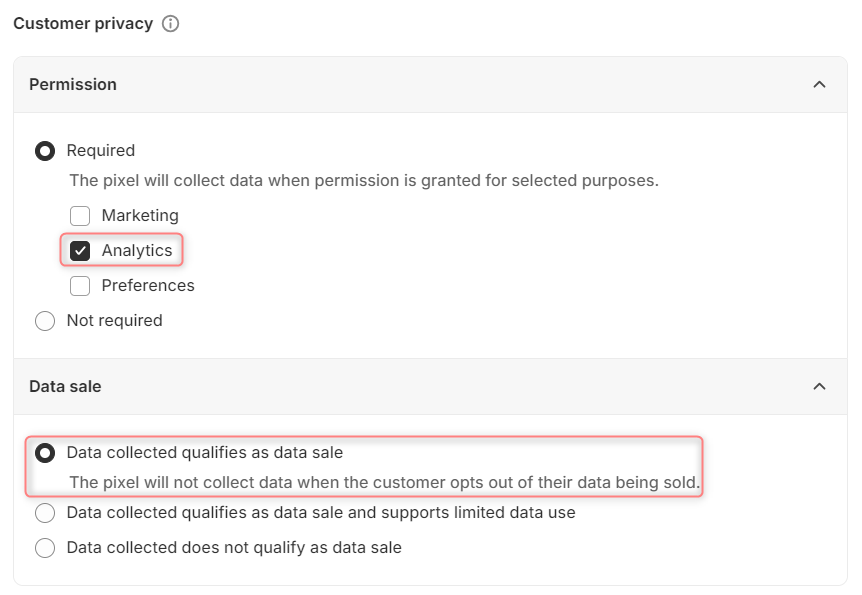
2.2 In the Permission window mark Analytics → in the Data sale window mark Data collected qualifies as data sale:
2.3 Paste the pixel (copied in step 1) into the Code section → change the tracking.domain and store.domain parts with your actual domains → Connect:
2. Create Webhooks.
Settings → Notifications → Webhooks → Create webhook:
- Event: Checkout creation
- Format: JSON
- URL: https://ecomappspf.redtrack.io/custom_webhooks

- Event: Order creation
- Format: JSON
- URL: https://ecomappspf.redtrack.io/custom_webhooks

Order edit webhook should be added only for Upsell event tracking.
- Event: Order edit
- Format: JSON
- URL: https://ecomappspf.redtrack.io/custom_webhooks
- Event: Cancelled
- Trigger: order cancellation
- Webhook: https://ecomappspf.redtrack.io/custom_webhooks
▸ If you want to track manually added orders in Shopify with RedTrack, refer to this article for additional setup steps.
▸ If your Shopify store domain or/and custom tracking domain were changed you must update these domains in RedTrack and/or Shopify for correct tracking. Refer to this article for additional setup steps.
▸ If you use a landing page before the shop, plus the landing page and Shopify shop domains are different, refer to this article for setup.
▸ If your Shopify store is connected with Cartpanda, refer to this article for additional setup steps related to this case.