
WooCommerce and RedTrack


WooCommerce (WooCom) is a flexible, open-source commerce solution built on WordPress. WooCommerce empowers small and medium businesses to build exactly the store they want and sell online.
Integrations steps
1. Known limitations: check your setup first
RedTrack WooCommerce plugin handles standard stores fine. These configurations are where the data turns unreliable:
If your setup includes… | What to expect | What to check |
|---|---|---|
COD and Pending orders | The “Submit Purchase on Processing + Pending + COD” setting can revert to Processing-only after a WordPress or WooCommerce update, dropping COD and Pending orders. | Re-verify the COD setting after every plugin update. If your RedTrack count drops below your WooCommerce order list, start here. |
A third-party or local payment gateway (e.g. Netopia) | RedTrack’s webhook fires on “Processing”. Gateways using a custom in-between status, or jumping straight to Completed, cause purchases tracked before payment clears or conversions missed entirely. Common with local providers in Brazil, Romania, and MENA. | Confirm your gateway moves orders through the standard “Processing” status. |
AffiliateWP for publisher tracking | The RedTrack click ID isn’t written into the order at checkout, so affiliate conversions can’t be tied to a source in RedTrack. Paid traffic still tracks normally. | Expect no affiliate-source attribution under AffiliateWP; track paid traffic separately. |
2. Setup in RedTrack
1. Create custom conversion events.
1.1 Before you add the events for WooCom in RedTrack, study these 2 categories of WooCom events that can be tracked with RedTrack:
1st category includes standard events, which will be tracked once these events are added to RT and the WooCom <-> RT integration is done as per this guide. These events are:
- ViewContent
- AddToCart
- InitiateCheckout
- Purchase
2nd category of events are custom ones. They are:
- Subscription
- Upsell
- Downsell
- OrderBump
In order to track the events of the 2nd category, in addition to the WooCom plugin you also need to get WordPress (WP) plugins aka funnel builders. These plugins/funnel builders are: One Click Upsell, WooFunnels, and Upsell Order Bump.
As for the upsells, RedTrack supports WooFunnels Funnel Builder Pro. Click here for more details on the WooCom subscription info.
Check out which events can be tracked with each additionally added plugin/funnel builder for WooCom:
WP type of the plugin/funnel builder for WooCom | ||||
Conversion events, that will be counted when using this plugin type | ViewContent | ViewContent | Order Bump | Subscription |
AddToCart | AddToCart | |||
InitiateCheckout | InitiateCheckout | |||
Purchase | Purchase | |||
Upsell | Upsell | |||
Subscription | Subscription | |||
Downsell | Downsell | |||
OrderBump |
The following notes provide tips on handling specific event types. Please review them carefully:
Subscription and Upsell events are fully tracked using plugins like One Click Upsell, WooFunnels, and YITH WooCommerce Subscription. While other plugins may also track these events, their reliability is uncertain since this workflow hasn’t been fully tested or verified, making such testing potentially risky.
For the Purchase event to be tracked in RedTrack, the order must have the status Completed / event marked payment_complete in WooCom.
– If a customer sells subscriptions, his purchases = subscriptions.
– If the customer sells goods or services, his purchases = purchases.
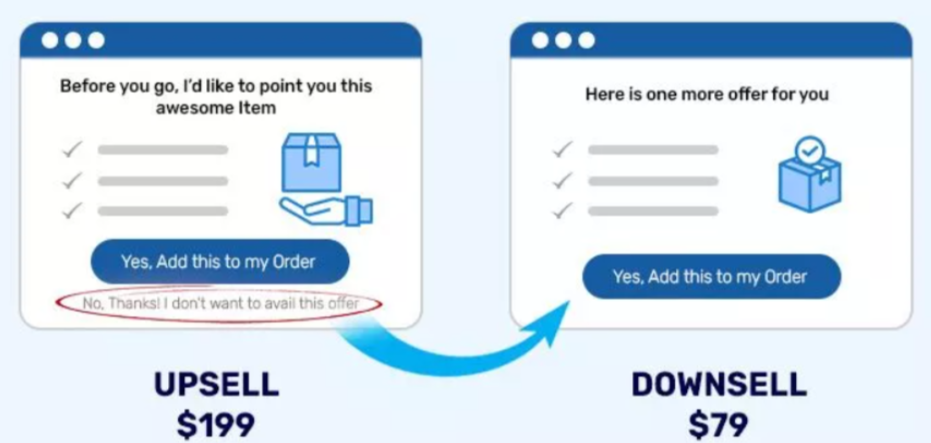
– Upsells are products that you recommend instead of the currently viewed product.
– Downsell offer is the one that you make to your customer after they’ve turned down your initial upsell offer. So if the customer didn’t accept your upsell offer, you can still increase their AOV by offering a downsell:
Order Bump event does not record revenue. The revenue from order bumps is recorded under the Purchase event.
1.2 To add the events in RedTrack go to Tools → Conversion tracking → Conversion types → set the events for WooCommerce. Use this guide to help you with conversion events in RedTrack.
2. Create a custom Brand.
Brands → New from scratch → use this guide to help you add your Brand
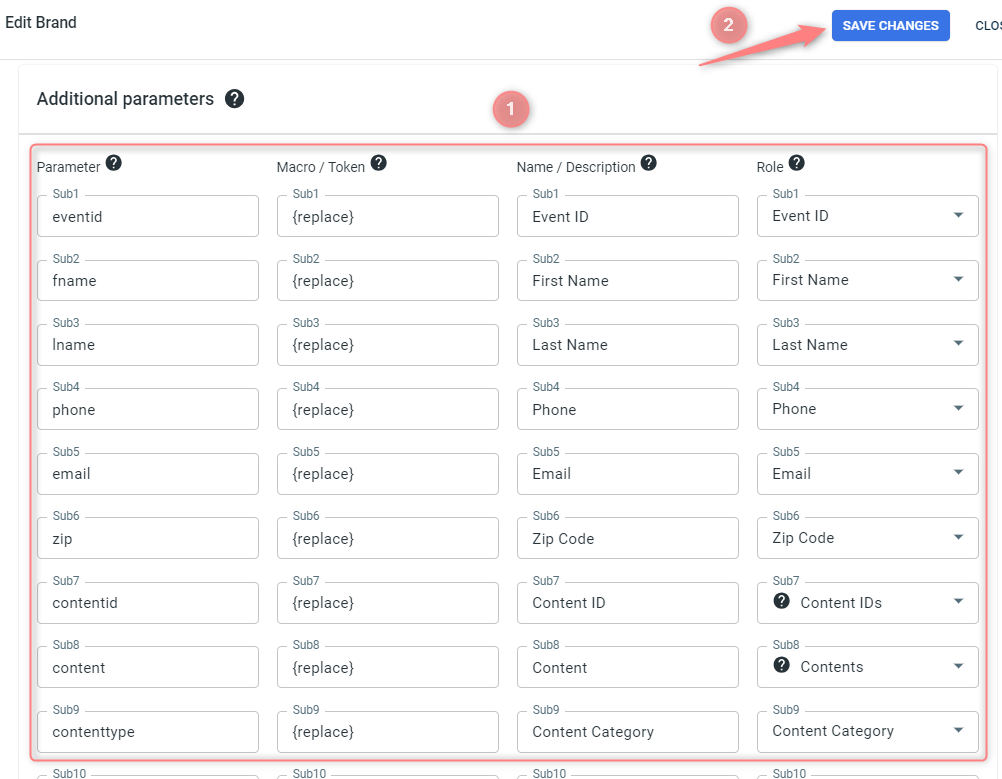
3. To send the PII data for better attribution go to the added Brand settings → Additional parameters → add the following parameters with the corresponding roles:
Parameter | Macro / Token | Name / Description (what you’ll see in reports instead of subx) | Role | Info we receive under these parameters |
|---|---|---|---|---|
eventid | {replace} | Event ID | Event ID | Your order ID or the external ID for the conversion |
fname | {replace} | First Name | First Name | Customer First Name from the order |
lname | {replace} | Last Name | Last Name | Customer Last Name from the order |
phone | {replace} | Phone | Phone | Customer phone number from the order |
email | {replace} | Email | Email | Customer email from the order |
zip | {replace} | Zip Code | Zip Code | Customer zip code from the order |
contentid | {replace} | Content ID | Content IDs | External product ID |
content | {replace} | Content | Contents | Product title |
contenttype | {replace} | Content Category | Content Category | The type of product |
4. Add your Website.
Websites → New → use this guide to help you add your website
5. Create a paid traffic campaign.
The campaign for the unattributed (organic) traffic is already in place. Now you need to create the one for the paid traffic. To do that:
- Add the Traffic channel. Most of them have a preset template in RedTrack.
- Launch a campaign for the paid traffic channel. Your website/shop will be the main link added to the traffic channel.
3. Setup in WordPress (WooCom)
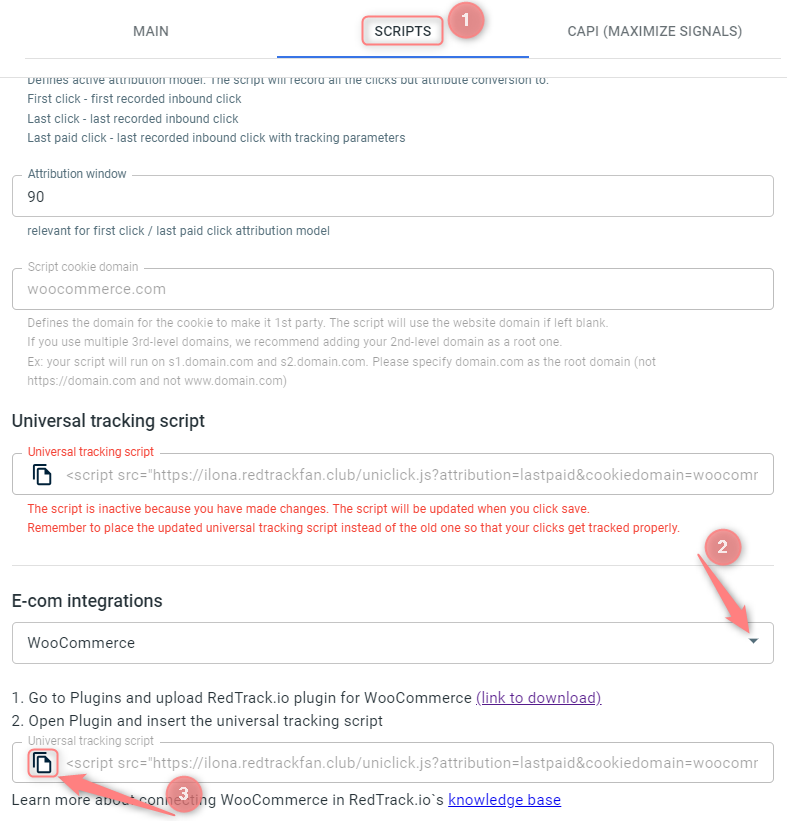
1. Download the RedTrack.io plugin for WooCommerce to your computer:

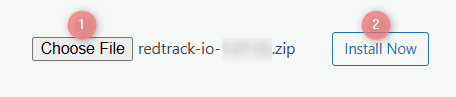
2. Login into the WordPress admin panel and navigate to the Plugins → Add New Plugin → Upload Plugin:
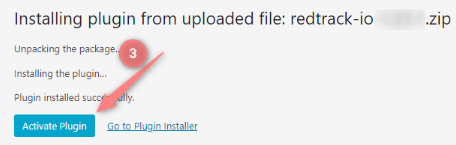
3. Press Choose file → upload the downloaded RedTrack.io plugin for WooCommerce from your computer → Install Now → Activate Plugin:
4. Go to Plugins → Installed Plugins → find the downloaded plugin → press Settings:

5. For the events to be tracked accurately you need to do these 3 actions precisely:
- Add the universal tracking script.
- Check the boxes next to the needed events in settings of the added WooCommerce plugin.
- Add the checked events in RedTrack.
Act as per your tracking scenario:
Events you want to track | Actions in WooCom plugin | Actions in RedTrack |
|---|---|---|
Standard Purchase:
| RedTrack Settings → add universal tracking script to the Script field → check the Purchase (order status Completed) box in the Advanced conversion settings section: 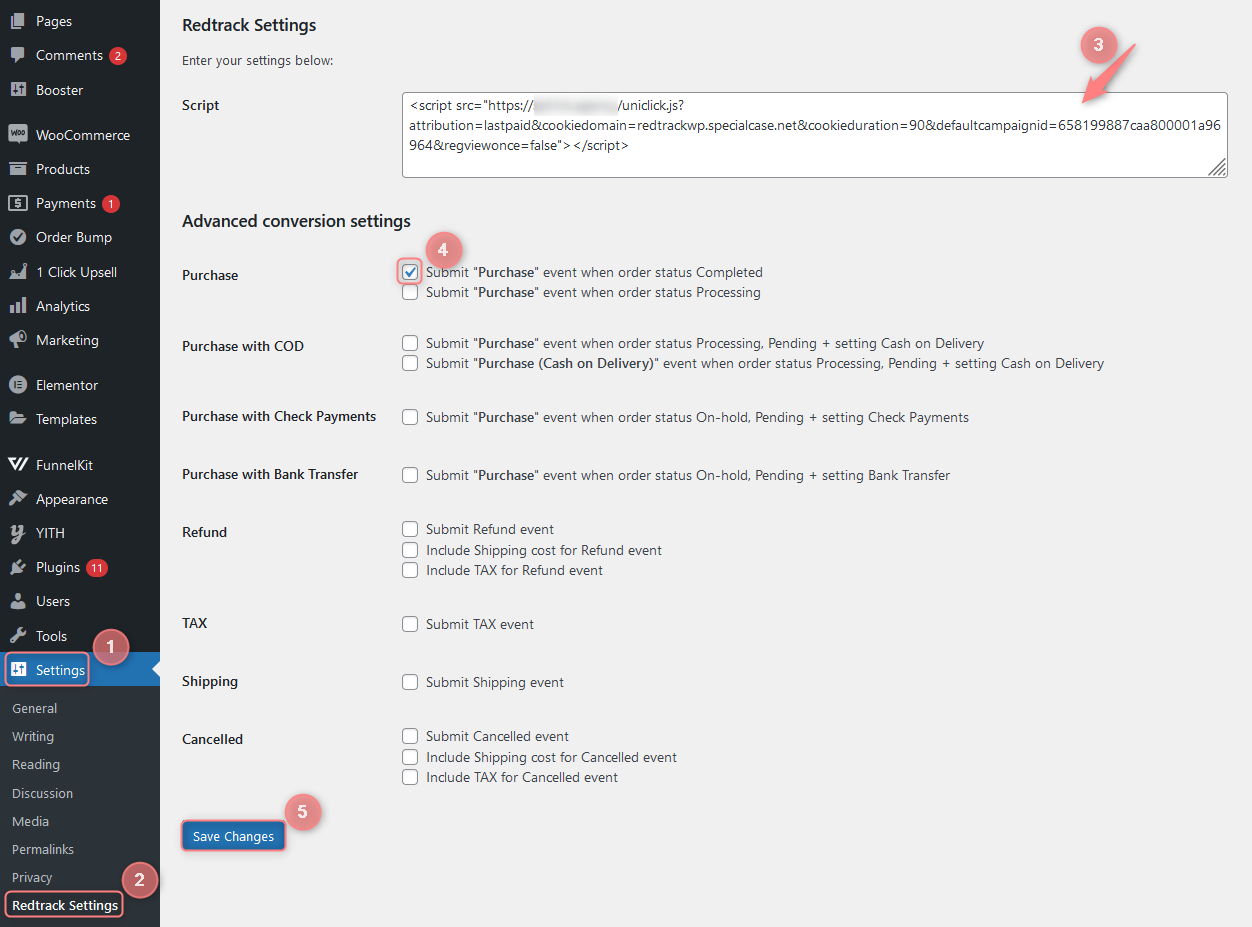 Note! Depending on your needs, mark either Purchase (order status Completed) or Purchase (order status Processing). Marking both types of Purchases within this plugin may lead to duplicated conversions under the name Purchase in RedTrack. | Tools → Conversion tracking → Conversion type → add the following events:
|
Standard Purchase:
| RedTrack Settings → add universal tracking script to the Script field → check the Purchase (order status Processing) box in the Advanced conversion settings section: 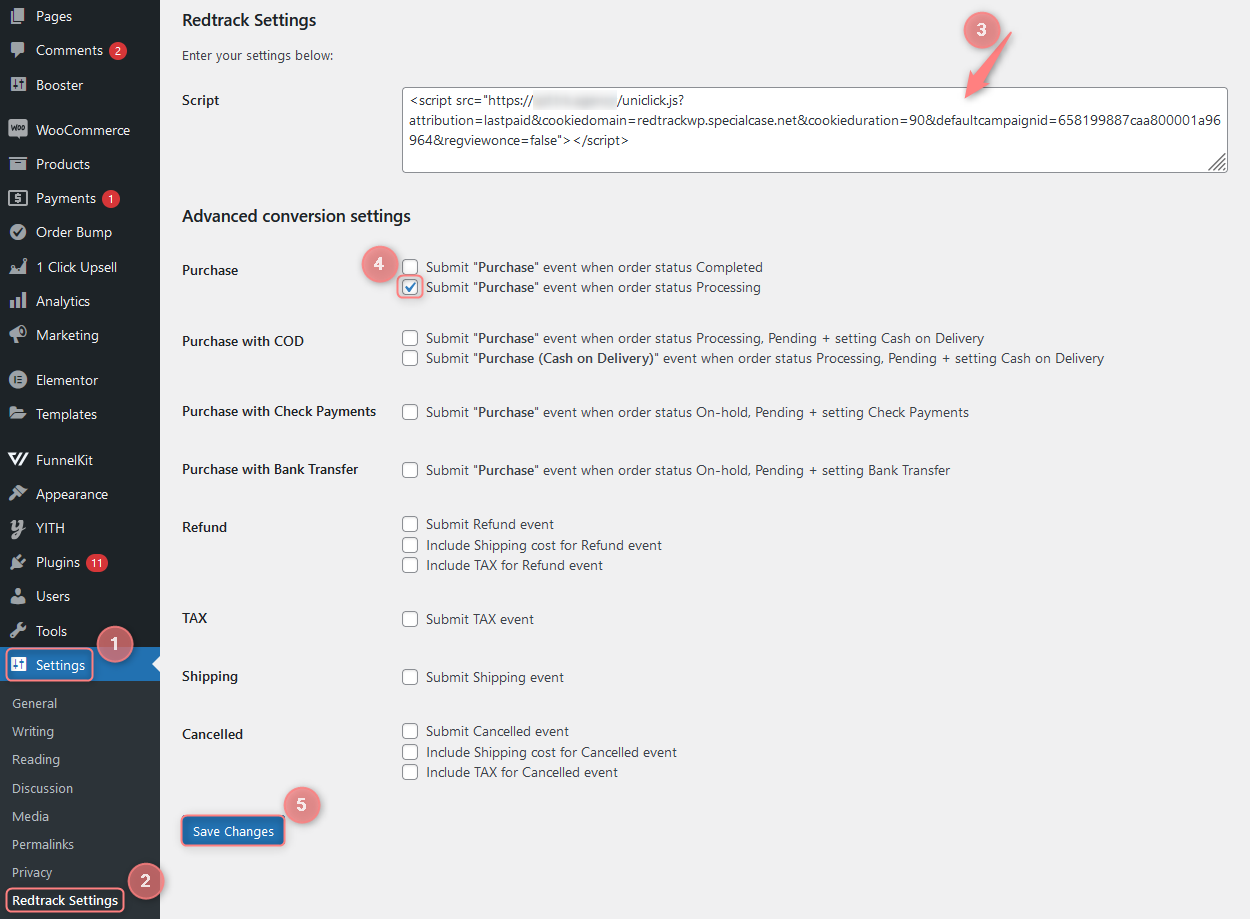 Note! Depending on your needs, mark either Purchase (order status Completed) or Purchase (order status Processing). Marking both types of Purchases within this plugin may lead to duplicated conversions under the name Purchase in RedTrack. | Tools → Conversion tracking → Conversion type → add the following events:
|
Advanced Purchase:
| RedTrack Settings → add universal tracking script to the Script field → check the Purchase and Purchase with COD (Purchase (Cash on Delivery)) boxes in the Advanced conversion settings section: 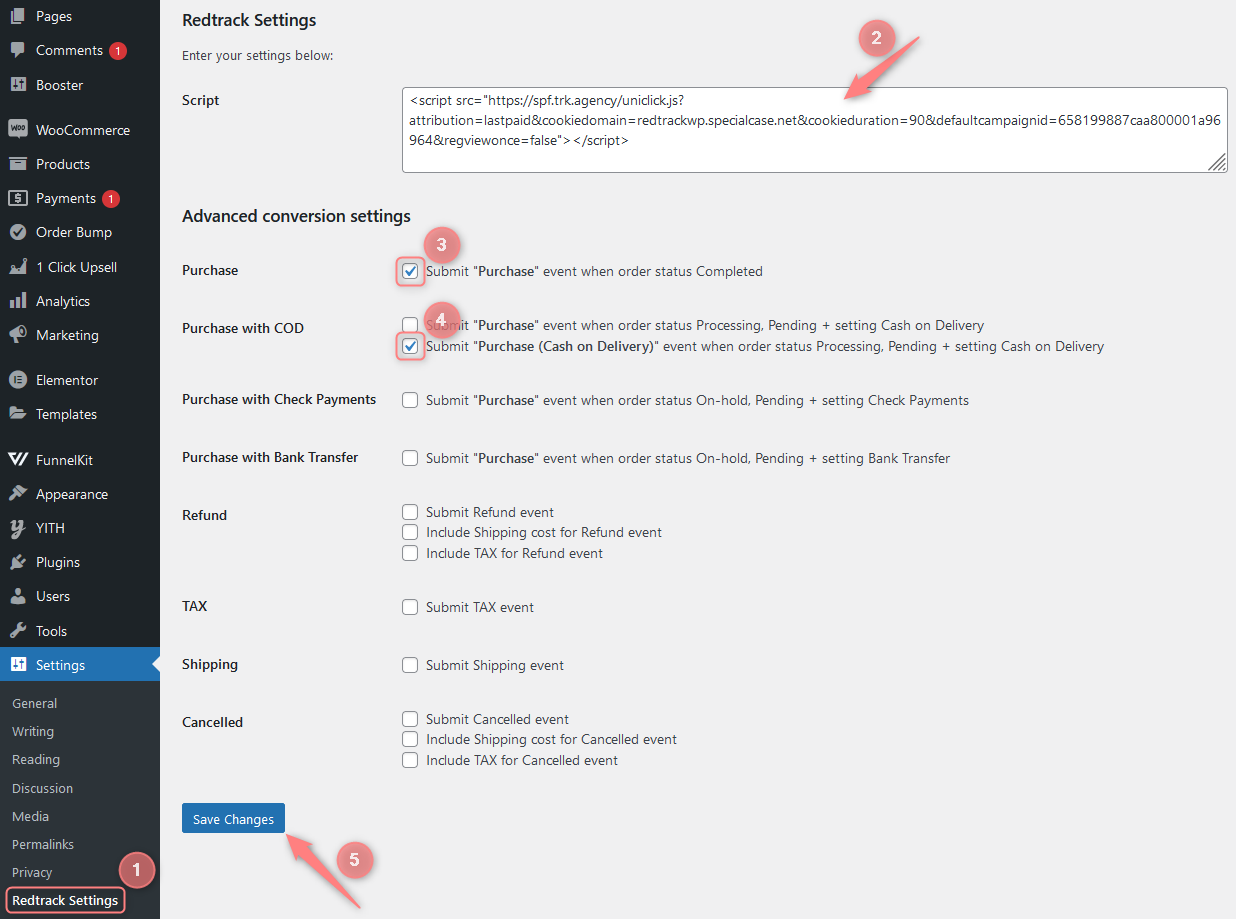 | Tools → Conversion tracking → Conversion type → add the following events:
|
Advanced Purchase:
| RedTrack Settings → add universal tracking script to the Script field → check the Purchase with COD (Purchase (Cash on Delivery)) box in the Advanced conversion settings section: 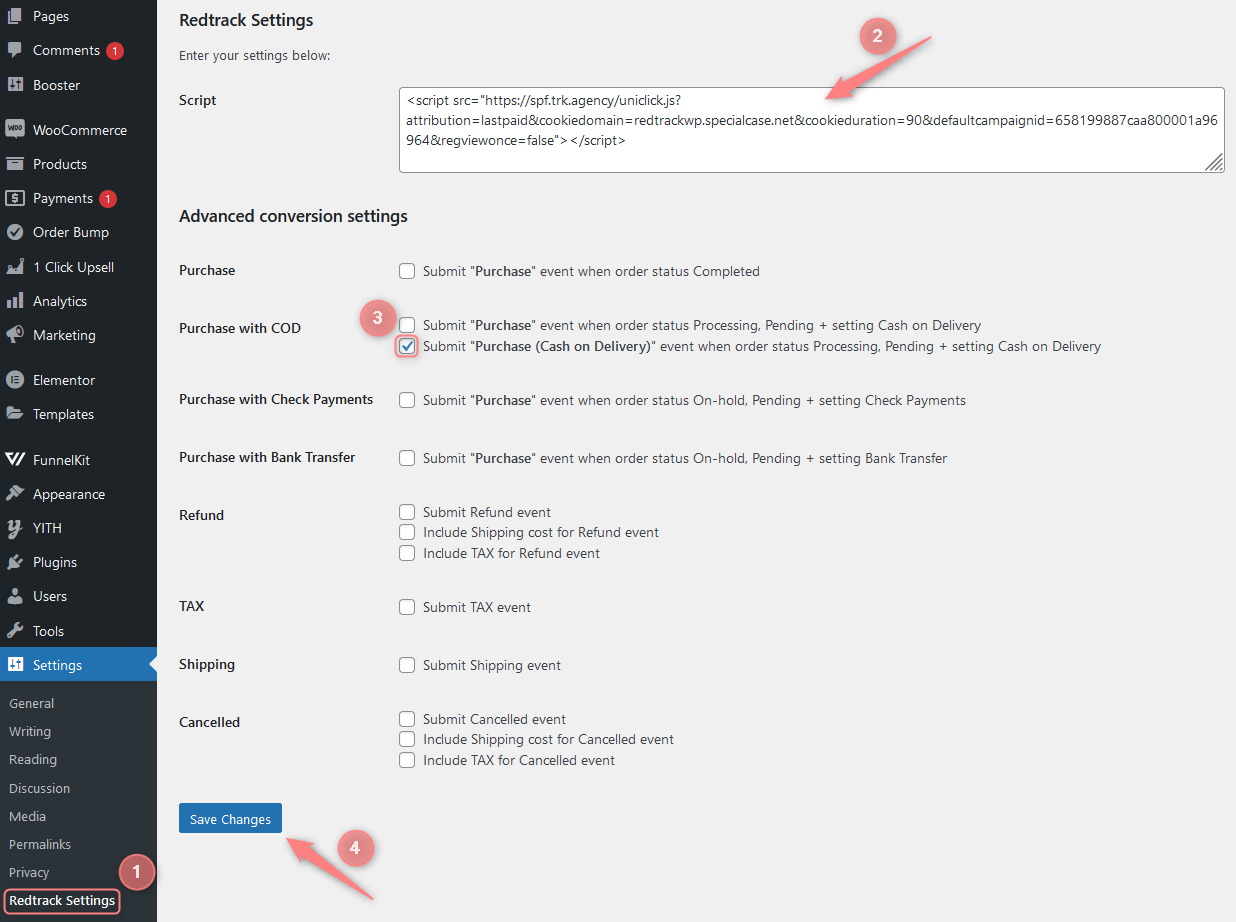 | Tools → Conversion tracking → Conversion type → add the following events:
|
Advanced Purchase:
| RedTrack Settings → add universal tracking script to the Script field → check the Purchase with COD (Purchase) box in the Advanced conversion settings section: 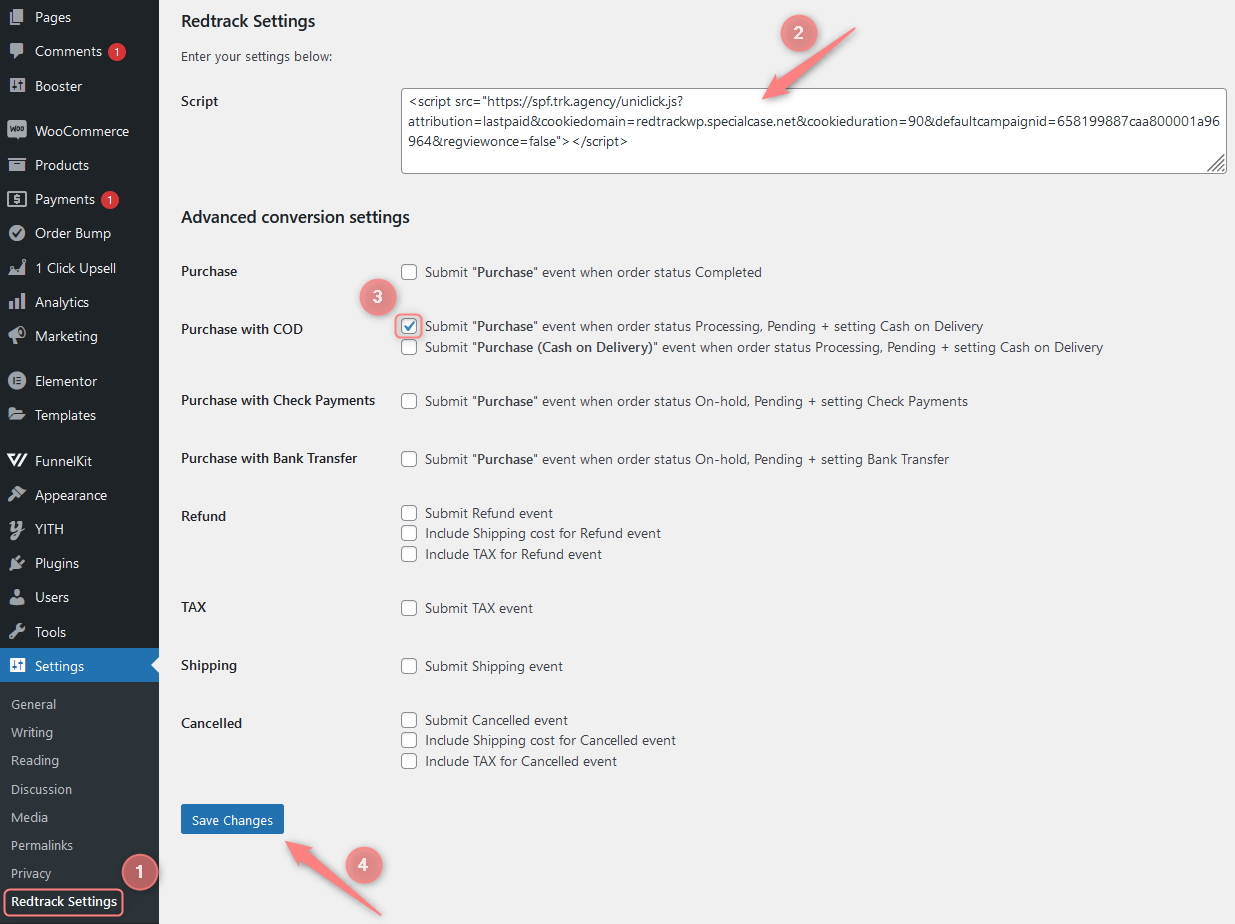 | Tools → Conversion tracking → Conversion type → add the following events:
|
Additional conversions:
| RedTrack Settings → add universal tracking script to the Script field → check the Purchase, Tax and Shipping boxes in the Advanced conversion settings section: 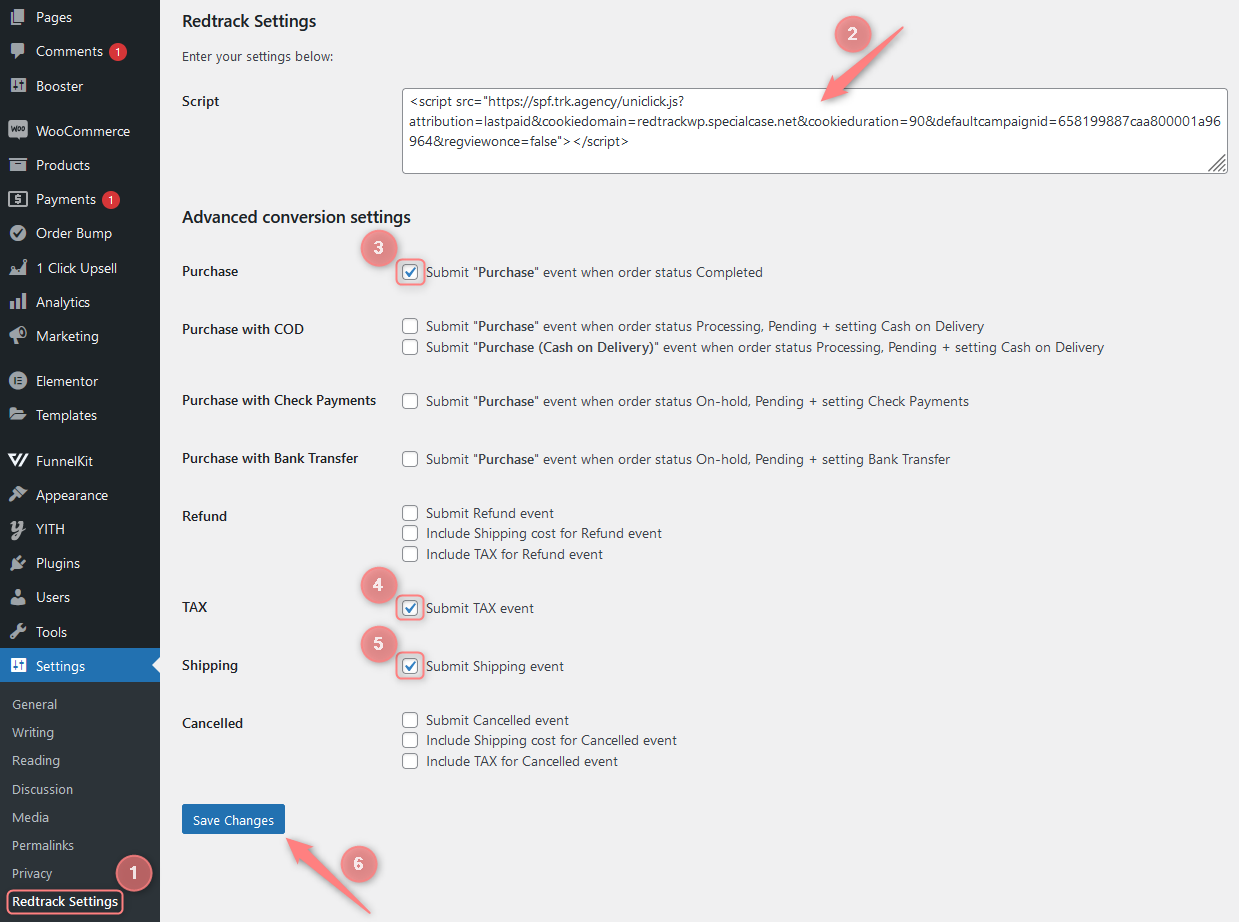 Example Product $44 + TAX $6 + Shipping $10 = Purchase $60 Events: Purchase = $60 TAX = -$6 Shipping = -$10 | Tools → Conversion tracking → Conversion type → add the following events:
|
Additional conversions:
| RedTrack Settings → add universal tracking script to the Script field → check the Purchase and Refund boxes in the Advanced conversion settings section: 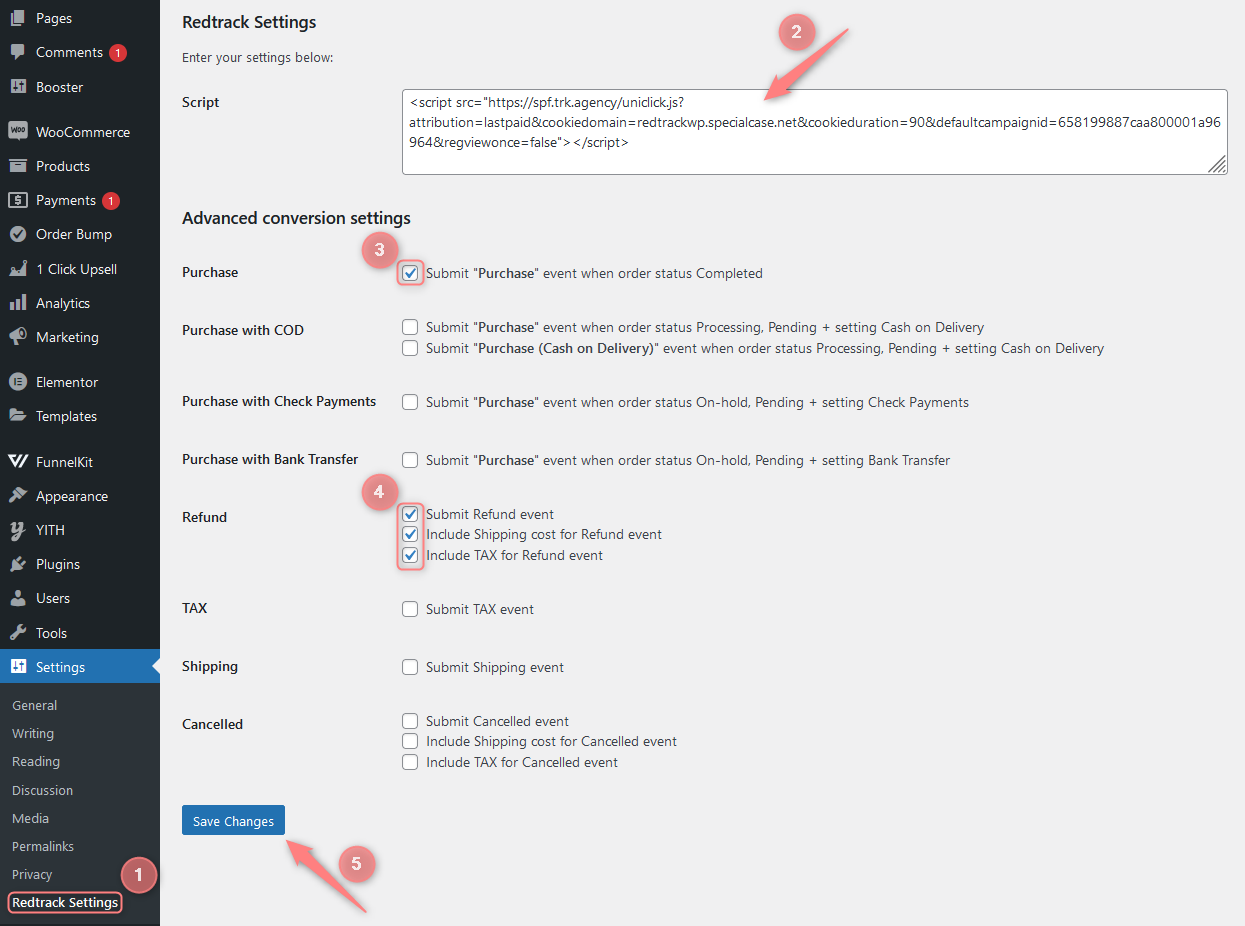 Example Product $200 + TAX $44 + Shipping $20 = Purchase $264 Events: Purchase = $264 Refund = -$264 | Tools → Conversion tracking → Conversion type → add the following events:
|
Additional conversions:
| RedTrack Settings → add universal tracking script to the Script field → check the Purchase and Refund boxes in the Advanced conversion settings section: 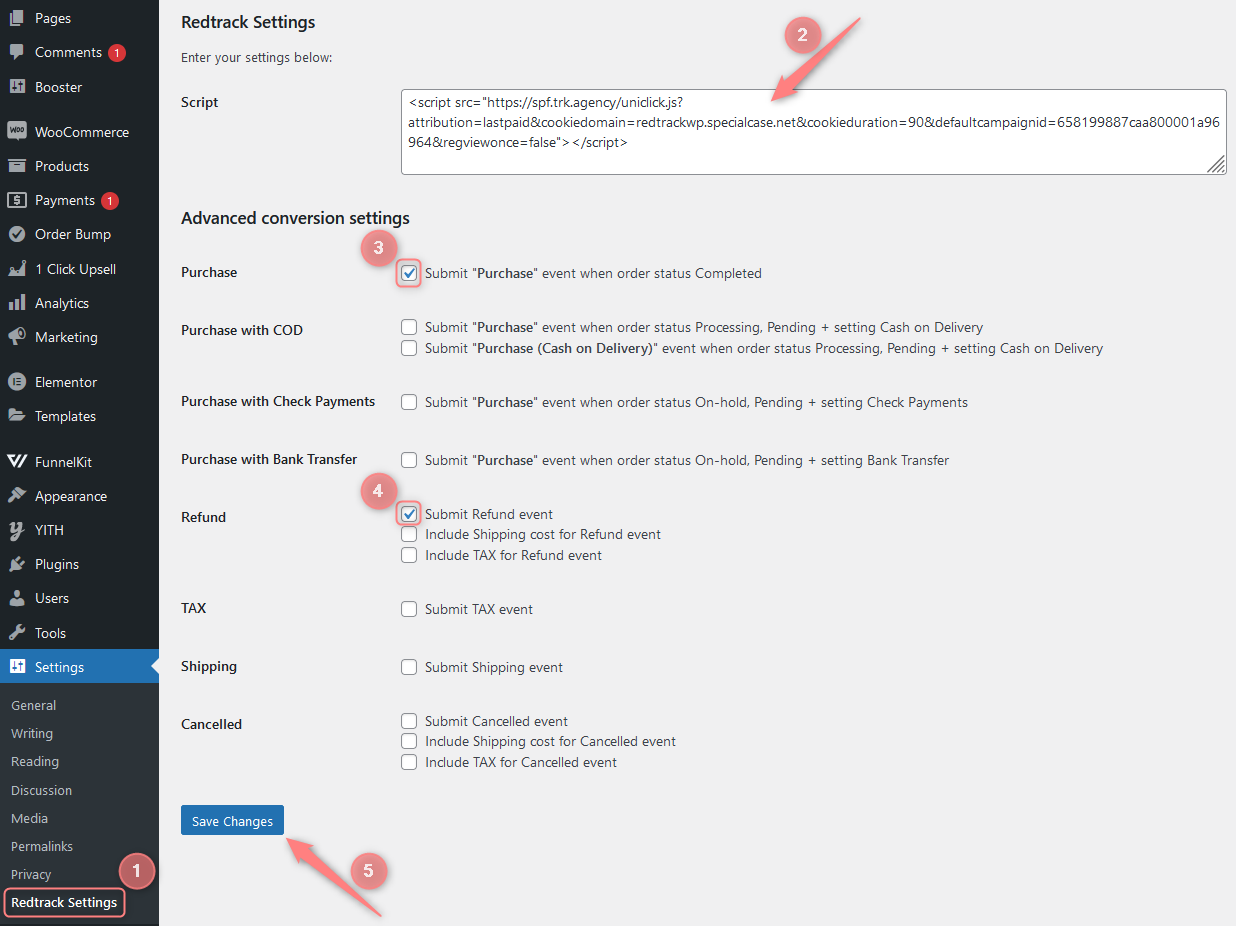 Example: Product $200 + TAX $44 + Shipping $20 = Purchase $264 Events: Purchase = $264 Refund = -$200 | Tools → Conversion tracking → Conversion type → add the following events:
|
Additional conversions:
| RedTrack Settings → add universal tracking script to the Script field → check the Purchase, Refund, TAX and Shipping boxes in the Advanced conversion settings section: 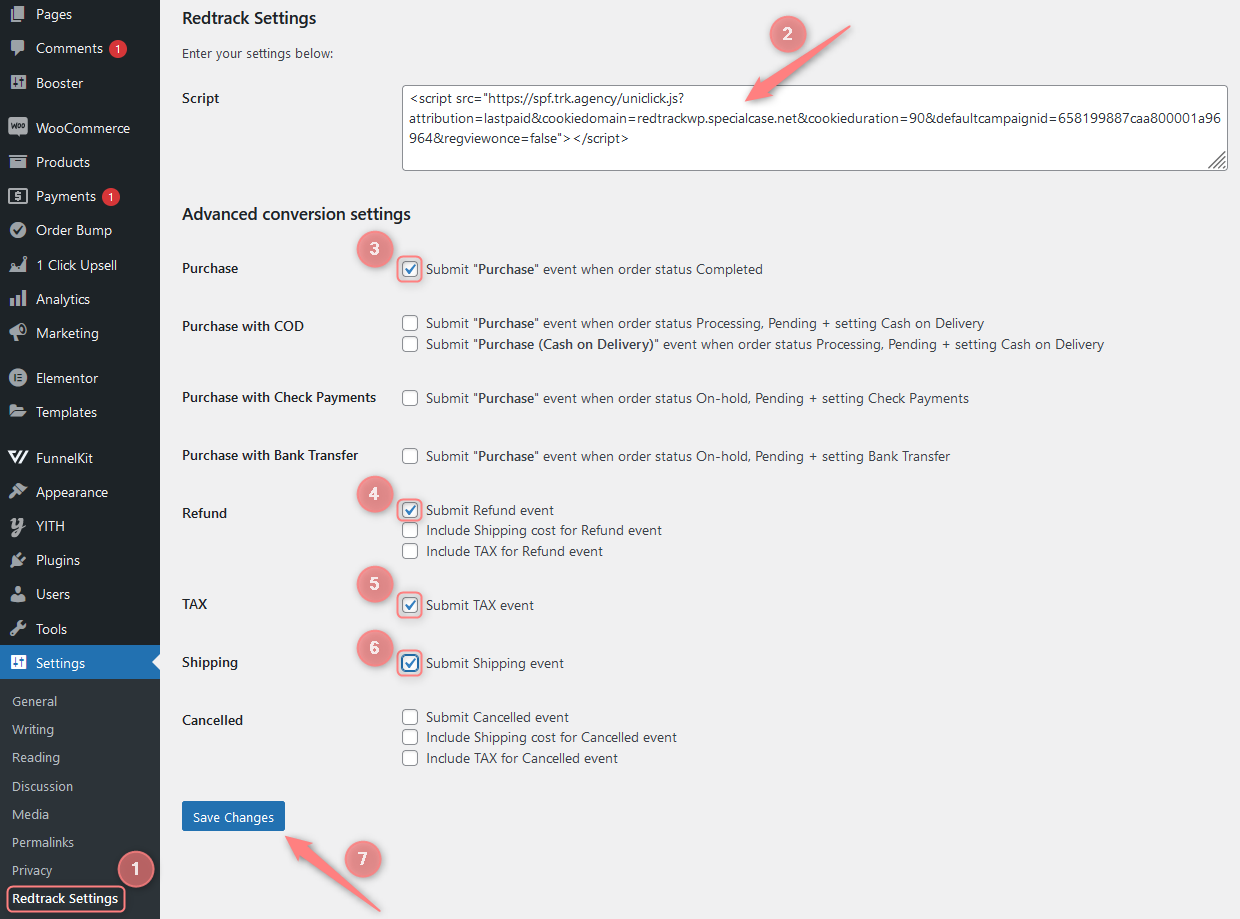 Example Product $200 + TAX $44 + Shipping $20 = Purchase $264 Events: Purchase = $264 TAX = -$44 Shipping = -$20 Refund = -$200 | Tools → Conversion tracking → Conversion type → add the following events:
|
Additional conversions:
| RedTrack Settings → add universal tracking script to the Script field → check the Purchase and Cancelled boxes in the Advanced conversion settings section: 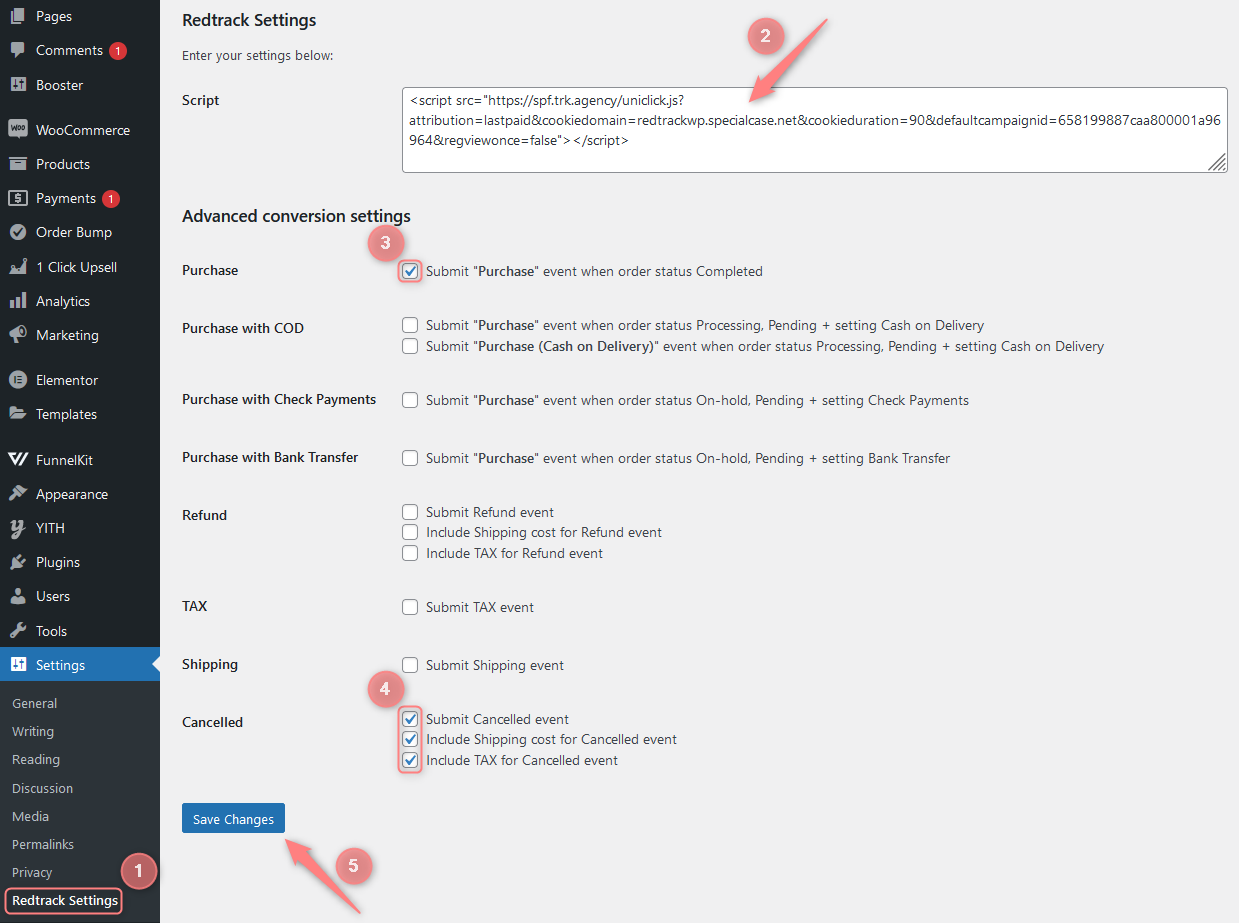 Example Product $200 + TAX $44 + Shipping $20 = Purchase $264 Events: Purchase = $264 Cancelled = -$264 | Tools → Conversion tracking → Conversion type → add the following events:
|
Additional conversions:
| RedTrack Settings → add universal tracking script to the Script field → check the Purchase and Cancelled boxes in the Advanced conversion settings section:  Example: Product $200 + TAX $44 + Shipping $20 = Purchase $264 Events: Purchase = $264 Cancelled = -$200 | Tools → Conversion tracking → Conversion type → add the following events:
|
Additional conversions:
| RedTrack Settings → add universal tracking script to the Script field → check the Purchase, TAX, Shipping and Cancelled boxes in the Advanced conversion settings section: 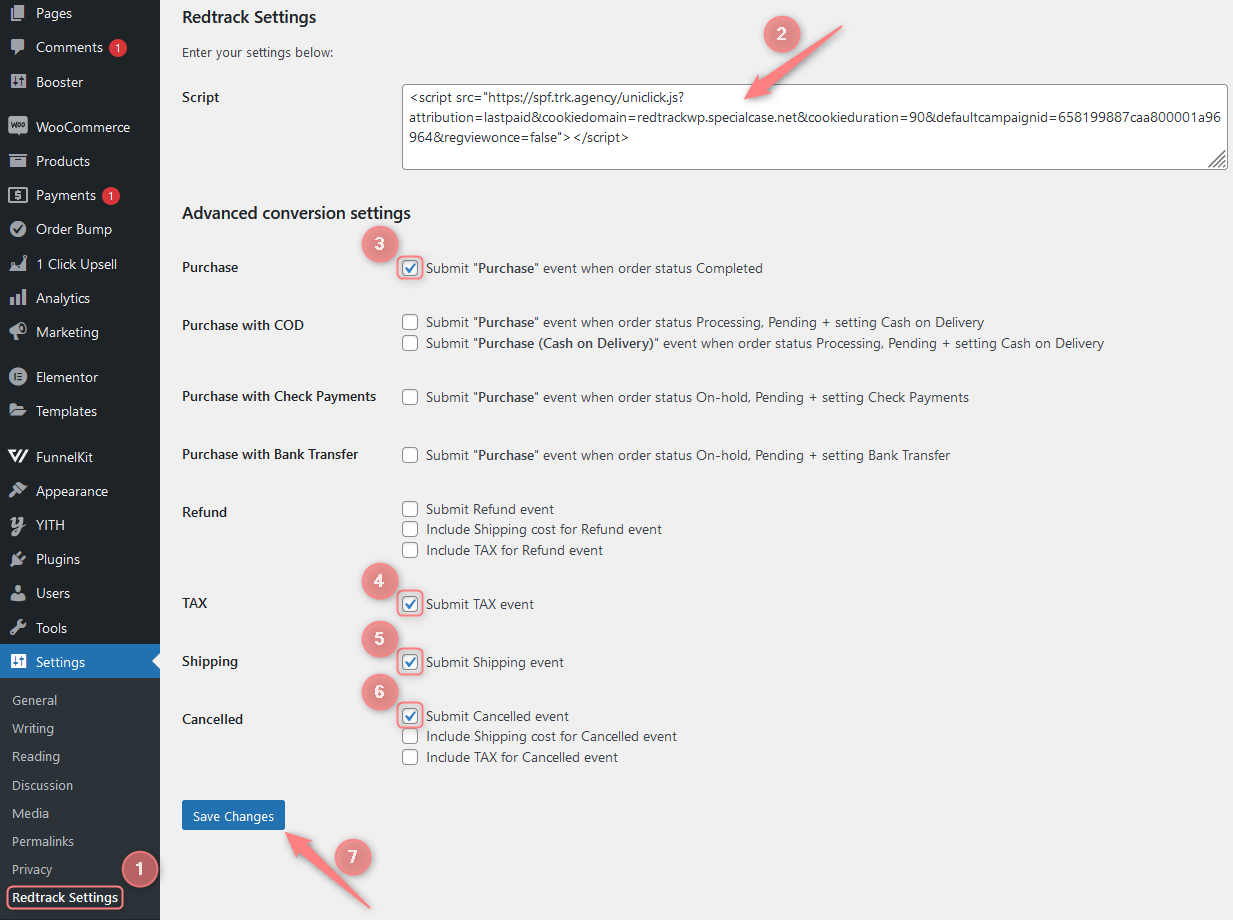 Example Product $200 + TAX $44 + Shipping $20 = Purchase $264 Events: Purchase = $264 TAX = -$44 Shipping = -$20 Cancelled = -$200 | Tools → Conversion tracking → Conversion type → add the following events:
|