
Digistore24 and RedTrack

Digistore24 is a platform for transforming the world of online business through automation and conversion optimization.
Integration
Act accordingly depending on your account type:
1. Add a custom tracking domain
1. Add a CNAME record pointing to your RedTrack default domain in your domain registrar.
2. On the left menu go to Tools → Domains → Create new domain.
3. Add the integrated domain to your RedTrack account and activate the Free SSL option.
2. Add your traffic channel
Before you proceed with the integration, make sure to have the already added your Traffic channel.
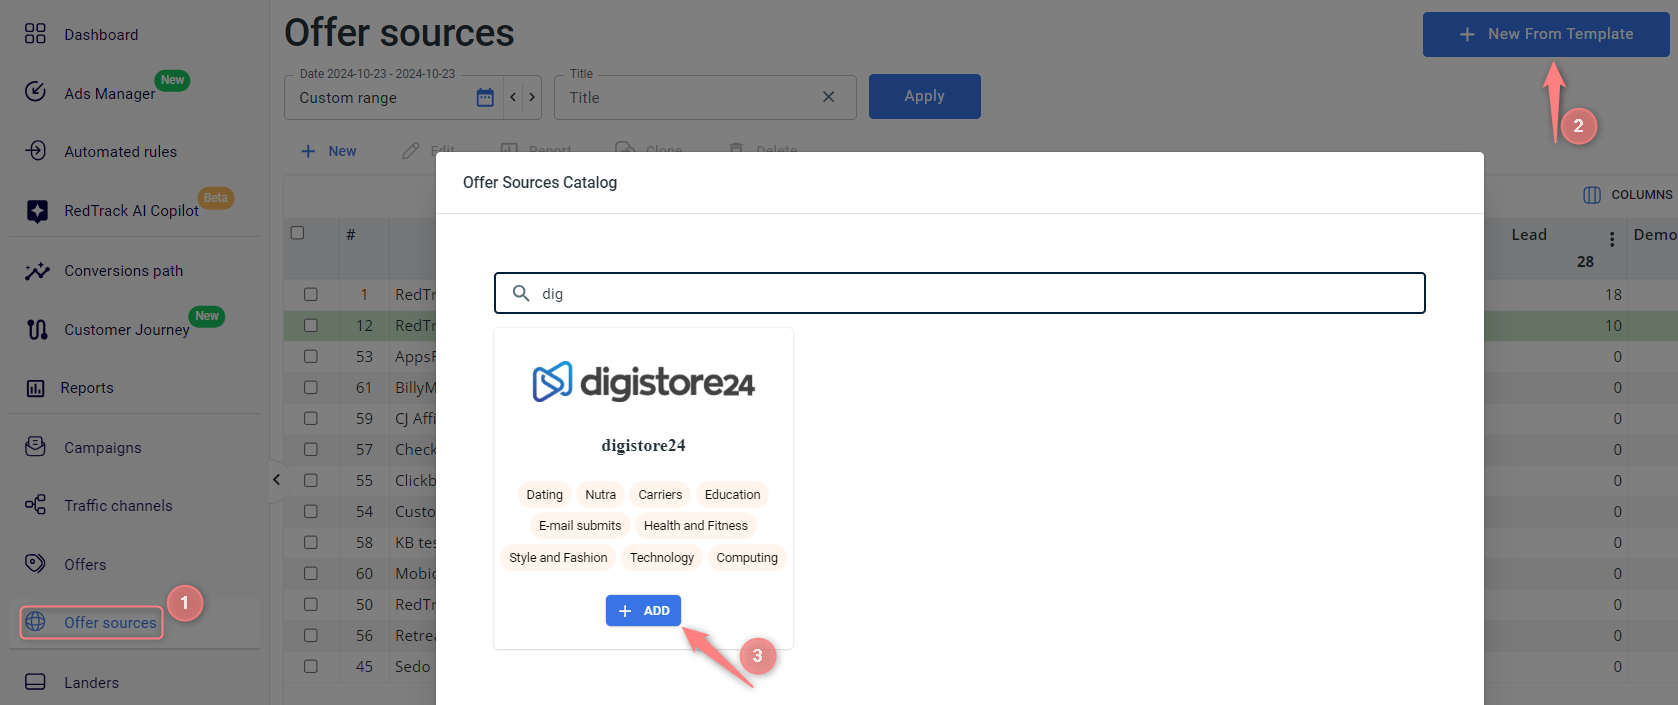
3. Add Digistore24 as an Offer source in RedTrack
Offer sources → New from template → find digistore24 template → Add → copy the Postback URL→ Save the template:
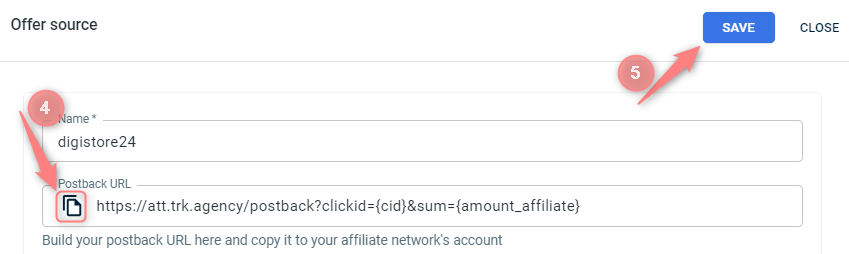
4. Set up RedTrack Postback URL in Digistore24
To configure the RedTrack Postback URL in Digistore24, follow the instructions below:
1. Digistore24 allows you to track conversions in 2 ways: by adding to the end of the postback URL dynamic macros supported by Digistore24 or &type=yourconvtypename. You can combine the two ways or use only one of them. But mind that the workflow for setting up conversions tracking via each way is different.
2. There is a special workflow for Initiate Checkout event tracking.
The details for each case are described below↓
1. Study the correlation between Digistore24-supported dynamic macros and the events you should add in RedTrack.
Digistore24 supports 4 dynamic macros. Each macro corresponds to the events you want to track with its help:
- {transaction_type} = payment, refund, chargeback.
- {order_type} = initial_sale, upsell.
- {billing_type} = single_payment, subscription, installment
- {billing_status} = paying, completed, aborted.
So if you want to track such events as “payment, refund and chargeback” you should add them to RedTrack and add {transaction_type} macro to the end of the Postback URL in digistore24. Use this table for a reference:
Events I want to track | What I need to add to RedTrack | Macro I should add to the Postback URL in Digistore24 |
payment refund chargeback | payment refund chargeback | {transaction_type} |
initial_sale upsell | initial_sale upsell | {order_type} |
single_payment subscription installment | single_payment subscription installment | {billing_type} |
paying completed aborted | paying completed aborted | {billing_status} |
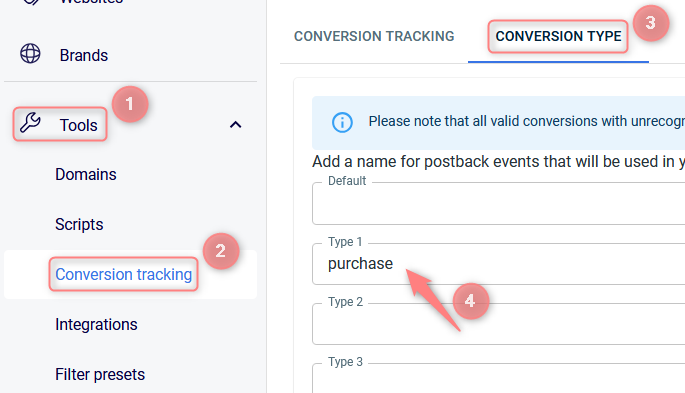
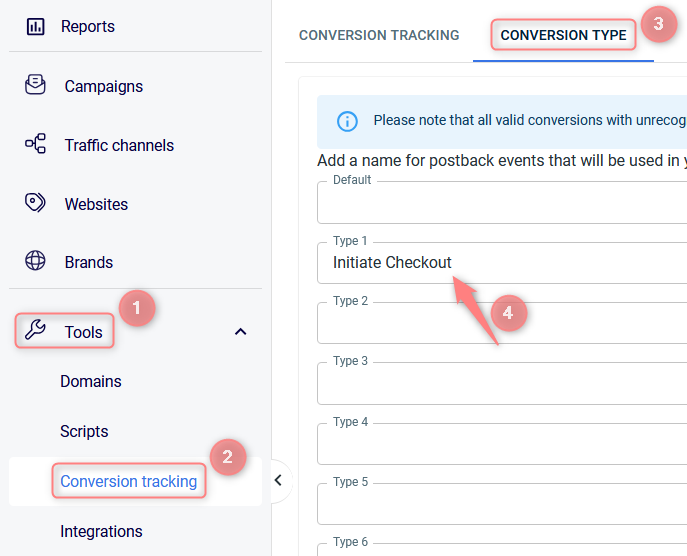
2. Add the events you want to track with Digistore24 in RedTrack. To do that go to Tools → Conversion tracking → Conversion type. Refer to this guide for details.

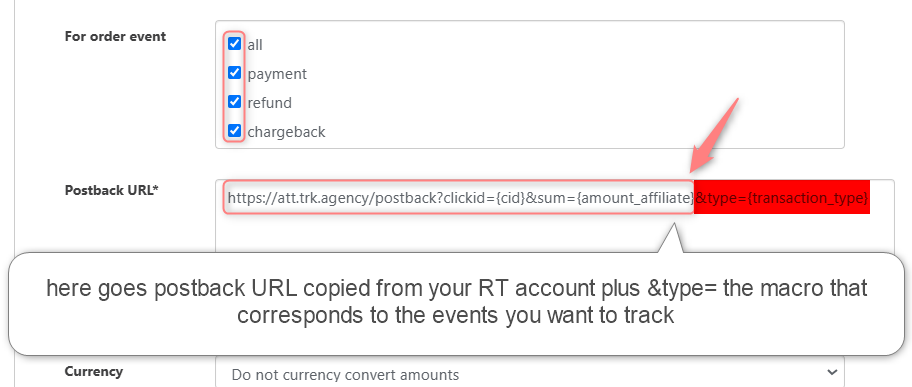
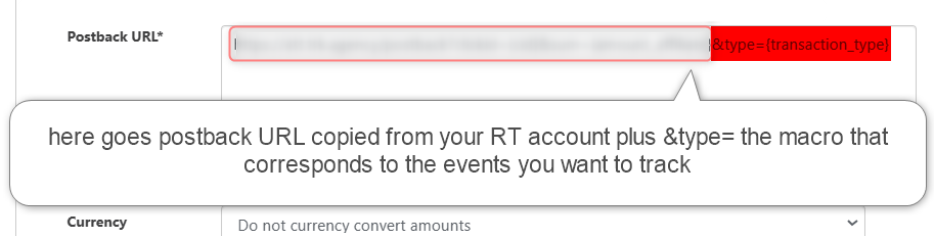
3. Add your Postback URL in Digistore24.
In your digistore24 account go to Account → S2S postback → Add s2s postback integration:

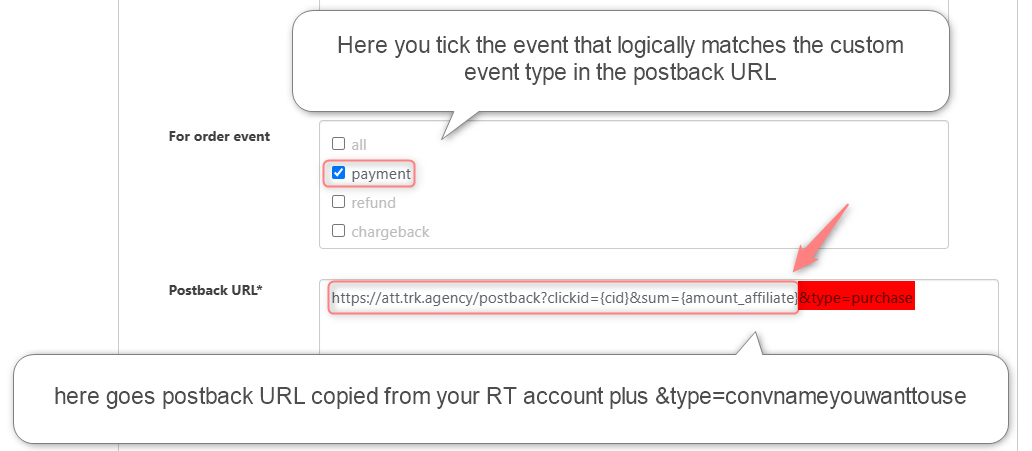
Add the copied postback URL from RT to the Postback URL field → add the needed macro to the end of the URL string → mark the needed events in the For order event field → Save:
You can use a custom name for the event you want to track. To do that:
1. Add the event(s) you want to track with Digistore24 in RedTrack. To do that go to Tools → Conversion tracking → Conversion type. Refer to this guide for details.
2. Add this event to the end of your Postback URL in Digistore24 and mark the proxy type event supported by Digistore24.
In your digistore24 account go to Account → S2S postback → Add s2s postback integration:
Add the copied postback URL from RT to the Postback URL field → add &type=conveventname → mark the needed event in the For order event field → Save:
In RedTrack
Go to Tools → Conversion tracking → Conversion type → add “InitiateCheckout” (without spaces) → Save:
In Digistore24
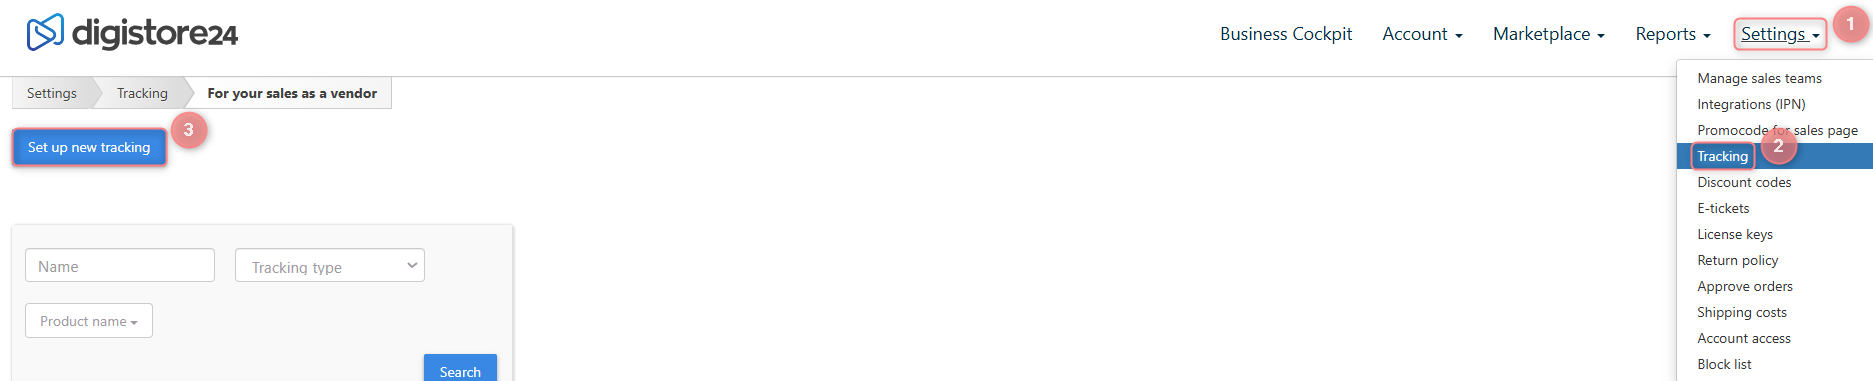
1. In your Digistore24 account access the Tracking tab:
Account → Tracking → Set up new tracking:

2. Fill in the mandatory fields in the pop-up Order form → Save:
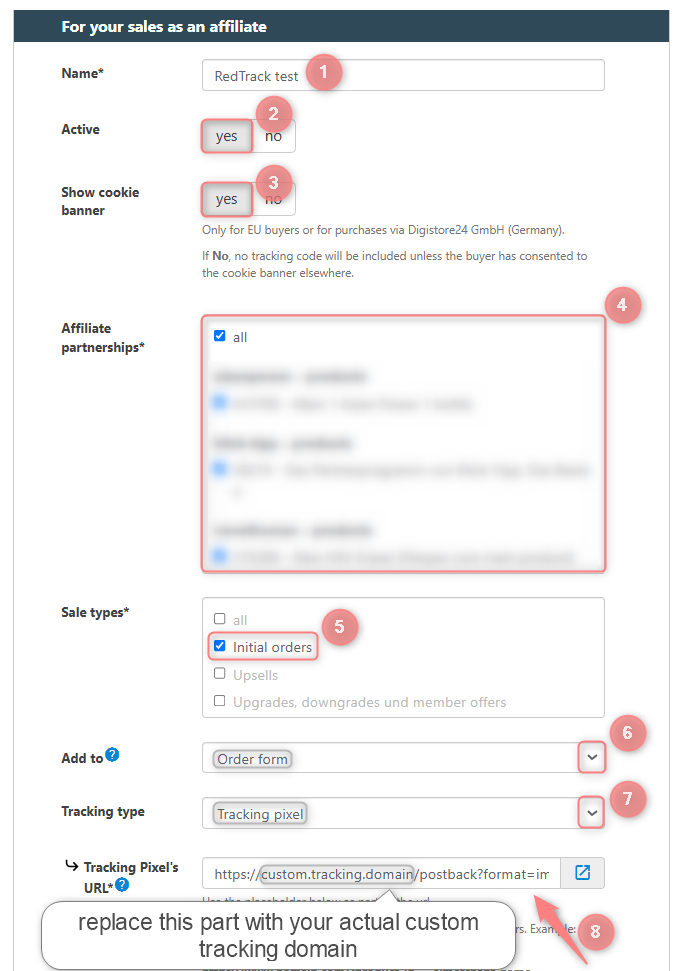
Fields explained:
- (1) Give your form a name.
- (2) Choose Yes for the tracking code to be activated immediately after saving.
- (3) Choose Yes to enable the cookie banner field.
- (4) Select the products for which you want to activate the tracking.
- (5) Select Initiate Checkout in the Sale types field.
- (6) Select the Order form type from the drop-down.
- (7) Select Tracking pixel from the drop-down.
- (8) Add this Pixel URL to the filed:
https://custom.tracking.domain/postback?format=img&clickid=__cid__&type=InitiateCheckout.
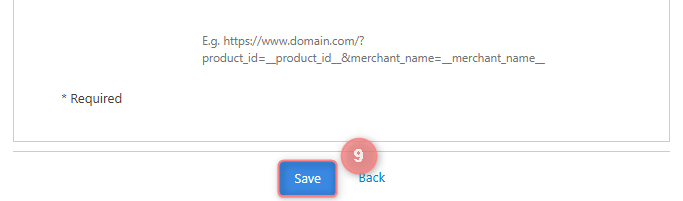
- (9) Save to apply the changes to the form.

It means that there is no real clickid value in the postback link, so there is nothing to test. To fix it add the postback URL into the right field and save it (make sure all parameters are set correctly according to this guide). It will work once there is a real conversion with a real value.
5. Add your Digistore24 offer to RedTrack
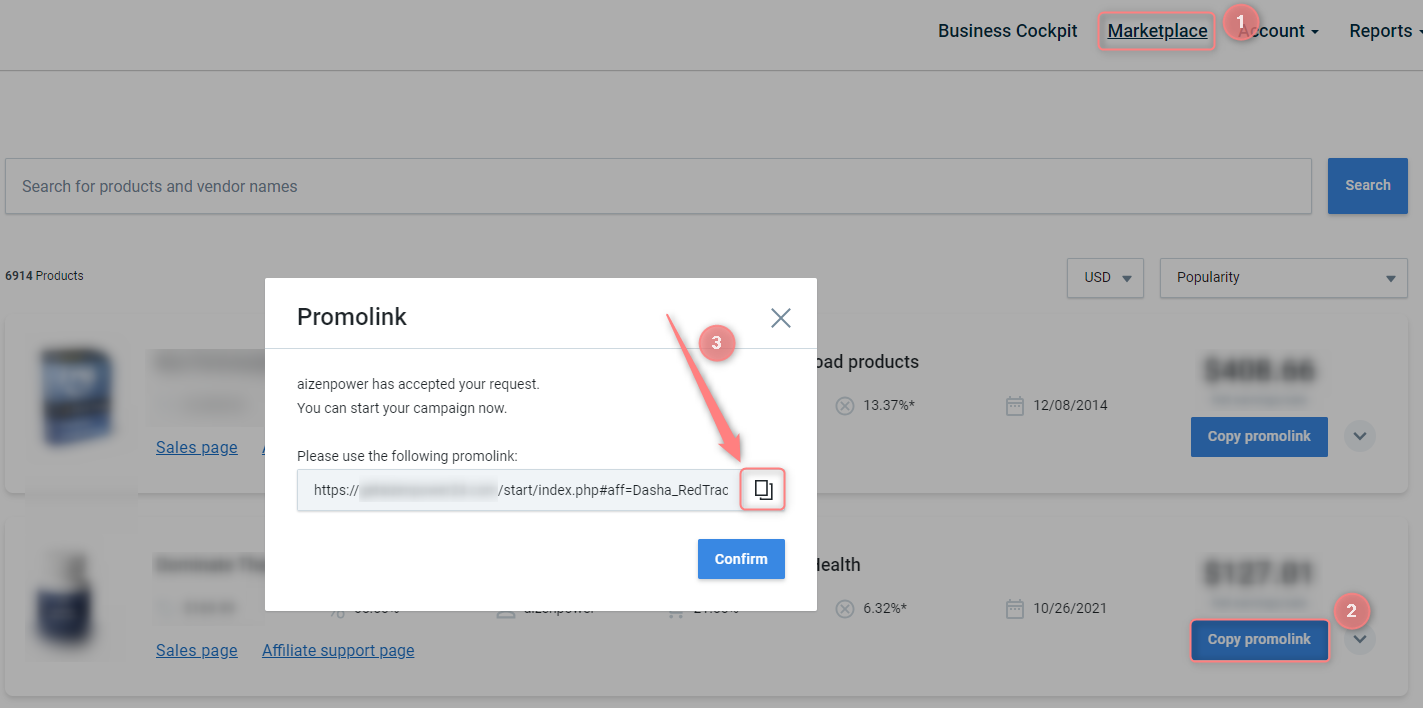
1. Get the Digistore24 offer URL.
In your Digistore24 account go to Marketplace→ choose the offer you want to promote and request access→ once approved copy the tracking link:
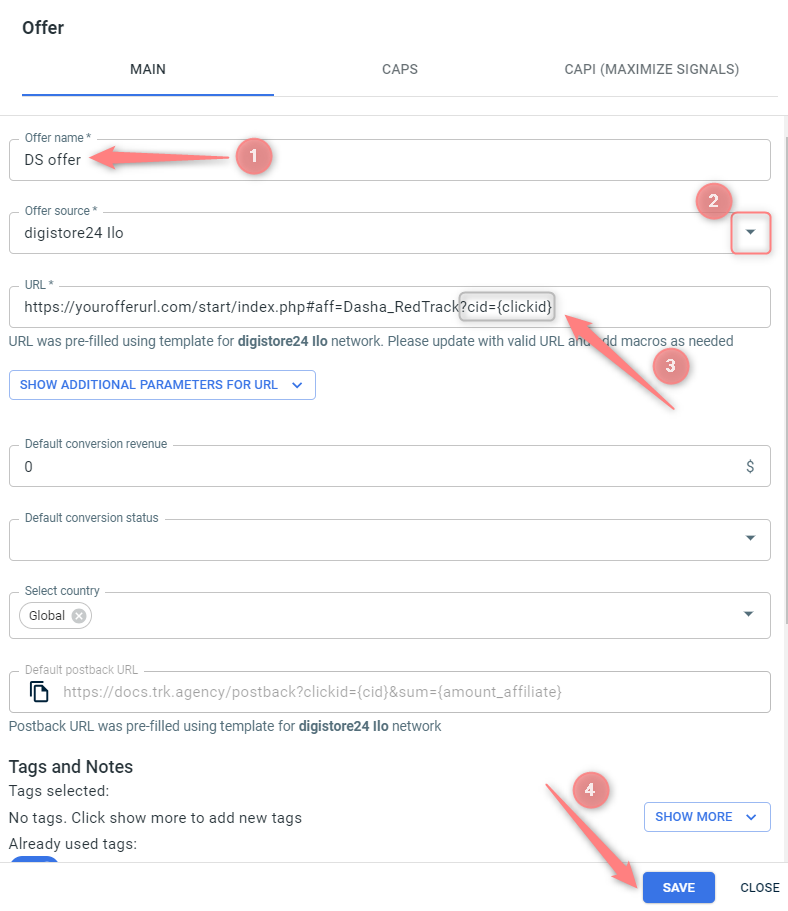
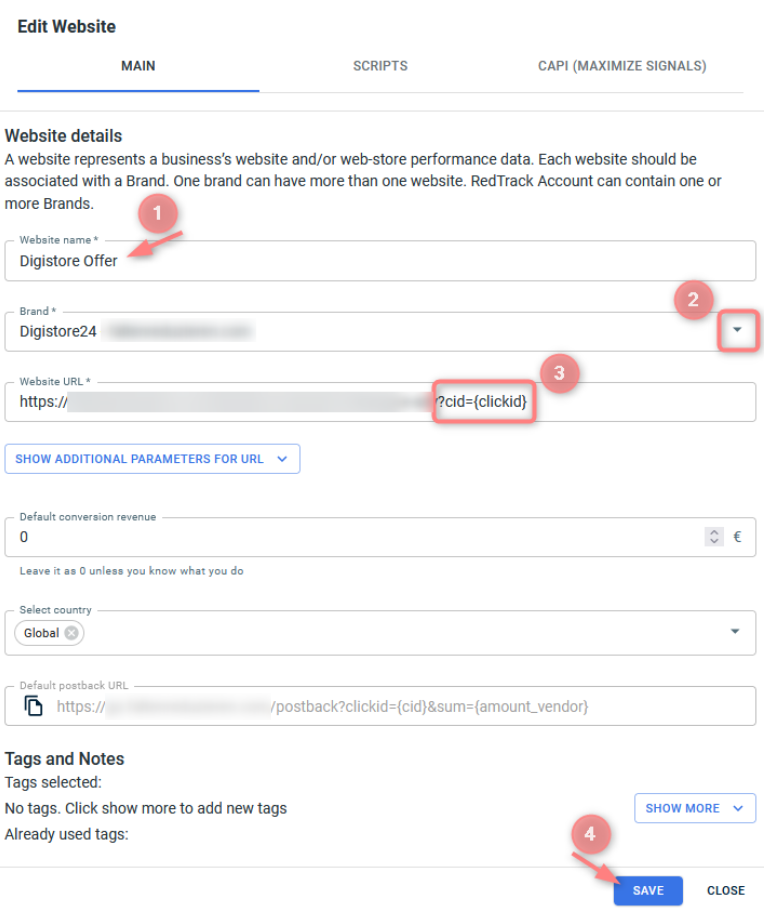
2. Add Digistore24 Offer to RedTrack
RedTrack → Offers → New → give the offer a name and choose Digistore24 as the offer source → paste the URL from Digistore24 → make sure ?cid={clickid} parameter is added to the URL → Save:
6. Add landing page (if you have one)
Go to Landers → Create new lander → use this guide to help you add one.
7. Create a campaign
In your RT account go to Campaigns → Create new campaign → fill in the info in all the sections and tabs:
- General: give it the name, and choose the traffic channel, tracking domain, and cost-tracking method.
- Funnels: choose the type of funnel you are using and add the elements from the drop-downs.
- S2S postback: this field will be filled in automatically based on the data you have added to your traffic channel settings.
1. Add a custom tracking domain
1. Add a CNAME record pointing to your RedTrack default domain in your domain registrar.
2. On the left menu go to Tools → Domains → Create new domain.
3. Add the integrated domain to your RedTrack account and activate the Free SSL option.
2. Add your traffic channel
Before you proceed with the integration, make sure to have the already added your Traffic channel.
3. Add Digistore24 as a Brand in RedTrack
Go to Brands → New from scratch:

1. Fill the name “Digistore24”:
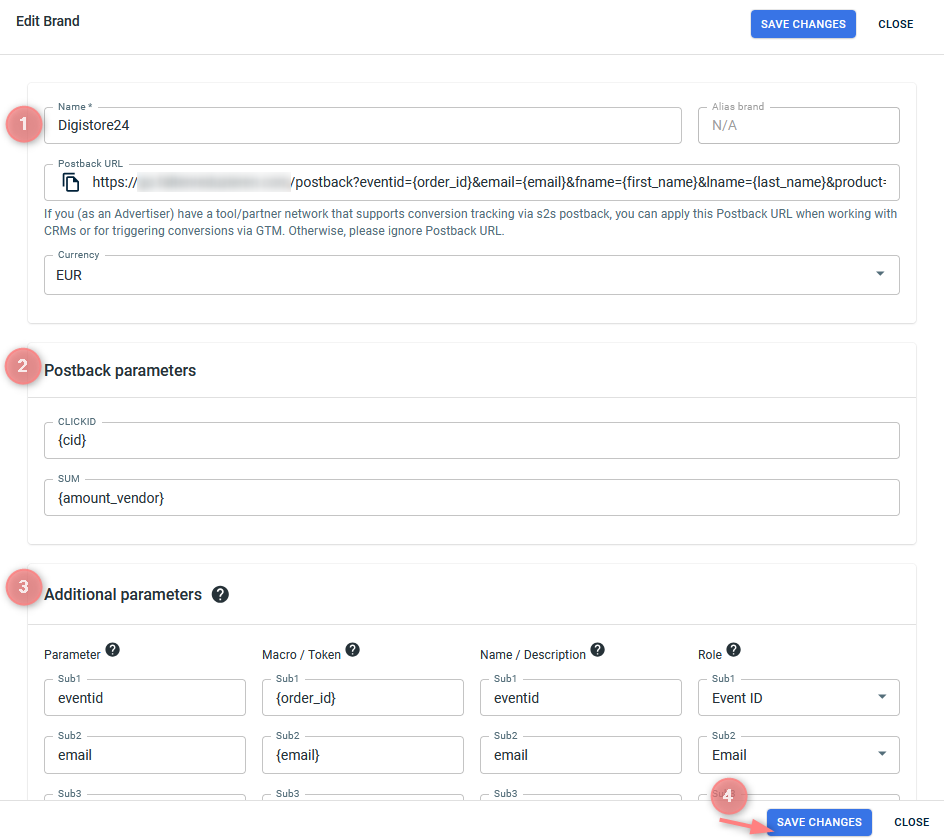
2. Fill the postback parameters:
- Clickid: {cid}
- Sum: {amount_vendor}
3. Fill the additional parameters:
| Parameter | Macro / Token | Name / Description | Role |
| eventid | {order_id} | eventid | Event ID |
| {email} | |||
| fname | {first_name} | fname | First Name |
| lname | {last_name} | lname | Last Name |
| product | {product_name} | product_name | Product Name |
4. Save changes.
4. Set up RedTrack Postback URL in Digistore24
To configure the RedTrack Postback URL in Digistore24, follow the instructions below:
1. Digistore24 allows you to track conversions in 2 ways: by adding to the end of the postback URL dynamic macros supported by Digistore24 or &type=yourconvtypename. You can combine the two ways or use only one of them. But mind that the workflow for setting up conversions tracking via each way is different.
2. There is a special workflow for Initiate Checkout event tracking.
The details for each case are described below↓
1. Study the correlation between Digistore24-supported dynamic macros and the events you should add in RedTrack.
Digistore24 supports 4 dynamic macros. Each macro corresponds to the events you want to track with its help:
- {transaction_type} = payment, refund, chargeback.
- {order_type} = initial_sale, upsell.
- {billing_type} = single_payment, subscription, installment
- {billing_status} = paying, completed, aborted.
So if you want to track such events as “payment, refund and chargeback” you should add them to RedTrack and add {transaction_type} macro to the end of the Postback URL in digistore24. Use this table for a reference:
Events I want to track | What I need to add to RedTrack | Macro I should add to the Postback URL in Digistore24 |
payment refund chargeback | payment refund chargeback | {transaction_type} |
initial_sale upsell | initial_sale upsell | {order_type} |
single_payment subscription installment | single_payment subscription installment | {billing_type} |
paying completed aborted | paying completed aborted | {billing_status} |
2. Add the events you want to track with Digistore24 in RedTrack. To do that go to Tools → Conversion tracking → Conversion type. Refer to this guide for details.
3. Add your Postback URL in Digistore24.
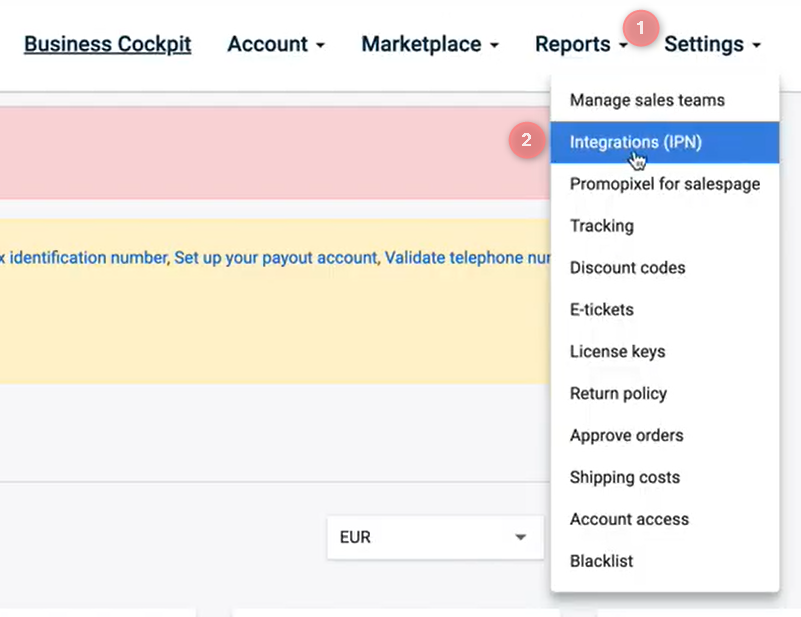
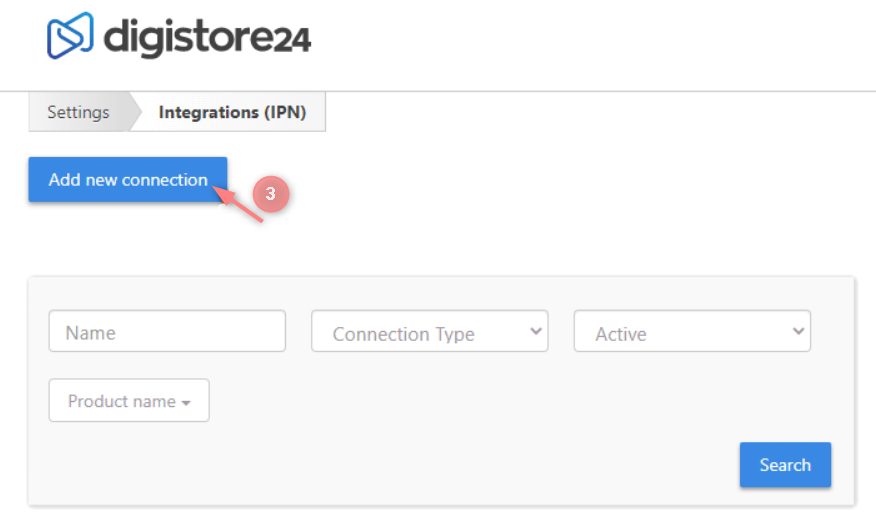
In your digistore24 account go to Settings → Integration (IPN) → Add new connection:
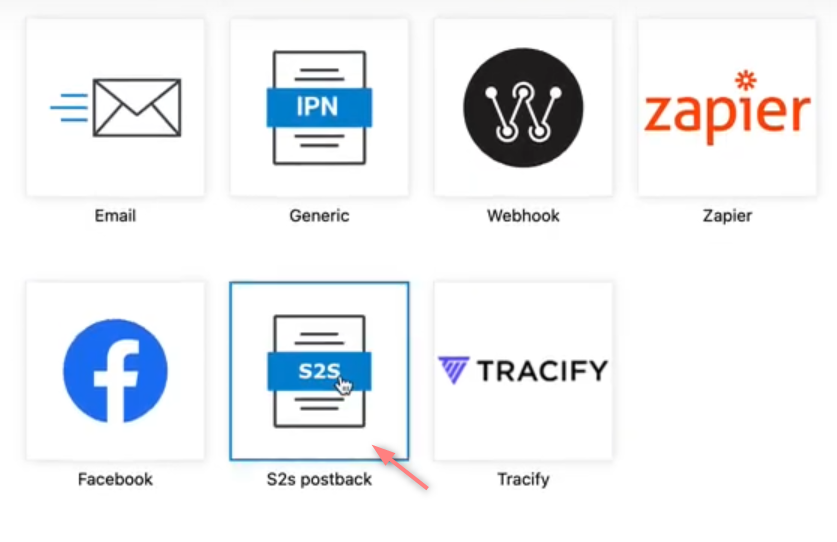
Click on “S2S postback”:
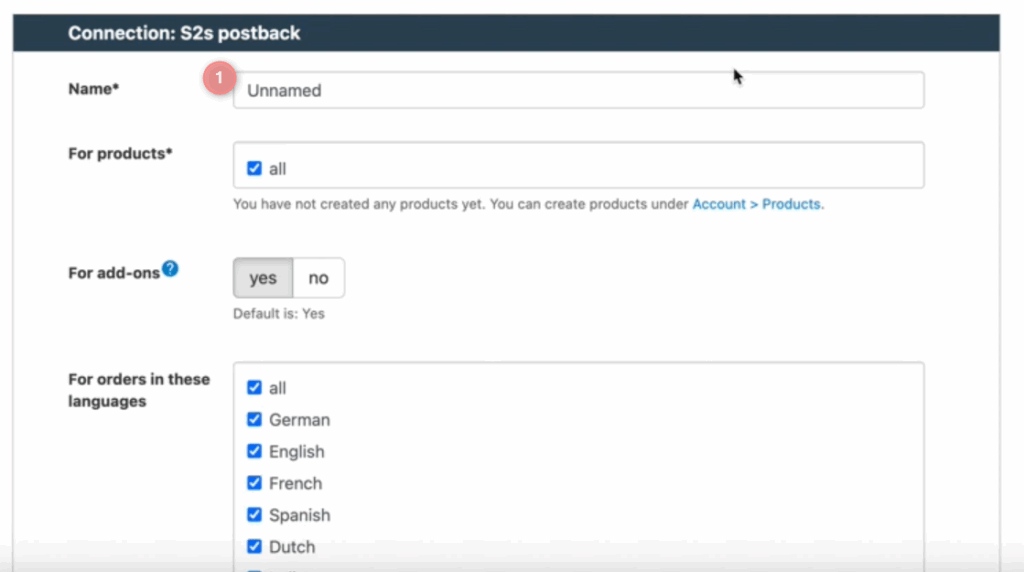
Enter the postback name – for example, “RedTrack”:
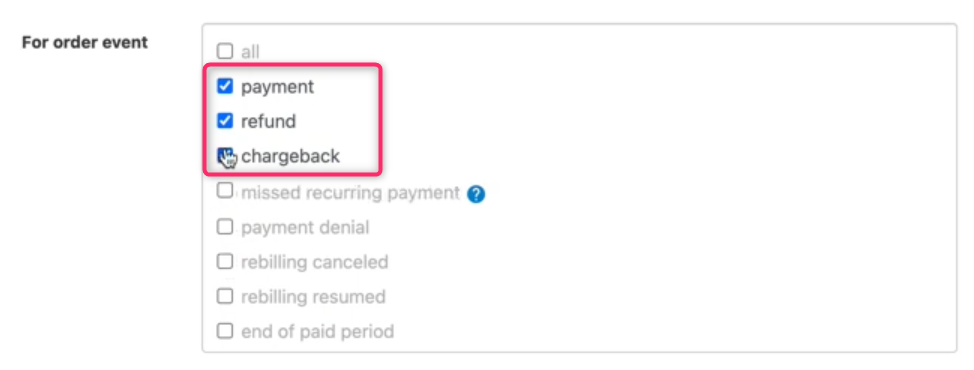
Mark the needed events in the For order event field:
Add the copied postback URL from RT in the spet 1 of this guide to the “Postback URL” field → Add the macro “&type={transaction_type}” to the end of the postback → Save:
You can use a custom name for the event you want to track. To do that:
1. Add the event(s) you want to track with Digistore24 in RedTrack. To do that go to Tools → Conversion tracking → Conversion type. Refer to this guide for details.
2. Add this event to the end of your Postback URL in Digistore24 using “&type=event_name” and mark the proxy type event supported by Digistore24.
Add the copied postback URL from RT in the step 1 of this guide to the “Postback URL” field → Add the macro “&type=event_name” to the end of the postback → mark the needed event in the For order event field → Save:
In RedTrack
Go to Tools → Conversion tracking → Conversion type → add “InitiateCheckout” (without spaces) → Save:
In Digistore24
1. In your Digistore24 account access the Tracking tab
Settings → Tracking → Set up new tracking:
2. Fill in the mandatory fields in the pop-up Order form → Save:
Fields explained:
- (1) Give your form a name.
- (2) Choose Yes for the tracking code to be activated immediately after saving.
- (3) Choose Yes to enable the cookie banner field.
- (4) Select the products for which you want to activate the tracking.
- (5) Select Initiate Checkout in the Sale types field.
- (6) Select the Order form type from the drop-down.
- (7) Select Tracking pixel from the drop-down.
- (8) Add this Pixel URL to the filed:
https://custom.tracking.domain/postback?format=img&clickid=__cid__&type=InitiateCheckout
- (9) Save to apply the changes to the form.
It means that there is no real clickid value in the postback link, so there is nothing to test. To fix it add the postback URL into the right field and save it (make sure all parameters are set correctly according to this guide). It will work once there is a real conversion with a real value.
5. Add your Digistore24 offer to RedTrack
1. Get the Digistore24 offer URL.
In your Digistore24 account go to Marketplace→ choose the offer you want to promote and copy the tracking link:
2. Add Digistore24 Offer to RedTrack
RedTrack → Websites → New → give the website a name and choose Digistore24 as the Brand → paste the URL from Digistore24 → make sure ?cid={clickid} parameter is added to the URL → Save:
6. Create a campaign
In your RT account go to Campaigns → Create new campaign → fill in the info in all the sections and tabs:
- General: give it the name, and choose the traffic channel, tracking domain, and cost-tracking method.
- Funnels: choose the type of funnel you are using and add the elements from the drop-downs.
- S2S postback: this field will be filled in automatically based on the data you have added to your traffic channel settings.